Can You Put Window Bars on Vinyl Windows? Installation Guide (2026)
Yes, you can put window bars on vinyl windows. Vinyl frames are fully compatible with modern security bar systems, including both frame-mount (no-drill) and through-frame screw-mount configurations. The key is choosing bars with wide, flat clamping brackets that distribute pressure evenly across the vinyl surface, preventing frame deformation while delivering genuine forced-entry resistance.
Vinyl windows are the most popular window type in American homes, making up roughly 70 percent of new residential installations. Yet homeowners and renters with vinyl frames frequently hesitate to add security bars because they worry the material is too soft, too flexible, or too fragile to support a steel bar system. That concern is understandable but largely outdated. In this guide we will walk you through every method for mounting window bars on vinyl frames, explain which approaches work best, and show you how to complete the installation yourself in under 20 minutes per window.
Why Vinyl Windows Raise Concerns About Security Bars
Vinyl, also called PVC or uPVC in manufacturing specs, is a rigid thermoplastic rather than a metal or hardwood. That distinction leads to three legitimate questions homeowners ask before installing bars:
- Will the clamps crush or crack the frame? Vinyl has a lower compressive strength than aluminum or steel, so concentrated point-loads can dent or deform the profile. This is a real risk with poorly designed brackets, but modern wide-pad clamps eliminate it entirely.
- Can screws hold in vinyl? Standard wood screws will strip in vinyl over time. However, self-tapping sheet-metal screws or machine screws into the reinforcement steel inside the vinyl profile hold extremely well.
- Will the bars void my window warranty? Most vinyl window warranties cover the glass seal and hardware mechanisms, not cosmetic modifications. That said, drilling into the frame may void the structural warranty on some brands. Frame-mount clamp systems avoid this issue completely.
The bottom line: vinyl frames are not a barrier to window bar installation. You just need to match the right mounting method to the material. The rest of this guide shows you exactly how.
Three Mounting Methods for Vinyl Window Frames
There are three proven ways to attach security bars to vinyl windows. Each has trade-offs in strength, permanence, and ease of installation. Here is a clear comparison.
Method 1: Frame-Mount Clamp System (No Drilling)
This is the most popular option for vinyl windows and the one we recommend for most homeowners. A frame-mount system uses telescopic steel bars with adjustable brackets that clamp directly into the interior recess of your window frame. No drill, no holes, no damage.
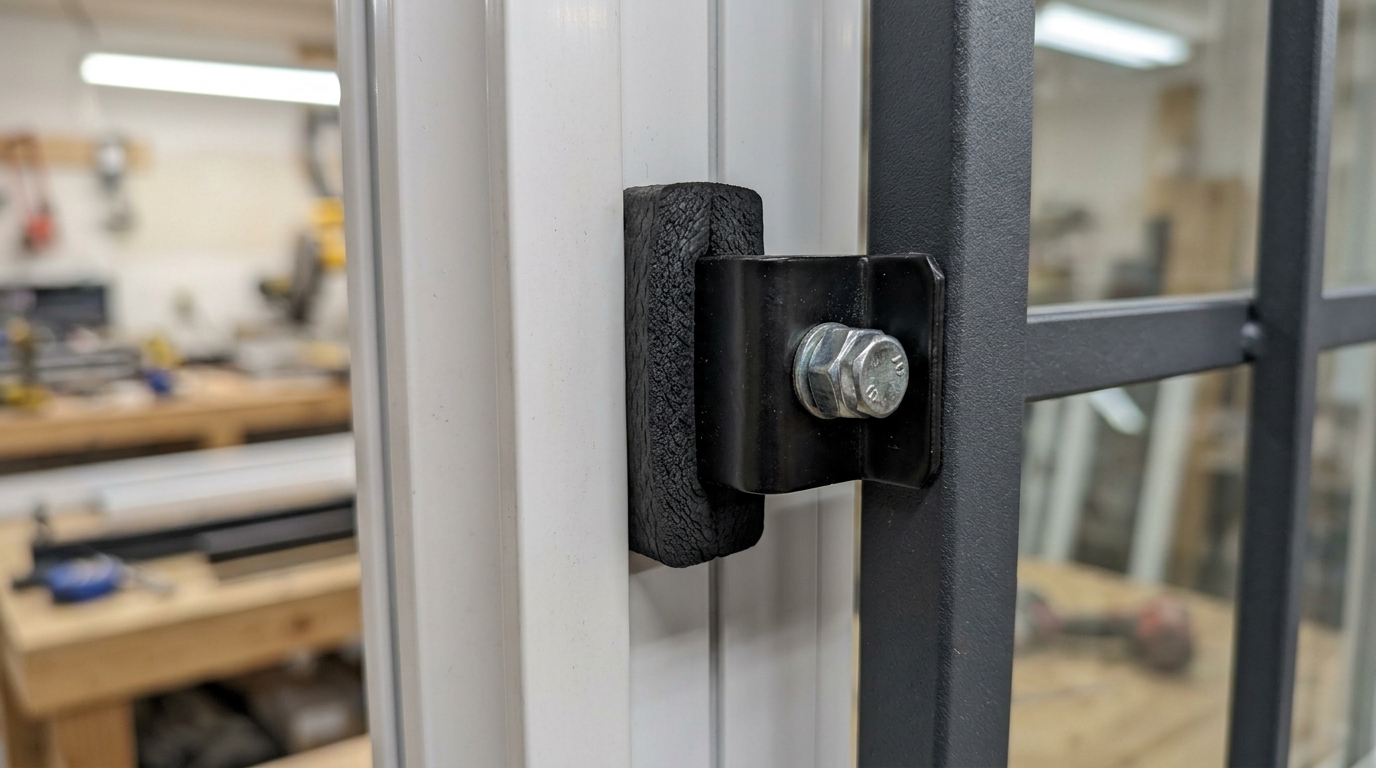
How it works: You extend the bar assembly to the width of your window opening, seat the brackets against the left and right sides of the vinyl frame, and tighten the set screws until the brackets grip firmly. The clamping force is distributed across a wide contact pad, typically 2 to 3 inches long, which prevents any deformation of the vinyl.
Best for: Renters, warranty-conscious homeowners, anyone who wants strong security without permanent modifications. The SWB Model A is purpose-built for this application. Its telescopic design adjusts to fit standard vinyl windows from 21 to 54 inches wide, and the flat steel clamping brackets sit flush against the frame without concentrating pressure on any single point.
Method 2: Through-Frame Screw Mount

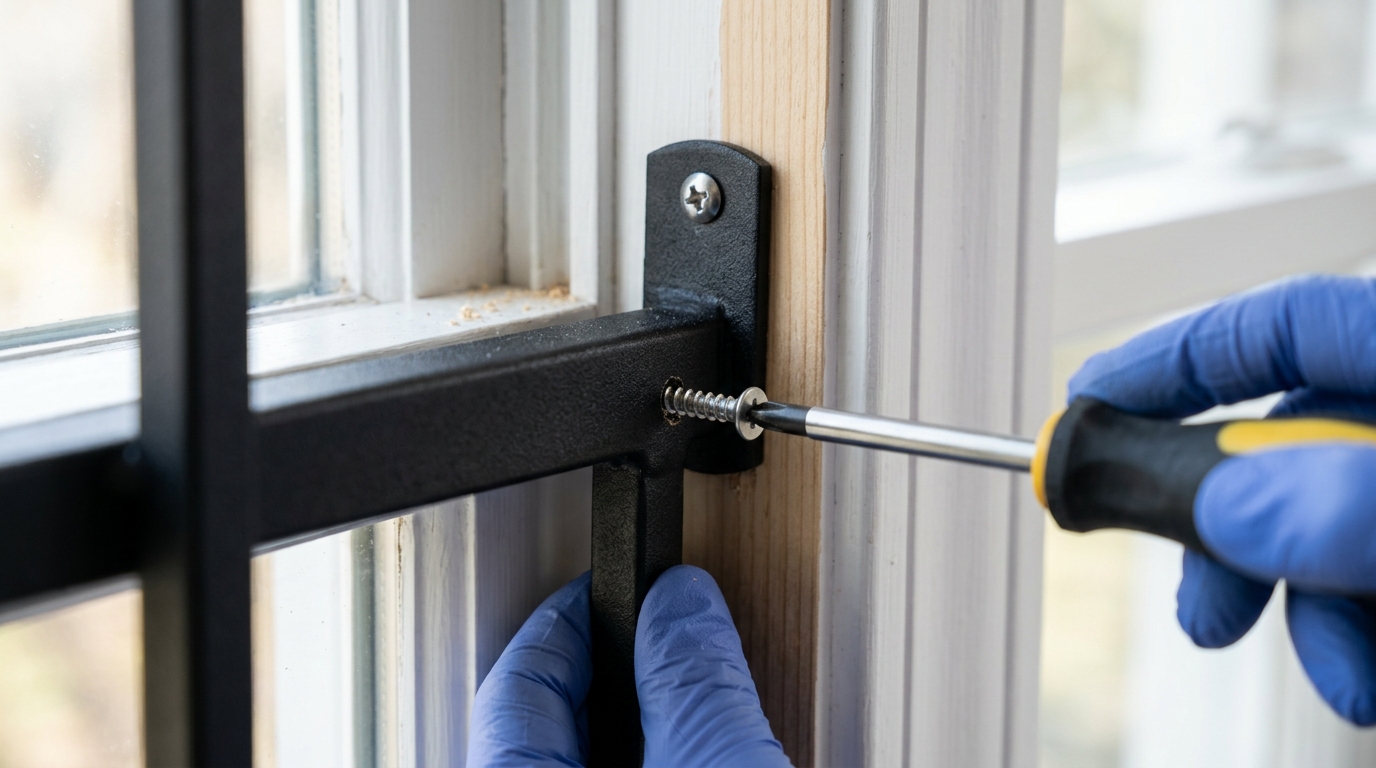
If you want maximum holding power and do not mind putting screws into the frame, a through-frame mount anchors the bar brackets directly to the vinyl with self-tapping screws. This creates a semi-permanent installation that is significantly harder to defeat than clamps alone.
How it works: Pre-drill pilot holes through the bracket and into the vinyl frame using a standard drill bit. Then drive stainless steel self-tapping screws through the bracket and into the frame. For the strongest hold, aim for the corners of the vinyl profile where the material is thickest, or better yet, hit the internal steel or aluminum reinforcement bar that runs inside most quality vinyl frames.
Best for: Homeowners on ground-floor units in higher-crime areas who want permanent protection and are not concerned about warranty impact.
Method 3: Wall-Mount Around the Window
This method bypasses the vinyl frame entirely and anchors the bar brackets into the wall surface surrounding the window, whether that is wood framing, drywall over studs, brick, or concrete. The bars span across the window opening from the exterior wall rather than sitting inside the frame recess.
How it works: Mark your bracket positions on the wall above and below (or left and right of) the window opening. Drill into the wall structure and secure with appropriate anchors: lag screws for wood studs, Tapcon screws for concrete, or sleeve anchors for brick.
Best for: Situations where the vinyl frame is thin, damaged, or too shallow for clamp brackets. Also ideal for very large windows where wall-anchored strength provides extra peace of mind. For a detailed guide on masonry mounting, see our article on installing window bars without drilling.
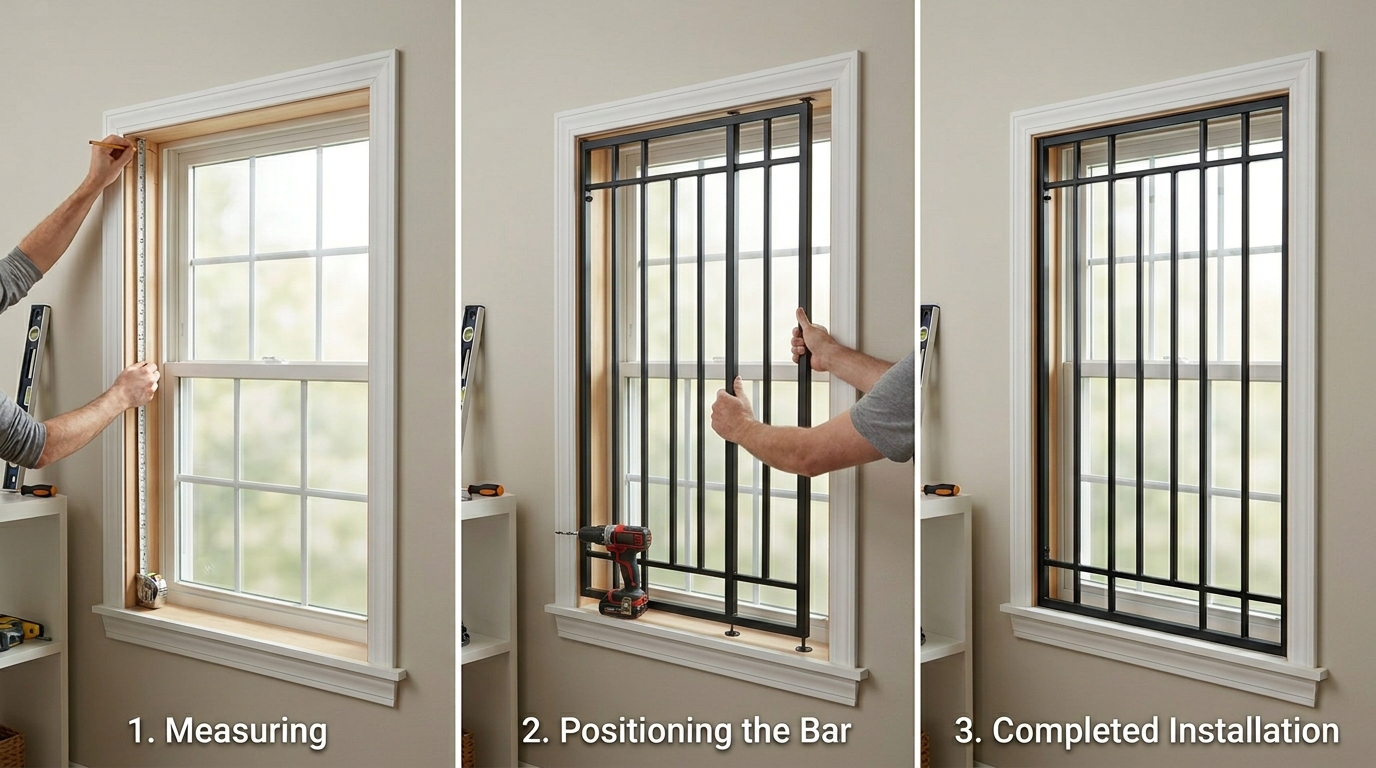
Step-by-Step: Installing Window Bars on Vinyl Frames
This walkthrough covers the frame-mount clamp method since it is the easiest, most common, and best suited to vinyl windows. The entire process takes 10 to 20 minutes per window.
Tools and Materials You Will Need
- Tape measure
- Telescopic frame-mount window bar set (such as the SWB Model A)
- Hex key or Allen wrench (usually included with the bar set)
- Pencil for marking
- Rubber or silicone pads (optional, for extra grip on slick vinyl)
- Level (optional, for a perfectly horizontal install)
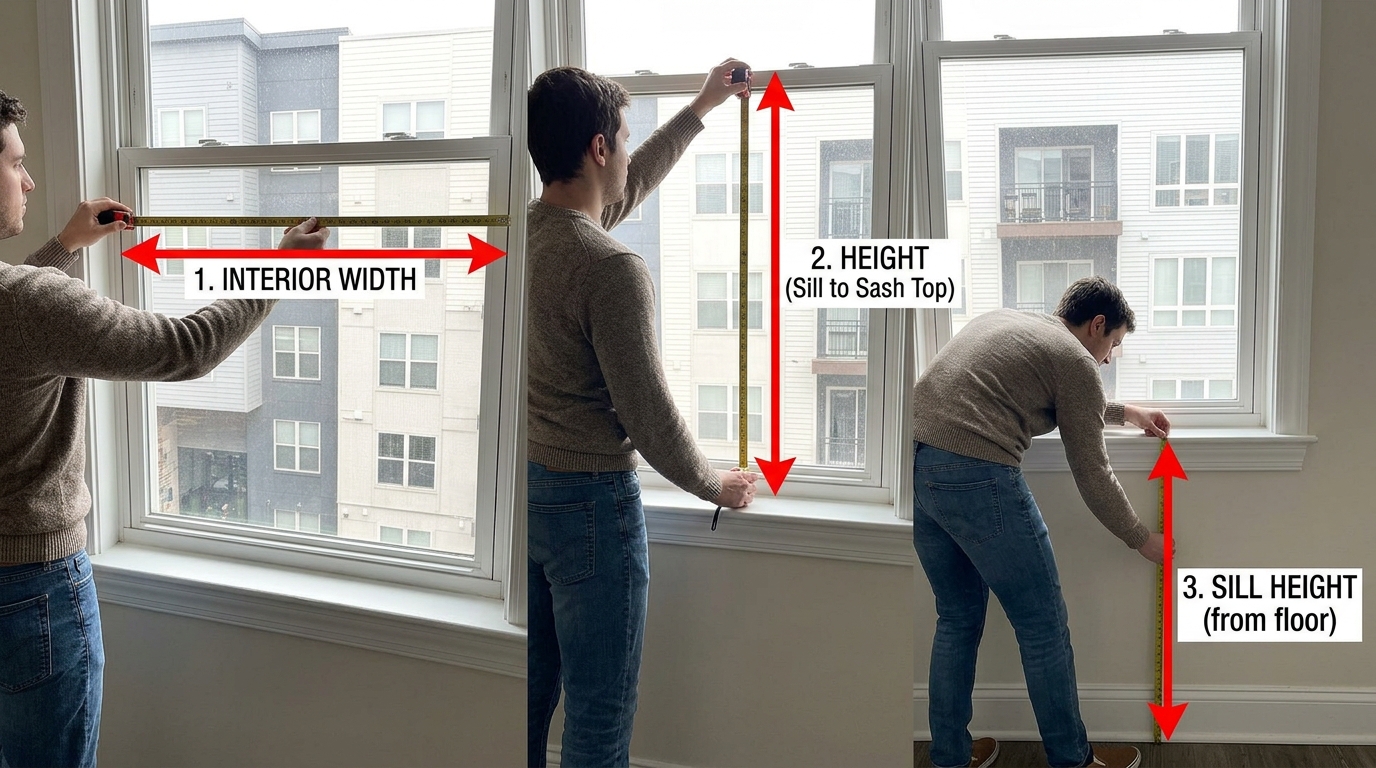
Step 1: Measure the Interior Window Opening
Measure the interior width of your vinyl window frame at three points: near the top, at the center, and near the bottom of the opening. Vinyl frames can flex slightly during manufacturing and installation, so the three numbers may differ by up to a quarter inch. Use the smallest measurement as your working width to ensure the bar cannot slip.
Next, measure the interior height from sill to top of the frame. This confirms your bar set fits within the opening without protruding. For precise measurement techniques, follow our complete guide to measuring windows for security bars.
Step 2: Inspect the Vinyl Frame
Before installing anything, check the condition of your frame. Run your fingers along the interior edges and look for:
- Cracks or splits: Sun-damaged vinyl can become brittle over time, especially on south-facing windows. A cracked frame will not hold clamps safely.
- Warping: If the frame bows inward or outward by more than a quarter inch, the clamp contact surface will be uneven, reducing grip strength.
- Weld joint integrity: Vinyl frames are fusion-welded at the corners. If you see separation at any corner joint, that frame needs repair before you add bars.
If your frame passes inspection, proceed. If not, repair or replace the frame first, or consider the wall-mount method instead.
Step 3: Prepare the Contact Surfaces
Wipe the interior edges of the vinyl frame with a clean cloth to remove dust, dirt, or any oily residue. Clean surfaces improve friction between the bracket pad and the vinyl, which directly translates to higher holding force.
If your bar set did not come with rubber pads and you want extra grip, cut thin strips of adhesive-backed rubber or silicone and apply them to the bracket contact faces. This is not strictly necessary with quality clamp systems, but it provides an additional safety margin on slick, glossy vinyl finishes.
Step 4: Extend and Position the Bars
Extend the telescopic bar assembly to match your measured width. Lock the extension mechanism so the bars hold their position. Then place the unit inside the window recess with the mounting brackets resting against the left and right sides of the frame.
Position the bars at the height you want. For maximum security, center the bar assembly vertically in the window opening. If you are installing multiple bar units on a tall window, space them evenly with no gap larger than six inches between bars.
Step 5: Tighten the Clamps
Using the included hex key, tighten the set screws on each bracket. Work in alternating sides: give the left bracket two turns, then the right bracket two turns, then back to the left. This keeps the pressure balanced and prevents the unit from shifting to one side during installation.
Tighten until the brackets are firmly seated against the vinyl with no visible gap. Do not overtighten. You want solid contact, not maximum force. With vinyl frames, overtightening can dimple or bow the frame inward. The correct feel is firm and immovable without visible flex in the vinyl.
Step 6: Test the Installation
Push against the bars from the outside with firm hand pressure. Try to rock the unit up, down, left, and right. Attempt to pull it toward you. The bars should feel completely rigid with zero movement in any direction.
If you detect any wobble or lateral play, loosen the clamps, reposition, and retighten. Check that your width measurement was accurate and that both brackets have full contact with the frame.
Step 7: Check Fire Egress Compliance
If this window is in a bedroom or any room used for sleeping, fire codes in virtually every U.S. jurisdiction require an emergency egress path. The International Residential Code mandates a minimum 5.7 square feet of clear opening. If your bars do not have a quick-release mechanism, either install them on non-sleeping-area windows only or upgrade to a model with interior quick-release capability.
Protecting Your Vinyl Frame: Do's and Don'ts
Vinyl is durable and low-maintenance, but it responds differently to stress than wood or metal. Follow these rules to protect your frames during and after installation.
Do
- Use wide-pad brackets. The wider the contact surface, the lower the pressure per square inch on the vinyl. Look for pads at least 1.5 inches wide.
- Add rubber interface pads. A thin rubber layer between metal bracket and vinyl frame increases friction, reduces the required clamping force, and prevents surface scratches.
- Retighten every six months. Vinyl expands and contracts with temperature changes more than wood or metal. A twice-yearly check ensures your clamps stay snug through summer heat and winter cold.
- Keep brackets away from corner welds. The welded corners are the structural weak point of a vinyl frame. Position your brackets on the straight runs of the frame, at least two inches from any corner.
Don't
- Don't use pointed set screws without pads. A bare metal point driven into vinyl will create a stress riser that can crack over time. Always use a bracket design that spreads force across a flat surface.
- Don't overtighten. If the vinyl is visibly bowing inward, you have gone too far. Back off one full turn.
- Don't install on sun-damaged frames. UV-degraded vinyl is brittle and may crack under clamping pressure. If the frame is chalky, faded, or cracking, repair it first.
- Don't use wood screws for through-frame mounting. Standard wood screws have coarse threads that will strip in vinyl. Use fine-thread self-tapping sheet-metal screws instead.
Vinyl vs. Other Frame Materials: Security Bar Compatibility
If you are comparing vinyl to other window frame types, here is how each material stacks up for security bar installation.
| Frame Material | Clamp Grip Strength | Screw Holding Power | Risk of Damage | Overall Rating |
|---|---|---|---|---|
| Vinyl / PVC | Good | Moderate (use self-tappers) | Low (with wide pads) | Very Good |
| Wood (hardwood) | Excellent | Excellent | Very low | Excellent |
| Wood (softwood) | Very Good | Good (check for rot) | Low | Very Good |
| Aluminum | Excellent | Good (machine screws) | Very low | Excellent |
| Fiberglass | Very Good | Very Good | Very low | Excellent |
| Steel (commercial) | Excellent | Requires tapping | None | Excellent |
As the table shows, vinyl is fully compatible with window bar installation. It ranks slightly below hardwood and metal for raw grip strength, but the difference is marginal for residential security applications. With the right bracket design, vinyl performs just as well in practice.
Special Considerations for Renters With Vinyl Windows
If you are renting an apartment or home with vinyl windows, security bars are one of the smartest upgrades you can make. Here is what to keep in mind.
Lease and Landlord Approval
Frame-mount bars leave zero holes and zero damage when removed. Most landlords have no objection to this type of installation. Still, send a quick email or text to your landlord describing what you plan to install, emphasize that it is non-permanent and fully removable, and save the written approval. This protects you if there is any dispute at move-out.
Security Deposit Protection
Because vinyl is softer than wood or metal, there is a small chance of leaving faint compression marks where the brackets sat, especially if the bars stay installed for years. Using rubber interface pads eliminates this risk entirely. When you remove the bars, the vinyl surface looks the same as the day you moved in.
Portability Between Apartments
Telescopic frame-mount bars like the SWB Model A adjust across a wide range of window widths. If your next apartment also has standard vinyl windows, which is highly likely given vinyl's market dominance, the same bar set will fit. This makes security bars a one-time purchase that moves with you from lease to lease. For more renter-specific options and tips, read our guide on the best window bars for apartments and renters in 2026.
Ground Floor Priority
If you live on the ground floor or have windows accessible from fire escapes, stairwells, or street level, those windows should be your first priority for bar installation. According to FBI Uniform Crime Report data, over 60 percent of residential burglaries involve entry through a ground-level window or door. Upper-floor windows are lower risk unless they are adjacent to a shared roof, balcony, or climbable structure.
Frequently Asked Questions
Will window bars crack my vinyl window frame?
No, window bars will not crack a healthy vinyl frame when installed correctly. The key is using brackets with wide, flat contact pads that distribute clamping pressure across a broad surface area. Avoid pointed set screws and do not overtighten. If your vinyl frame is sun-damaged, chalky, or already cracked, repair the frame before installing bars.
Do I need to drill into vinyl frames to install security bars?
No, drilling is not required. Frame-mount clamp systems grip the interior of your vinyl window frame using adjustable brackets and set screws. No holes, no anchors, and no permanent modifications are needed. This makes them ideal for renters and homeowners who want to preserve their window warranty.
Can vinyl window bars withstand a break-in attempt?
Yes. A quality frame-mount bar system on a vinyl window provides strong forced-entry resistance sufficient for residential security. The steel bars themselves are the primary barrier, and the clamping brackets distribute enough force against the vinyl frame to resist sustained pushing, pulling, and prying. For maximum security, pair bars with window locks and an alarm sensor.
Will installing window bars void my vinyl window warranty?
Frame-mount clamp systems typically do not void vinyl window warranties because they make no permanent modifications to the frame. However, if you choose to drill screws through the vinyl profile, some manufacturers may consider that an unauthorized modification. Check your warranty documentation or contact the window manufacturer directly to confirm before drilling.
How often should I retighten window bar clamps on vinyl frames?
Check and retighten your clamps every six months, ideally at the start of summer and the start of winter. Vinyl expands in heat and contracts in cold more than wood or metal frames, which can cause gradual loosening over time. A quick check with a hex key takes less than 30 seconds per window and ensures your bars stay secure year-round.