How to Measure Windows for Security Bars: Step-by-Step Guide
Why Accurate Window Measurements Matter for Security Bars
Getting your window measurements right is the single most important step in the entire security bar installation process. Bars that are too narrow leave gaps a burglar can exploit. Bars that are too wide won't seat properly in the frame and can bow under pressure. Either mistake costs you time, money, and the false sense of security that's worse than no bars at all.
The good news: measuring windows for security bars is straightforward. You don't need specialized training or expensive tools. What you do need is attention to detail, a systematic approach, and about 15 to 20 minutes per window.
This guide walks you through the complete measurement process for both frame-mount (inside the window opening) and wall-mount (outside the window frame) installations. Whether you're securing a single basement window or every ground-floor opening in your home, the techniques below will give you the precise dimensions you need for a professional-grade fit.
If you're still deciding which type of security bars to install, our guide to the best window security bars for homes covers every option on the market.
What You'll Need: Tools and Materials
Before you start measuring, gather everything on this list. Having the right tools on hand keeps you from estimating or rounding, both of which lead to ordering errors.
Required Tools
- Steel tape measure (25 ft / 7.5 m) — a cloth or plastic tape measure won't give you the rigidity needed for accurate horizontal spans. Use a 1-inch-wide blade minimum.
- Torpedo level or 24-inch level — to check whether the window opening is plumb and square.
- Pencil or grease pencil — for marking measurement points directly on the frame or wall surface.
- Notepad or measurement worksheet — record every number immediately. Don't rely on memory when you're measuring multiple windows.
- Step stool or ladder — if measuring above-grade windows, you need stable footing to get accurate reads at the top of each opening.
Optional but Helpful
- Digital caliper — useful for measuring frame depth and recesses on aluminum or vinyl windows.
- Smartphone camera — photograph each window after measuring so you can cross-reference later.
- Masking tape — stick small numbered labels on each window to match your measurements to specific locations.
- Combination square — helps verify 90-degree corners in the window frame.
Safety note: If you are measuring windows above the first floor, always use a rated ladder on level ground. Have someone spot you. Never lean beyond the ladder's side rails to reach a measurement point.
Step 1: Identify Your Mount Type
Before you pull out the tape measure, you need to decide how the security bars will attach. This determines what you measure and where you measure it.
Frame Mount (Inside Mount)
The security bar sits inside the window opening, anchored to the window frame or the surrounding wall material on the interior edges. Frame mounts work well when:
- You want a flush, low-profile look
- The window frame is made of solid wood or steel (not vinyl or thin aluminum)
- You have at least 1.5 inches (38 mm) of frame depth for the mounting brackets
- The window opening is reasonably square (less than 1/4-inch deviation corner to corner)
Wall Mount (Outside Mount)
The security bar sits on the exterior wall surface around the window, anchored into the wall material with appropriate fasteners. Wall mounts are the better choice when:
- The window frame is vinyl, thin aluminum, or otherwise too weak for direct mounting
- You want maximum coverage beyond the glass area
- The wall material is solid brick, masonry, concrete, or structural wood framing
- You prefer more visible deterrence
Telescopic models like the Model A by Security Window Bars work with both mount types and offer the advantage of adjustable width, which provides some forgiveness if your measurements are slightly off. That said, accurate measurements still matter because adjustment range has limits.
For a detailed breakdown of mounting on masonry surfaces specifically, see our guide to installing window security bars on brick and masonry walls.
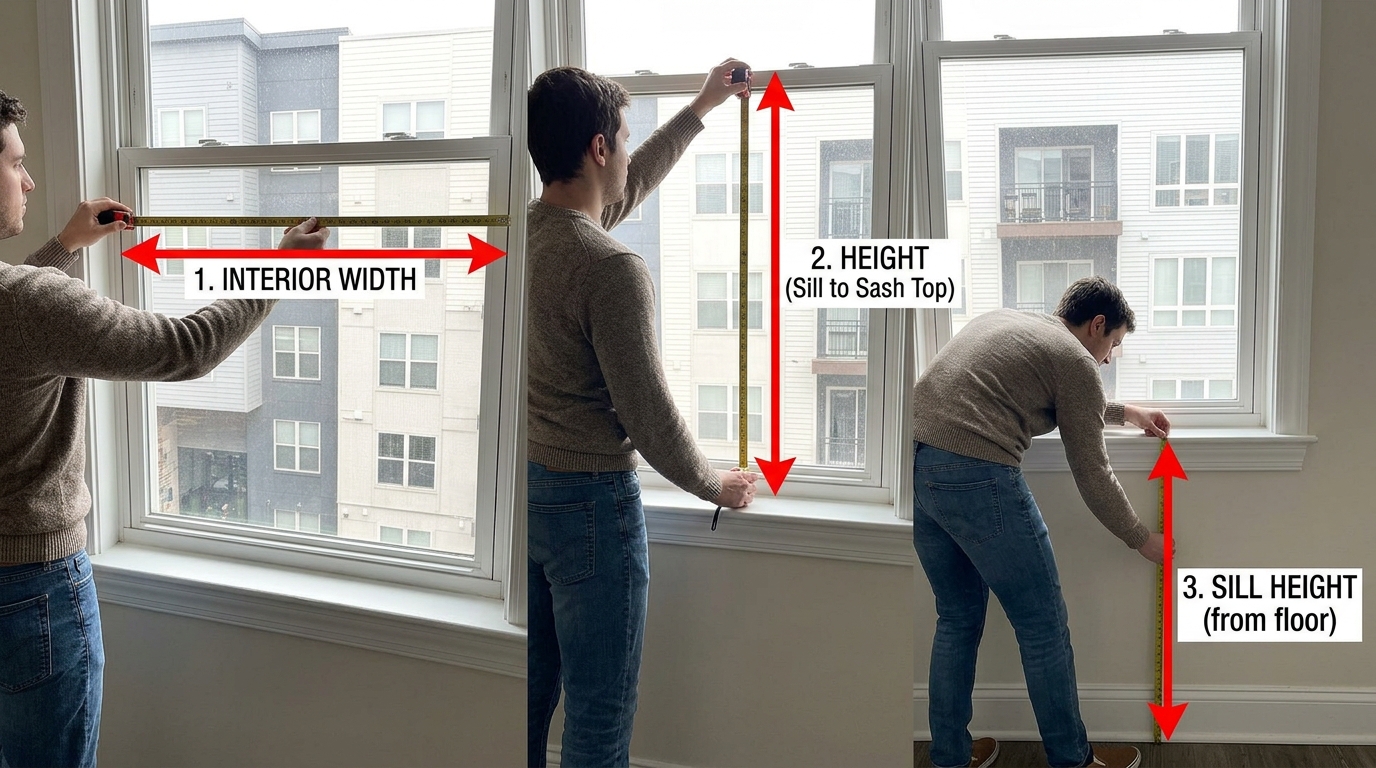
Step 2: Measure the Window Width
Width is typically the most critical dimension because it determines the horizontal span the security bar must cover. Here's how to get it right.
For Frame Mount (Inside the Opening)
- Open or remove any window screens, blinds, or shutters that could interfere with the tape measure.
- Place the tape measure at the inside left edge of the window opening (where the frame meets the wall, not the window sash).
- Extend the tape horizontally to the inside right edge of the opening.
- Record this measurement in both inches and millimeters for accuracy.
- Repeat this measurement at three points: the top of the opening, the center, and the bottom.
- Record all three numbers. Use the smallest of the three widths as your ordering dimension.
Why measure at three points? Residential windows are almost never perfectly square. Settling, framing irregularities, and decades of temperature cycling cause frames to shift. The difference between top and bottom widths can be as much as 1/2 inch in older homes. Using the smallest measurement ensures the bars will fit at every point in the opening.
For Wall Mount (Outside the Frame)
- Measure from the outside left edge of the window frame to the outside right edge.
- Add 3 to 4 inches (75 to 100 mm) to each side for the mounting brackets to anchor into solid wall material. This means your total width measurement will be 6 to 8 inches wider than the frame.
- Measure at the same three points (top, center, bottom).
- Use the largest of the three widths, plus your bracket overlap, as your ordering dimension. For wall mount, you want full coverage.
Width Measurement Reference Table
| Mount Type | Where to Measure | Number of Points | Which Value to Use | Add for Brackets |
|---|---|---|---|---|
| Frame Mount | Inside edges of opening | 3 (top, center, bottom) | Smallest width | None |
| Wall Mount | Outside edges of frame | 3 (top, center, bottom) | Largest width + overlap | 3–4 in. per side |
Step 3: Measure the Window Height
Height determines the vertical span of the security bar assembly. The process mirrors the width measurement but runs vertically.
For Frame Mount
- Place the tape measure at the inside top edge of the window opening.
- Extend it vertically to the inside bottom edge (the sill or the bottom of the recess).
- Measure at three points: the left side, the center, and the right side of the opening.
- Use the smallest of the three heights.
For Wall Mount
- Measure from the outside top edge of the window frame to the outside bottom edge.
- Add 2 to 3 inches (50 to 75 mm) above and below for mounting brackets.
- Measure at three points (left, center, right).
- Use the largest height plus bracket overlap.
Important: If your window has an exterior sill that protrudes outward, measure the height above the sill surface, not to the bottom of the sill. The bar assembly sits on top of the sill, not below it.
Step 4: Check for Square
A window opening that's out of square will cause fitment problems even if your width and height numbers are perfect. Here's how to verify.
- Measure the diagonal from the top-left corner of the opening to the bottom-right corner. Record the number.
- Measure the opposite diagonal from the top-right corner to the bottom-left corner.
- Compare the two diagonal measurements.
If the diagonals are within 1/4 inch (6 mm) of each other, the opening is square enough for a standard security bar installation. If the difference exceeds 1/4 inch, note this in your measurements. You may need:
- Shims or spacer plates to compensate for the gap on frame-mount installations.
- A custom-fabricated bar if the deviation is severe (more than 1/2 inch).
- A telescopic security bar that can absorb some dimensional variation through its adjustment mechanism, such as the Model A, which adjusts in width to accommodate slightly out-of-square openings.
Use your level to check the sill for plumb while you're at it. A sill that slopes more than 1/8 inch across its width may require shimming under the bottom mounting bracket for a wall-mount installation.
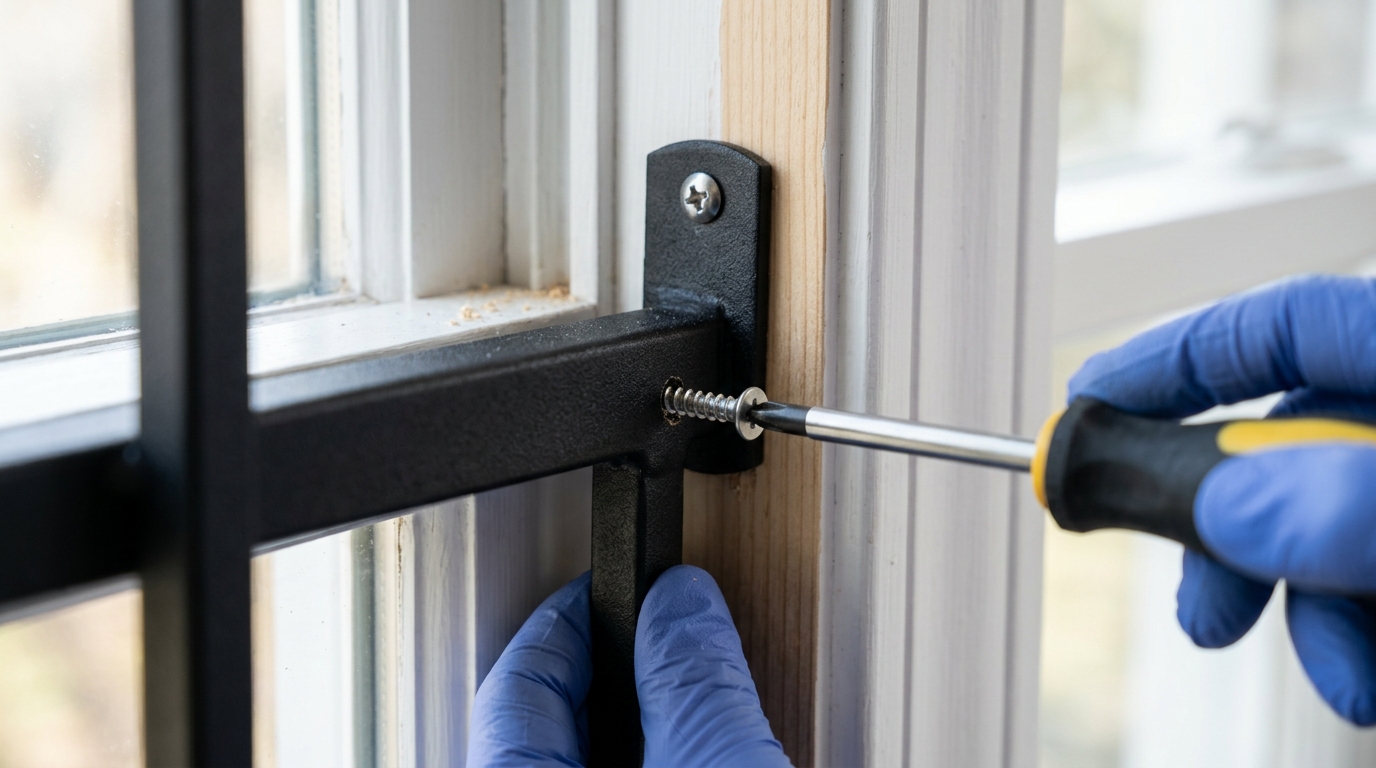
Step 5: Measure the Frame Depth and Obstructions
This step is critical for frame-mount (inside) installations and frequently overlooked.
Frame Depth
- Place your tape measure or digital caliper at the outer face of the window frame (flush with the exterior wall).
- Measure inward to the inner face of the frame (flush with the interior wall).
- This is your frame depth (also called reveal depth).
You need a minimum frame depth of 1.5 inches (38 mm) for most security bar mounting brackets. If your frame depth is less than 1.5 inches, a wall-mount installation is the safer option because there isn't enough material to seat the anchors securely.
Obstructions to Check For
While you're examining the frame area, note any of the following:
- Window crank mechanisms — casement and awning windows have hardware that extends into the frame area when the window is open.
- Window sensors from alarm systems — these may need to be relocated.
- Drip caps and flashing above the window — these can interfere with top-mounted brackets.
- Exterior trim pieces — decorative molding may need to be removed or trimmed for a flush fit.
- AC units — if a window air conditioner occupies the opening seasonally, note its dimensions and discuss options with your bar supplier.
- Window type (single-hung, double-hung, sliding, casement) — this affects how the window opens and whether the security bar will interfere with normal operation.
Write down every obstruction you find. Include approximate dimensions and locations within the window opening. This information saves time during ordering and installation.
Step 6: Measure Multiple Windows Systematically
Most homes need bars on more than one window. Here's how to stay organized when measuring an entire house.
Create a Measurement Worksheet
Label each window with a unique identifier that references its location. A simple system works best:
- Floor + Side + Number: 1N1 = first floor, north side, window 1
- Room + Position: Kitchen-L = kitchen, left window
Recommended Workflow
- Walk the exterior perimeter of the building first. Count every window and note which ones need bars.
- Photograph the exterior of each window with your phone. Include the surrounding wall area in the frame.
- Start measuring at one corner and work clockwise around the building. Don't jump around.
- At each window, record:
- Window ID (from your labeling system)
- Width (three measurements + which value you're using)
- Height (three measurements + which value you're using)
- Diagonals (both + whether it's square)
- Frame depth
- Mount type (frame or wall)
- Obstructions
- Wall material (wood, brick, stucco, concrete block, siding type)
- Double-check your three smallest measurements before moving to the next window.
For basement windows, which often have non-standard sizes and deeper window wells, our basement window bars size guide and calculator gives you additional step-by-step instructions tailored to below-grade openings.
Pro tip: Measure every window, even if they look identical from the outside. Production-home builders use the same rough opening specifications, but framing tolerances, settlement, and stucco or siding buildup create real-world variations of 1/4 to 1/2 inch between "identical" windows.
Step 7: Account for Adjustability and Tolerances
Once you have your raw measurements, you need to factor in the tolerance built into the specific security bar product you're ordering.
Fixed-Width Bars
If you're ordering a fixed-width security bar, provide your exact measured dimension. The manufacturer will typically fabricate the bar 1/8 to 1/4 inch smaller than your stated dimension to ensure it fits. Confirm this deduction policy before ordering.
Telescopic / Adjustable Bars
Telescopic security bars (like the Model A from Security Window Bars) have a defined adjustment range. For example, a bar designed for windows between 24 and 42 inches wide uses overlapping tubes that slide to the correct width. When ordering:
- Confirm your measured width falls within the stated adjustment range — ideally in the middle third of the range, not at either extreme.
- Avoid maxing out the extension. A telescopic bar at its maximum extension has less overlap between the inner and outer tubes, which reduces rigidity.
- Avoid compressing to the minimum. This leaves excess tube material that may interfere with the mounting brackets or look bulky.
For a deeper look at how telescopic bars compare to fixed models across various criteria, read our telescopic vs. fixed window security bars comparison.
Standard Tolerance Guidelines
| Scenario | Tolerance to Apply | Notes |
|---|---|---|
| Frame mount, fixed bar | Subtract 1/4 in. from smallest width | Allows for shimming and seasonal expansion |
| Frame mount, telescopic | Order range that centers your measurement | Keep measurement in middle 60% of range |
| Wall mount, fixed bar | Add 6–8 in. to largest frame width | 3–4 in. per side for brackets |
| Wall mount, telescopic | Add 6–8 in. to largest frame width | Confirm total falls within adjustment range |
Step 8: Special Cases and Unusual Window Types
Not every window is a simple rectangle. Here's how to handle the most common variations.
Arched and Radius-Top Windows
Measure the width at the widest point (which is usually at the spring line, where the arch begins to curve). Measure the height at the tallest point (center of the arch). Note the radius or take a template of the curve using a piece of cardboard. Most arched windows require custom-fabricated bars.
Bay and Bow Windows
Treat each pane as a separate window. Measure every panel individually, including the angled side panels. Note the angle between panels (typically 30, 45, or 90 degrees). You'll likely need individual bars for each section plus angled connectors or custom brackets.
Sliding Glass Doors
Sliding doors are wider than typical windows and require multi-module security bar systems. Measure the full opening width (not just the sliding panel). For modular approaches to wide spans, see our window bar size calculator for modules.
Casement Windows
Casement windows swing outward. If mounting bars on the exterior (most common), the bars must sit far enough from the window that the sash can open fully without hitting the bars. Measure the swing arc of the sash when fully open and add this distance to your wall-mount offset from the frame.
Hopper and Awning Windows
These tilt inward (hopper) or outward (awning). Interior-mount bars need to clear the inward tilt of a hopper. Exterior-mount bars need to clear the outward tilt of an awning. Measure the maximum protrusion of the sash when open.
Common Mistakes to Avoid
After years in the security bar industry, we've seen every measurement error in the book. Here are the most frequent ones and how to prevent them.
- Measuring the glass instead of the opening. The glass pane is smaller than the frame opening. Security bars mount to the frame or wall, not the glass. Always measure frame-to-frame or wall surface.
- Taking only one measurement per dimension. One width measurement at the center tells you nothing about the top and bottom. Always take three measurements per dimension.
- Forgetting to check for square. An opening that's 1/2 inch out of square will leave a visible, exploitable gap on one corner if you order based on a single width number.
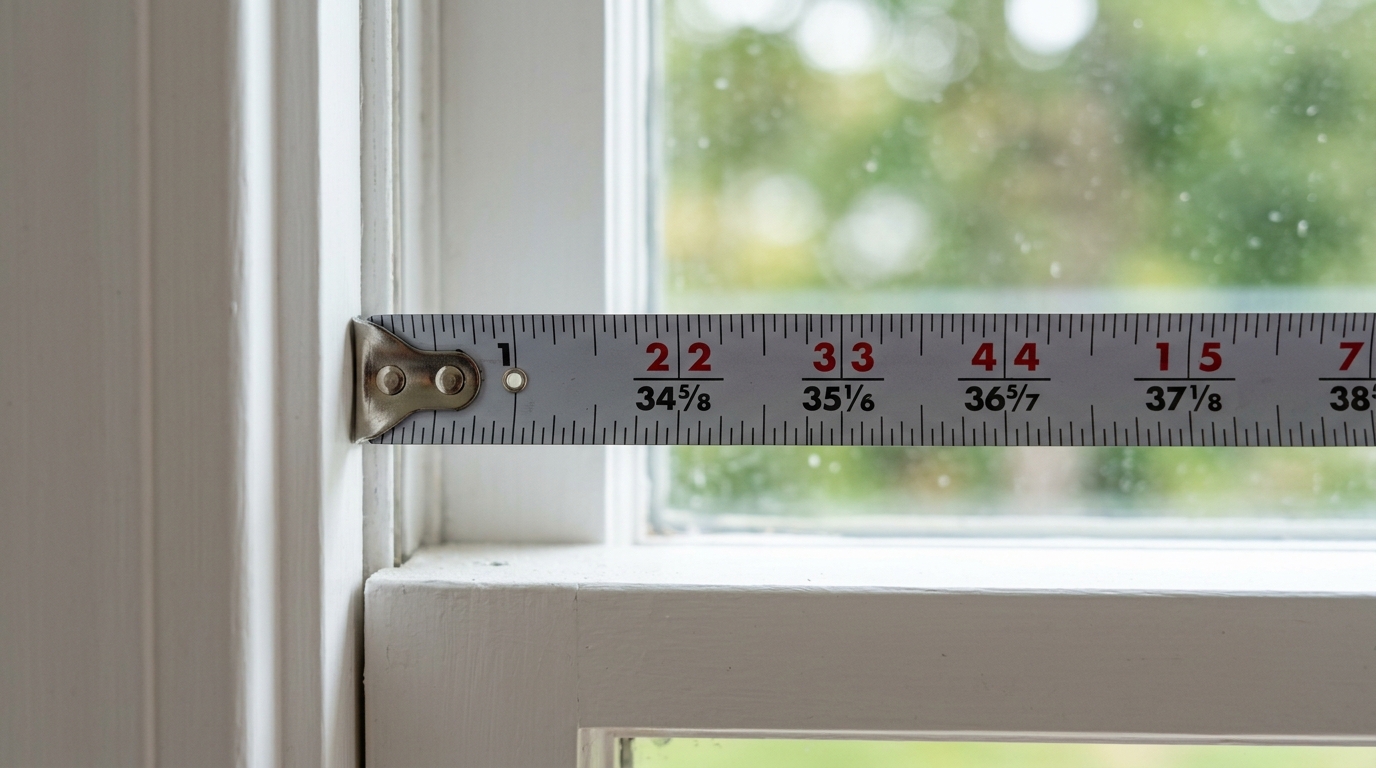
- Rounding measurements up. Never round a measurement of 36-3/8 inches to "about 36 and a half" or "37 inches." Record exact fractions or switch to millimeters for precision. Round down, never up, for frame-mount installations.
- Ignoring frame depth on interior mounts. If the mounting bracket needs 1.5 inches of depth and your frame offers only 1 inch, the installation will fail. Measure depth before committing to an inside mount.
- Not accounting for exterior trim or sills. Decorative trim, drip caps, protruding sills, and stucco buildup all add unexpected dimensions that change where brackets land.
- Mixing up windows. When measuring 8 or 10 windows in a session, it's easy to write a measurement next to the wrong window ID. Photograph each window as you go and double-check your notes before leaving that window.
- Measuring with a worn or damaged tape measure. A bent hook on the end of a tape measure can throw off every measurement by 1/16 to 1/8 inch. Inspect your tape before you start. Better yet, use a tape with a true-zero end hook or verify its accuracy against a known-length reference.
Critical safety reminder: Never measure windows from the outside while standing on an unstable surface. Falls from ladders cause over 164,000 emergency room visits each year in the United States. Use a rated ladder, maintain three points of contact, and work with a spotter.
Recording and Submitting Your Measurements
Once all windows are measured, organize your data for ordering.
What to Include
- Window ID and location description
- Mount type (frame or wall)
- Final ordering width (after tolerance adjustments)
- Final ordering height (after tolerance adjustments)
- Wall material at each window location
- Obstruction notes
- Photos of each window (exterior and interior)
Sample Measurement Log
| Window ID | Location | Mount | Width (in.) | Height (in.) | Square? | Wall Material | Notes |
|---|---|---|---|---|---|---|---|
| 1N1 | Kitchen, north | Frame | 35-7/8 | 23-3/4 | Yes | Wood frame | No obstructions |
| 1N2 | Dining, north | Wall | 42-1/2 + 8 | 36-1/4 + 5 | Yes | Brick | Drip cap above, use masonry anchors |
| B1 | Basement, east | Frame | 31-5/8 | 17-1/2 | No (3/8 in.) | Concrete block | Window well present, 14 in. deep |
| 1S1 | Bedroom, south | Wall | 36-3/8 + 7 | 48-1/8 + 5 | Yes | Stucco on wood | AC unit removed seasonally |
Keeping a clean measurement log like this makes ordering faster and reduces the chance of errors when communicating with your supplier or installer.
When to Call a Professional
While measuring windows for security bars is a DIY-friendly task, certain situations call for professional help:
- Windows more than 10 feet above grade — high-reach measurements require commercial-grade ladders or scaffolding.
- Non-rectangular openings — arched, circular, or irregularly shaped windows need template measurements that most homeowners aren't equipped to take.
- Historic homes with non-standard framing — pre-1940 construction often has inconsistencies that require on-site assessment by an experienced fabricator.
- Multi-story commercial buildings — safety regulations may require certified fall protection for anyone working at height.
- Egress-code concerns — if you're unsure whether your windows need quick-release bars for fire code compliance, consult with a professional who understands your local building codes.
If you're planning to install the bars yourself after measuring, our DIY window security bar installation guide covers the full process from unboxing to final inspection.
Quick-Reference Measurement Checklist
Print this list and bring it with you when measuring.
- Gather tools: steel tape measure, level, pencil, notepad, camera, step stool.
- Decide mount type for each window (frame or wall).
- Measure width at three points (top, center, bottom).
- Measure height at three points (left, center, right).
- Measure both diagonals to check for square.
- Measure frame depth if using frame mount.
- Note all obstructions (hardware, trim, sensors, AC units).
- Record wall material at each window.
- Photograph each window (exterior and interior).
- Apply tolerance adjustments based on bar type (fixed vs. telescopic).
- Organize data into a measurement log with unique window IDs.
- Double-check every number before ordering.
Total time estimate: 15 to 20 minutes per window for a thorough job, or about 2 to 3 hours for a typical 8- to 10-window home.
Frequently Asked Questions
What tools do I need to measure windows for security bars?
You need a 25-foot steel tape measure (1-inch blade minimum), a torpedo or 24-inch level, a pencil for marking, a notepad for recording measurements, and a step stool or rated ladder for above-grade windows. Optional tools that improve accuracy include a digital caliper for measuring frame depth, a combination square for checking corners, and a smartphone camera for photo documentation.
Should I measure the window glass or the window frame for security bars?
Always measure the window frame opening, never the glass. For frame-mount (inside) installations, measure the interior edges of the window opening from frame to frame. For wall-mount (outside) installations, measure the exterior edges of the window frame and add 3 to 4 inches on each side for mounting brackets. The glass is smaller than the frame opening, so measuring it would result in bars that are too narrow to secure the window properly.
How many measurements do I need per window?
Take a minimum of eight measurements per window: three widths (at the top, center, and bottom of the opening), three heights (at the left, center, and right), and two diagonal measurements (corner to corner both ways). The three width measurements catch any taper or out-of-square condition. For frame-mount installations, also measure the frame depth to verify it meets the minimum 1.5-inch requirement for mounting brackets.
What if my window opening is not perfectly square?
Most residential windows are not perfectly square. If the diagonal measurements differ by less than 1/4 inch, the opening is within acceptable tolerance for standard security bars. If the difference is between 1/4 and 1/2 inch, you can use shims or spacer plates to compensate during installation. Telescopic security bars like the Model A are particularly helpful here because they adjust in width and absorb minor dimensional variations. If the difference exceeds 1/2 inch, the opening may require a custom-fabricated bar to ensure a secure, gap-free fit.
How long does it take to measure all the windows in a house?
Budget approximately 15 to 20 minutes per window for thorough measuring that includes width, height, diagonals, frame depth, obstruction checks, and photo documentation. For a typical home with 8 to 10 windows that need security bars, the entire measuring process takes 2 to 3 hours. Working with a helper can cut this time by about 30 percent because one person can hold the tape while the other reads and records. Always factor in additional time for unusual window types like arched, bay, or casement windows.