How to Install Window Security Bars on Concrete Walls: The Complete Anchor Guide
Learn how to install window security bars on concrete walls step by step. Anchor bolts, bit selection, load ratings, and code compliance for US homeowners.
From our experience protecting thousands of homes across the USA, SWB analyzes the best strategies so you can sleep soundly. If you're trying to figure out how to install window security bars on concrete walls, you're already taking one of the smartest steps a homeowner or landlord can make. According to the FBI Uniform Crime Report, approximately 60% of all residential burglaries involve forced entry through ground-floor windows — and ground-floor windows in older urban homes, basements, and commercial properties are almost always framed by concrete or masonry. That changes your installation approach entirely. Wood-framed windows allow simple wood screws; concrete demands proper anchor bolts, carbide-tipped masonry bits, and an understanding of load ratings to keep your bars anchored under real-world attack force. Whether you own a row house in Philadelphia, a concrete-block rental in Houston, or a basement unit in Chicago, this guide walks you through every step of the process — from selecting the right hardware to torquing your final bolt — so your window security bars stay exactly where they need to be when it matters most.
Poured concrete walls — common in basements and foundation walls throughout the Midwest and Northeast — are solid from face to face. Every anchor you place is s…
Why Concrete and Masonry Walls Require a Specialized Installation Approach
Most DIY window bar guides are written with wood-frame construction in mind. Tap a pilot hole, drive a lag screw, and you're done. Concrete and masonry substrates are an entirely different category of challenge. Concrete is dense, brittle under improper drilling, and will crack if you use the wrong bit or technique. Masonry block (CMU — Concrete Masonry Unit) adds the complication of hollow cores: an anchor placed in the hollow section of a block provides a fraction of the holding strength of one seated in solid material. According to the American Concrete Institute (ACI), anchor performance in concrete depends on three critical variables: embedment depth, edge distance, and concrete compressive strength (measured in PSI). For residential concrete walls commonly found in homes built before 1980 across cities like Detroit, Baltimore, and Memphis, you're typically dealing with 2,500–3,500 PSI concrete. Modern poured foundations may reach 4,000–5,000 PSI. Each of these values changes how deep your anchors must go and how much tension load they can reliably resist. Understanding these fundamentals before you drill a single hole is the difference between bars that hold under a 400-lb pry force and bars that pull free the moment a determined burglar leans into them. This section establishes the foundational knowledge you need before touching a drill.
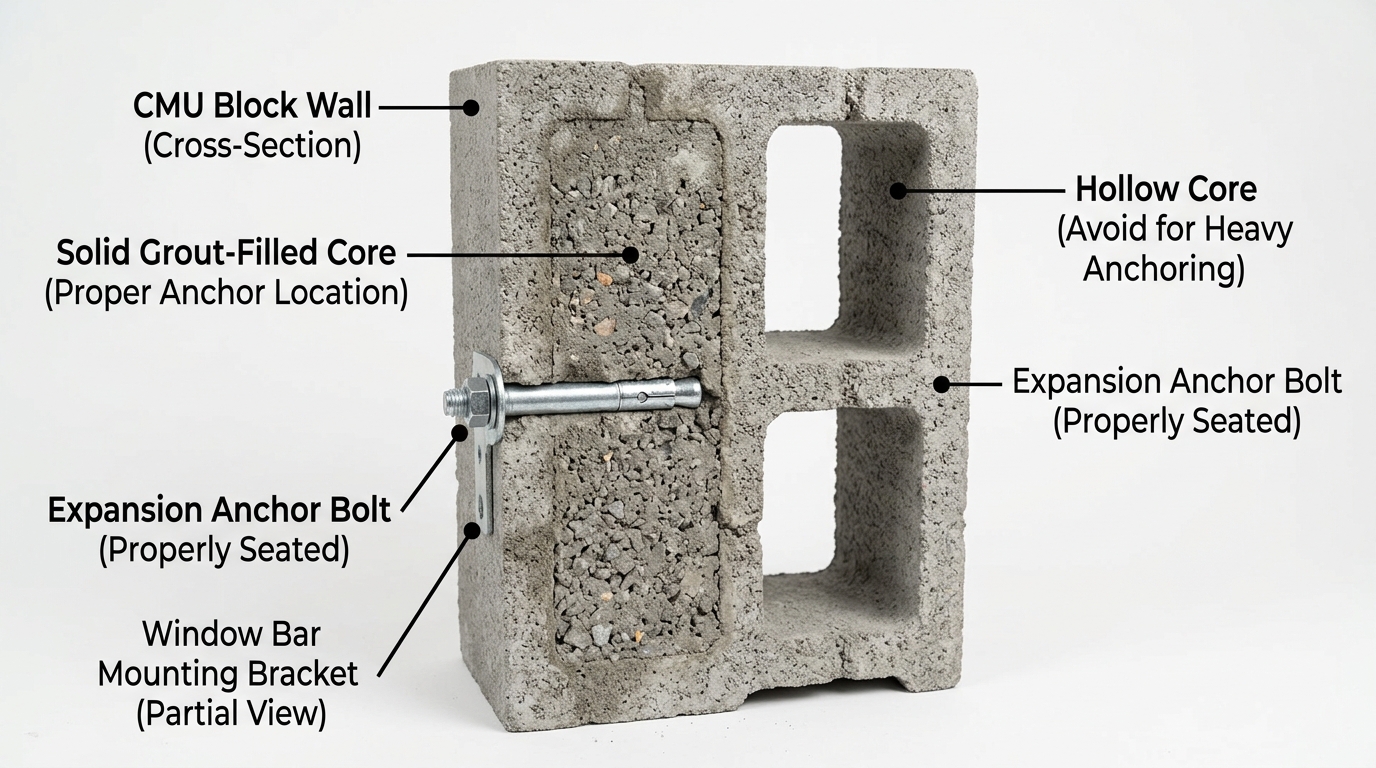
Concrete vs. Masonry Block: Knowing What You're Drilling Into
Poured concrete walls — common in basements and foundation walls throughout the Midwest and Northeast — are solid from face to face. Every anchor you place is seated in dense, continuous material. Concrete masonry units (CMU or cinder block), on the other hand, are manufactured with two or three hollow cores running vertically through the block. If your anchor lands in a hollow core, you'll get dramatically reduced pullout strength. To determine which substrate you're working with, knock lightly on the wall surface with your knuckles. Solid concrete returns a dense, low thud. Hollow-core block will sound noticeably hollow. You can also use a stud finder set to deep-scan mode — many modern models detect density changes that reveal hollow cores. For CMU installations, you must either use a sleeve anchor long enough to span through the hollow and into the next solid section, or fill the hollow cores with hydraulic cement or non-shrink grout before anchoring. Taking this extra step can increase your anchor pullout rating from under 500 lbs to over 2,000 lbs, per anchor manufacturer load tables published by brands such as Simpson Strong-Tie and Hilti.
Understanding Load Ratings for Window Bar Anchors
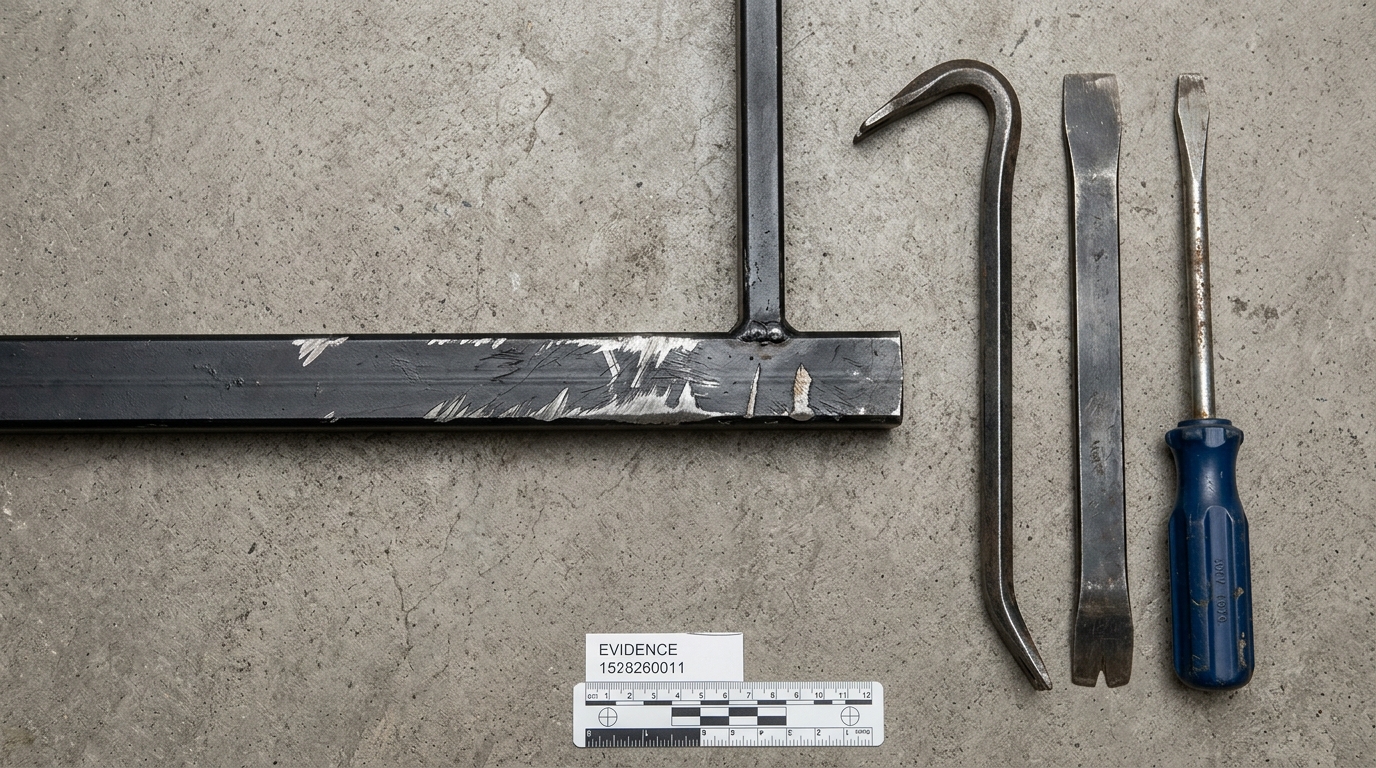
A window security bar installation is only as strong as its weakest anchor point. Each anchor in your system is rated for two types of load: tensile (pulling straight out from the wall) and shear (pulling downward or sideways along the wall face). For window bars, shear load is the dominant concern — a burglar prying outward on a bar exerts massive shear force on every anchor simultaneously. The International Building Code (IBC) does not specify a minimum load rating for residential window security bars specifically, but structural engineers generally recommend a combined anchor system capable of resisting at least 1,000 lbs of shear force per bar bracket location. For a standard window bar set with four anchor points (two per side bracket), that means each anchor should carry a minimum rated shear load of 250 lbs — though doubling that safety margin to 500 lbs per anchor is best practice for high-risk installations. Anchor manufacturers publish these load tables in their technical data sheets, and you should always verify the rated values match or exceed your installation requirements before purchasing fasteners.
Tools and Materials You Need Before You Start Drilling
Walking through a proper list of tools and materials before you begin prevents the most common installation mistakes: under-sized anchors, incorrect bit diameters, and cracked concrete from improper drilling technique. A concrete installation for window security bars is not a single-trip-to-the-hardware-store project — it requires specific items that not every homeowner already owns. Budget approximately $40–$80 for the hardware and tooling beyond what you'll spend on the bars themselves. That investment is trivial compared to the $600–$1,800 a professional security contractor would charge for the same installation, according to national contractor pricing data from HomeAdvisor (2023). The tools and materials listed below apply to both poured concrete and CMU block installations. Where differences exist between the two substrate types, those are called out specifically. Having every item staged before you begin drilling will save you multiple trips to the hardware store and keep your installation accurate and efficient from the first hole to the final torque.
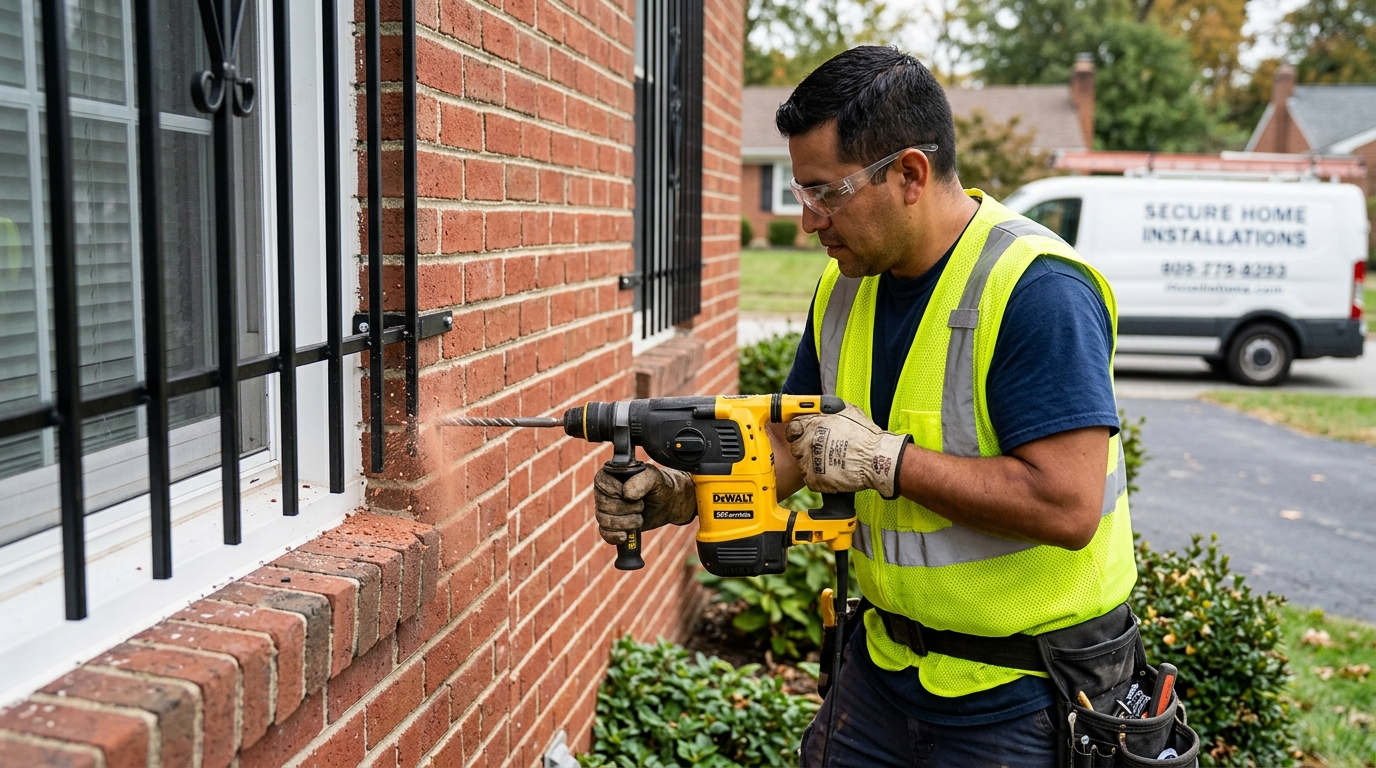
Drill Selection: Rotary Hammer vs. Standard Hammer Drill
This is the single most important tool decision you will make for a concrete bar installation. A standard hammer drill (the type most homeowners already own) uses a cam-action mechanism to vibrate the bit back and forth while spinning. It works acceptably in softer masonry like brick and lightweight block, but in dense poured concrete it is slow, hard on bits, and increases the risk of cracking the concrete near your anchor holes. A rotary hammer drill uses a piston-and-striker mechanism (SDS-Plus or SDS-Max chuck) that delivers genuine impact force — far more powerful than a cam-action drill. For any installation in poured concrete rated above 3,000 PSI, a rotary hammer is strongly recommended. You can rent a quality SDS-Plus rotary hammer from Home Depot or Lowe's for approximately $35–$55 per day — money very well spent for a clean, accurate installation. Use the drill-only mode (not hammer mode) when you are within 1 inch of your final depth to avoid cracking the concrete at the bottom of the hole.
Masonry Drill Bits: Carbide-Tipped and SDS Variants
Never use a standard twist bit or wood bit on concrete. You need carbide-tipped masonry bits matched to the anchor diameter specified by your anchor manufacturer. For most residential window bar installations using 3/8-inch sleeve anchors or wedge anchors, a 3/8-inch carbide-tipped SDS-Plus bit is the standard choice. Always purchase bits that match your drill chuck type — SDS-Plus bits cannot be used in a standard keyed chuck without an adapter, and using an adapter negates much of the rotary hammer's performance advantage. Bosch, Dewalt, and Hilti all manufacture quality carbide-tipped masonry bits in the $8–$20 range per bit. Buy at least two bits per installation — concrete will dull a bit noticeably after 6–8 holes, and a dull bit generates excessive heat that can micro-crack the concrete around your hole. Bit diameter must be precise: anchor manufacturers specify hole diameter tolerances within ±1/32 inch, and an oversized hole reduces pullout strength dramatically.
Complete Materials Checklist for Concrete Bar Installation
Here is the full materials list you should have staged before drilling a single hole. Rotary hammer drill (SDS-Plus recommended) with carbide-tipped masonry bits in the correct anchor diameter. Concrete wedge anchors or sleeve anchors — minimum 3/8-inch diameter, embedment depth per manufacturer spec (typically 2.25 inches minimum for residential security applications). Vacuum or compressed air bulb to clear hole debris before anchor insertion. Torque wrench or calibrated impact driver for final anchor tightening. Pencil or chalk line for marking anchor hole locations. Level (4-inch torpedo level minimum) to ensure horizontal bar alignment. Safety glasses and hearing protection — mandatory for rotary hammer use. Dust mask rated N95 or better — concrete dust contains respirable silica particles, which are regulated by OSHA (29 CFR 1926.1153) as a serious respiratory hazard. Thread-locking compound (Loctite 243 or equivalent) to prevent anchor nuts from vibrating loose over time. Non-shrink grout or hydraulic cement if you are working with hollow CMU block.
Choosing the Right Anchor Bolt Type for Window Security Bar Installations
The anchor bolt is the most technically critical component of your entire installation. The bar itself — whether it's a wall-mount model like SWB's Model B or another fixed-frame bar system — transfers all its structural load directly into those anchor points. Choosing the wrong anchor type for your specific concrete condition can result in a bar that looks solid but fails under the first serious forced-entry attempt. There are four anchor types commonly used in residential concrete security applications, and each has specific advantages and limitations depending on the concrete condition, the proximity to edges, and the depth of material available. US manufacturers including Hilti, Simpson Strong-Tie, and ITW Red Head publish detailed load tables and application guides for each anchor type, and cross-referencing those tables with your substrate conditions is the professional approach. Below are the four most relevant types for window bar installations on concrete walls.
Wedge Anchors: Maximum Strength in Solid Poured Concrete
Wedge anchors are the highest-strength option for solid poured concrete walls with adequate thickness (minimum 4 inches of concrete depth behind the anchor embedment zone). A wedge anchor works by expansion: as the nut is torqued, a steel clip on the anchor shank expands against the borehole walls, creating extraordinary mechanical interlock. For 3/8-inch diameter wedge anchors with 2.25-inch embedment in 3,000 PSI concrete, published shear load ratings from Simpson Strong-Tie reach 1,920 lbs per anchor — far exceeding what a window security bar installation demands. The limitation of wedge anchors is that they are permanent. Once set and torqued, removal typically damages the surrounding concrete. They are ideal for permanent installations such as SWB's Model B wall-mount bars on ground-floor windows in owner-occupied homes or commercial properties. They should not be used near concrete edges — maintain a minimum 2.5 inches of edge distance (measured from anchor centerline to the nearest concrete edge) to prevent edge blowout.
Sleeve Anchors and Drop-In Anchors for Versatile Applications
Sleeve anchors are the most versatile choice for residential concrete bar installations. They function similarly to wedge anchors but use a threaded bolt inside an expanding sleeve rather than a direct-expansion mechanism. Sleeve anchors can be used in both solid concrete and the solid sections of CMU block, and they offer good pullout and shear ratings — typically 800–1,400 lbs shear for 3/8-inch diameter anchors in 3,000 PSI concrete, depending on embedment depth. They are available in hex-nut, flat-head, and round-head styles. Drop-in anchors are a flush-set option used when you need a clean, flush mounting surface. They require a setting tool to expand the anchor inside the borehole and are typically used with machine bolts threaded into the set anchor. Drop-in anchors are a professional-grade choice for installations where the bracket face must sit perfectly flat against the concrete wall with no protruding anchor hardware — common in commercial or multi-family property installations across markets like New York City and Los Angeles.
Epoxy Anchors: The Professional Choice for Cracked or Hollow Masonry
Epoxy (adhesive) anchors are the top-tier solution for challenging substrates: cracked concrete, hollow CMU block (filling the void with epoxy), concrete with rebar congestion, or any situation where mechanical expansion anchors are inappropriate. Epoxy anchors use a two-part adhesive cartridge (dispensed through a mixing nozzle) injected into the cleaned and dried borehole. A threaded rod or bolt is then inserted and held in alignment while the epoxy cures. Cure times range from 20 minutes to 4 hours depending on ambient temperature and product formulation. ITW Red Head, Hilti HIT-RE 500, and Simpson SET-XP are leading products in the US market with published ICC-ES evaluation reports confirming their load ratings. Shear values for 3/8-inch threaded rod in epoxy anchor systems in 3,000 PSI concrete frequently exceed 2,500 lbs — the strongest option available for residential applications. For landlords managing older masonry-construction rental buildings in cities like Chicago, Detroit, or Philadelphia where deteriorated concrete and CMU block are common, epoxy anchors are the professional standard.
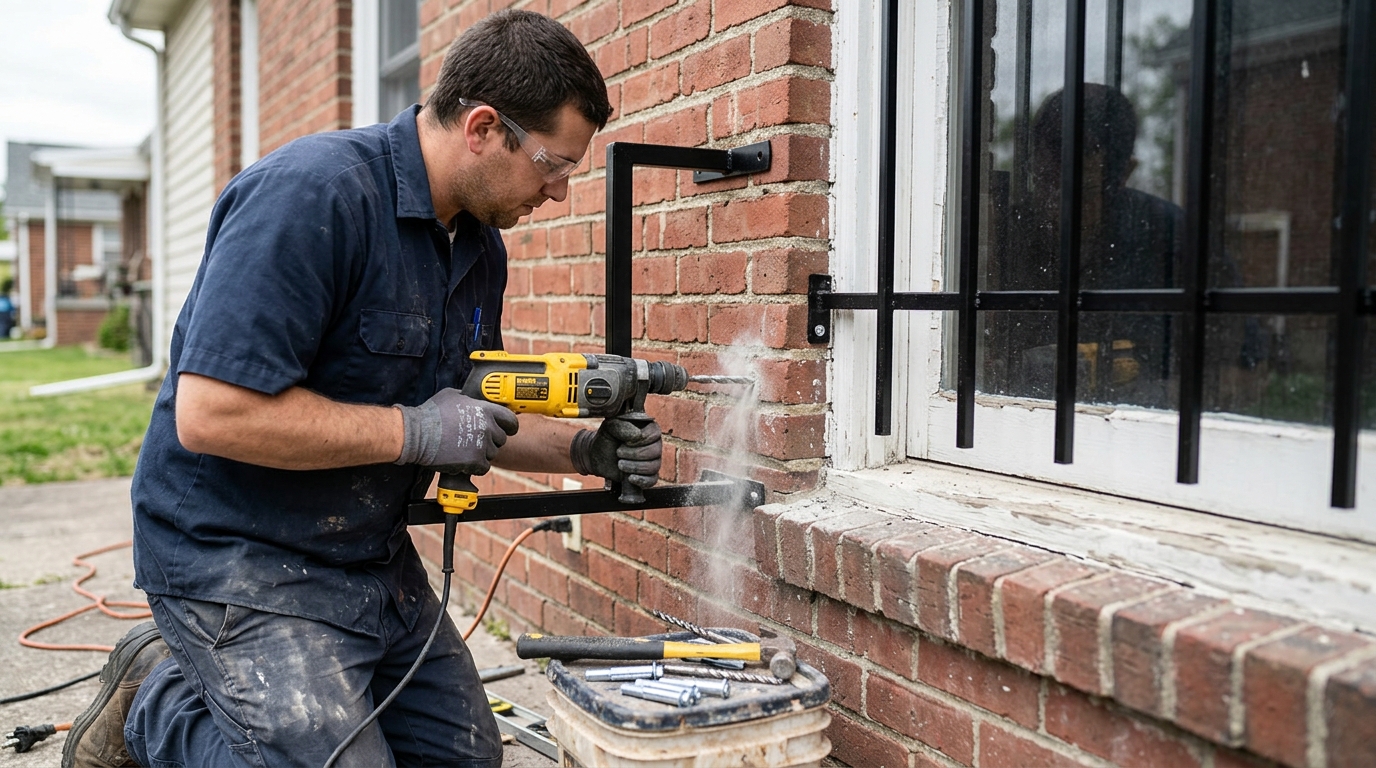
Step-by-Step: How to Install Window Security Bars on Concrete Walls
This is the core walkthrough for how to install window security bars on concrete walls. This process applies to wall-mount style bars like the SWB Model B, which uses a fixed bracket system designed for permanent anchoring in masonry and concrete substrates. Follow each step in sequence. Do not skip the hole-cleaning step — it is one of the most commonly omitted steps by DIYers, and it is directly responsible for a significant percentage of anchor failures in field installations. The entire installation process for a single window bar set should take an experienced DIYer approximately 60–90 minutes. Allow extra time on your first installation as you build familiarity with the rotary hammer and anchor-setting process.
Step 1 Through Step 4: Layout, Drilling, and Cleaning
Step 1 — Mark your bracket locations. Hold the bar bracket against the concrete wall at the desired position. Use a torpedo level to confirm the bracket is perfectly horizontal. Mark all anchor hole centerpoints with a pencil or chalk marker. For window bars, both side brackets must be set at the same height — use a measuring tape to confirm equal distance from the window sill on both sides before marking. Step 2 — Put on your safety glasses, hearing protection, and N95 dust mask. Insert your carbide-tipped SDS-Plus masonry bit into the rotary hammer. Set the drill to hammer mode. Step 3 — Drill each marked hole to the depth specified by your anchor manufacturer. Most 3/8-inch wedge and sleeve anchors require a minimum 2-inch borehole depth for residential security applications. Use the depth gauge on your rotary hammer, or mark the target depth on your drill bit with tape. Step 4 — This step is critical: clean every hole thoroughly before anchor insertion. Use a wire brush sized to your hole diameter, then blow all concrete dust out of the hole with compressed air or a vacuum bulb. Repeat: brush, blow, brush, blow. Concrete dust trapped in the borehole acts as a lubricant between the anchor and the borehole walls, reducing pullout strength by up to 40%, per anchor manufacturer testing data.
Step 5 Through Step 8: Anchor Setting, Bracket Installation, and Final Torque
Step 5 — Insert anchors into the cleaned holes. For wedge and sleeve anchors, thread the mounting nut and washer onto the anchor before insertion. Tap the anchor into the hole with a hammer until the washer and nut seat fully against the concrete surface. For drop-in anchors, insert the anchor flush with the surface, then use the setting tool and a hammer to expand the anchor fully. For epoxy anchors, inject epoxy into the hole, insert the threaded rod, and allow full cure time before proceeding. Step 6 — Place the bar bracket over the anchor studs and slide it against the concrete wall surface. Confirm it is still level using your torpedo level before tightening anything. Step 7 — Begin tightening anchor nuts by hand first, then use a torque wrench. Consult your anchor manufacturer's technical data sheet for the specified installation torque — typically 25–40 ft-lbs for 3/8-inch wedge anchors in residential applications. Over-tightening can crack the surrounding concrete; under-tightening leaves the anchor loose in the hole. Step 8 — Apply a small drop of thread-locking compound (Loctite 243 or equivalent) to the exposed threads before the final torque, or after setting, to prevent vibration-induced loosening over time. Repeat for all anchor points, then attach the bar to the installed brackets per the manufacturer's instructions.
Verifying Installation Strength After Anchoring
Once all anchors are set and brackets are mounted, perform a pull-test before considering the installation complete. Grip the installed bar firmly with both hands and apply steady outward and downward force — do not yank suddenly, as a proper anchor will resist gradual force far better than impact force, and you risk personal injury if a bracket does shift unexpectedly. The bar should show zero movement, zero rotation of the bracket, and zero cracking of the surrounding concrete under firm manual loading. If any anchor shows movement, remove the bar, extract the anchor, inspect the borehole for oversizing or inadequate depth, and reinstall with a larger-diameter or longer anchor. For critical installations — particularly basement windows in high-crime neighborhoods, or bedroom windows where egress compliance also matters — consider having a licensed structural engineer or building inspector review the completed installation. Many municipalities offer free or low-cost building inspection services that cover security hardware installations.
Building Code Compliance and Fire Safety Requirements for Concrete-Mounted Bars
Installing window security bars on concrete walls doesn't exempt you from building code requirements — and in many cases, a permanent concrete-anchored bar installation triggers stricter compliance obligations than a removable telescopic system. The most important code requirements governing window security bars in the USA come from the International Residential Code (IRC), the International Building Code (IBC), and NFPA 101, the Life Safety Code. These codes exist because window bars, while excellent at keeping intruders out, have historically also trapped occupants inside during fires. According to the U.S. Fire Administration (USFA), window bars without quick-release mechanisms have been documented as contributing factors in residential fire fatalities. Understanding which codes apply to your installation type and jurisdiction is not optional — it is a legal and life-safety obligation. For a complete overview of the general installation considerations and code landscape, the SWB installation guide at https://www.securitywb.com/installation/ provides a comprehensive resource for all window bar types.
IRC and IBC Egress Requirements for Bedroom Windows
The International Residential Code (IRC), Section R310, mandates that every bedroom in a residential dwelling must have at least one egress window capable of providing emergency escape and rescue access. Minimum opening dimensions are 20 inches in width, 24 inches in height, and a minimum net clear opening of 5.7 square feet (5.0 square feet for grade-floor openings). Any window security bar — whether anchored in concrete or wood — installed over a bedroom window must not reduce the window opening below these minimums. For permanently anchored concrete installations, this means the bar system must either include a compliant quick-release mechanism or be designed so that the bars themselves can be removed without tools within seconds. Failure to comply with IRC Section R310 creates a life-safety hazard and exposes homeowners and landlords to significant legal liability in the event of a fire-related injury. The SWB Model A/EXIT at https://www.securitywb.com/model-a-exit/ addresses this requirement directly with its patented quick-release egress mechanism, making it the recommended choice for any sleeping area — even when anchored into concrete.
NFPA 101 and Multi-Family Property Compliance
For landlords and property managers in multi-family residential buildings — the segment of housing stock most likely to feature concrete and masonry wall construction in cities like New York City, Chicago, and Los Angeles — NFPA 101 Life Safety Code Section 24.2.4 specifically addresses security bars on windows in the means of egress. The code requires that any security bar or grille installed on a required egress window must be openable from the inside without the use of a key, tool, or special knowledge or effort. This requirement applies to every unit, not just common areas. Landlords who install permanently anchored concrete bars on bedroom windows without a compliant quick-release mechanism are in direct violation of NFPA 101 in jurisdictions that have adopted it — which includes most major US cities. New York City's Local Law 57 further requires window guards in apartments where children under 10 years old reside, but those guards must also comply with egress requirements. Non-compliance exposes property owners to fines, mandatory remediation costs, and civil liability.
Special Situations: Basement Windows, Corner Anchors, and Thin Concrete Walls
Not every concrete wall installation fits the standard scenario of a thick, sound poured-concrete wall with plenty of edge distance and material depth. Real-world residential concrete installations — especially in older American housing stock — frequently present complications: shallow concrete ledges over basement windows, deteriorated mortar joints in brick or CMU walls, thin concrete veneers over framing, and window openings positioned close to corners where edge distance is insufficient for standard mechanical anchors. Each of these situations requires a modified approach. Skipping that modification and forcing a standard anchor into an incompatible substrate is the cause of most field installation failures reported in contractor forums and product review feedback. This section addresses the three most common non-standard scenarios you are likely to encounter when installing window security bars on concrete or masonry walls in American residential properties.
Basement Window Installations: Dealing with Shallow Concrete and High Moisture
Basement window frames in homes built before 1970 — common throughout the Rust Belt, New England, and Mid-Atlantic regions — are often set into concrete or stone foundation walls with very limited flat anchoring surface. The concrete may be as thin as 3–4 inches at the window jamb, and deterioration from decades of moisture cycling may have reduced its effective compressive strength significantly. For these installations, epoxy anchors are strongly preferred over mechanical expansion anchors, because epoxy distributes load over a larger bonded surface area rather than relying on point-contact expansion force. Use a minimum 1/2-inch diameter threaded rod with epoxy for these applications, and increase embedment depth to a minimum of 3 inches where the concrete condition allows. Moisture in the borehole is the critical threat to epoxy anchor performance: the hole must be completely dry before injection. Use a heat gun to dry the hole thoroughly, then allow it to cool to ambient temperature before injecting epoxy. Hilti HIT-RE 500 and Simpson SET-XP both publish moisture-tolerant application procedures in their technical data sheets for wet or saturated concrete conditions.
Corner Anchors and Edge Distance Limitations
Window openings positioned near the corner of a concrete wall create edge distance problems for mechanical expansion anchors. The minimum edge distance for most 3/8-inch wedge and sleeve anchors is 2.5 inches from the anchor centerline to the nearest concrete edge — but window rough openings cut into concrete walls frequently leave less than that on one or both sides of the frame. Installing a mechanical expansion anchor with insufficient edge distance concentrates stress at the concrete edge and can cause a wedge-shaped blowout failure, which looks solid until sudden, catastrophic pullout occurs under load. The solutions are: switch to an epoxy anchor system (which has lower minimum edge distance requirements due to its bonded rather than expansion mechanism), use a larger baseplate bracket that spans past the narrow edge zone to a deeper anchor location, or install the bar mounting bracket into the concrete block above the window opening where full-depth CMU material is available. Simpson Strong-Tie's ACI anchor calculator (available free online) allows you to calculate reduced edge-distance load values for any anchor configuration before committing to a specific hardware selection.
Anchoring Into Brick Veneer and Stucco Over Framing
A very common mistake in residential bar installations is treating brick veneer or stucco as if it were solid masonry. Brick veneer is typically 3.5–4 inches thick and is attached to a wood or metal framing system behind it with a 1-inch air gap between the veneer and the structural wall. Stucco is typically only 3/4 to 1 inch thick. Neither material provides adequate anchor depth or substrate strength for a security bar installation on its own. If you drill into brick veneer and hit air space at 4 inches, you cannot anchor a security bar there with standard concrete hardware. The correct approach is to use long structural lag screws or through-bolts that penetrate the veneer, the air gap, the sheathing, and into the structural framing — at which point you are doing a wood-frame installation, not a concrete installation, and the technique reverts to lag-screw anchoring into studs. Always probe the wall material carefully before purchasing anchors. A simple test: drill a 1/4-inch exploratory hole at low speed with a masonry bit and note what material resistance you feel and what depth the solid resistance ends. This 60-second test can save an entire failed installation.
Comparing DIY Concrete Installation vs. Professional Installation Costs
One of the most compelling reasons homeowners and landlords choose to install window security bars themselves — even on concrete walls where the process is more complex — is the dramatic cost difference between DIY and professional installation. According to national contractor pricing data compiled by HomeAdvisor and Angi (2023), professional window bar installation on masonry or concrete walls in major US cities averages $600–$1,800 per window, depending on bar type, anchor complexity, and local labor rates. In high-cost markets like New York City, San Francisco, and Boston, prices can reach $2,200 or more per window for a licensed security contractor's labor. A DIY installation using SWB's Model B wall-mount bars — priced at $91 — plus approximately $40–$80 in anchors, bits, and rental tooling brings total cost to $131–$171 per window. That is a savings of $430–$1,630 per window, and across a multi-unit property with six or eight windows requiring bars, those savings compound rapidly into thousands of dollars. For landlords managing affordable housing portfolios in cities like Detroit, Memphis, or Atlanta where margins are tight and security requirements are non-negotiable, DIY concrete bar installation is not just practical — it's financially essential.
When to Call a Professional Instead of DIYing
DIY concrete bar installation is practical and achievable for most homeowners and landlords, but there are specific situations where professional installation is the right call. First: if the concrete is severely deteriorated, cracked through, or spalling extensively, a structural assessment should precede any anchoring work. Installing into compromised concrete provides false security — the anchors may pass a manual pull test but fail under sustained load. Second: if the installation is in a multi-family building governed by a certificate of occupancy with specific code requirements for egress and security hardware, having a licensed contractor perform and document the installation creates a paper trail that protects the property owner legally. Third: if the window opening is large enough to require five or more anchor points and you are not comfortable with the rotary hammer and torque wrench process after reading this guide, the risk of a failed installation outweighs the cost savings. A failed installation is not just a financial loss — it's a security gap and potentially a life-safety hazard.
Long-Term Maintenance of Concrete-Anchored Window Bars
Unlike wood-frame installations where seasonal movement can gradually loosen fasteners, properly installed concrete anchor points are remarkably stable over time — concrete does not shrink, swell, or warp with temperature changes. However, long-term maintenance is still required. Inspect all anchor nut torque annually. Apply anti-corrosion spray (WD-40 or a dedicated metal protectant) to exposed anchor hardware and bar steel twice per year, particularly in humid coastal climates like Miami, Houston, or New Orleans where salt air and humidity accelerate oxidation. Check the bar finish for chips or scratches that expose raw steel — touch up with spray paint rated for metal surfaces to prevent rust formation at the surface level. Inspect the concrete immediately around each anchor point for hairline cracks, which can develop over years of thermal cycling and indicate the anchor is beginning to compromise the surrounding substrate. If cracks are found, consult an anchor manufacturer's technical representative before continuing to rely on that anchor point.
Selecting the Right SWB Window Bar Model for Concrete Wall Installations
Not every Security Window Bars model is designed for permanent concrete anchoring — and choosing the right model for your specific installation scenario is as important as choosing the right anchor bolt. SWB offers three core models, each engineered for a distinct installation context and security need. For concrete and masonry wall installations, the key decision factors are: whether the installation is permanent or needs to be removable between tenants, whether the window is in a sleeping area requiring egress compliance, and whether the property is residential or commercial. Understanding these factors will direct you to the appropriate SWB model and ensure your installation meets both structural performance and legal compliance requirements. For a full breakdown of all three models and their installation requirements across different wall types, the complete guide to how to install window security bars at https://www.securitywb.com/installation/ is the definitive SWB resource.
Model B (Wall Mount) — The Primary Choice for Concrete Anchoring
SWB's Model B wall-mount window bars at https://www.securitywb.com/model-b/ are the purpose-built solution for permanent concrete and masonry wall installations. Constructed from heavy-gauge steel with a powder-coated black finish that resists corrosion, Model B's brackets are engineered for anchoring directly into concrete, CMU block, or masonry using the anchor bolt types covered in this guide. At $91, Model B delivers professional-grade security at a fraction of the cost of a contractor-installed system. The fixed wall-mount design provides maximum rigidity — there is no telescopic mechanism to potentially weaken under sustained attack force. Model B is ideal for ground-floor windows in owner-occupied homes, commercial storefronts, garages, and any application where permanent installation is appropriate and the property owner has no concern about security deposit deductions or restoration requirements. Installation uses the exact step-by-step process described in this guide.
Model A/EXIT — Egress-Compliant Option for Bedroom Concrete Installations
For bedroom windows — even those set in concrete walls — code compliance demands a quick-release egress capability. SWB's Model A/EXIT at https://www.securitywb.com/model-a-exit/ is the answer. This patented system combines the structural security of a fixed bar installation with a quick-release mechanism that allows the bars to be opened from the inside in seconds without tools, keys, or special knowledge — meeting IBC, NFPA 101, OSHA, and IRC emergency egress requirements. At $92, the Model A/EXIT is the most critically important product in the SWB lineup for any sleeping area installation, regardless of wall material. When anchored into concrete using the wedge anchor or epoxy anchor methods described in this guide, the Model A/EXIT delivers both maximum burglary resistance and full life-safety compliance. For landlords managing multi-family properties in New York City, Chicago, or Los Angeles who need to satisfy both security and egress code requirements simultaneously, this is the only compliant single-product solution.
🏆 Conclusion
Installing window security bars on concrete walls is one of the most effective home security investments an American homeowner or landlord can make — but it demands a higher level of technical precision than standard wood-frame installations. The anchor selection, drilling technique, hole cleaning, and torque verification steps covered in this guide are not formalities. They are the difference between bars that genuinely stop a forced entry and bars that fail the moment a determined burglar applies real force. With the right rotary hammer, the correct anchor type matched to your specific concrete substrate, and strict adherence to the step-by-step installation process, a motivated DIYer can complete a professional-quality concrete bar installation for under $200 per window — compared to $600–$1,800 for a professional contractor. Security Window Bars makes this achievable with products engineered for exactly this purpose: Model B for permanent concrete installations, and Model A/EXIT for egress-compliant bedroom window protection. Don't leave your ground-floor windows unprotected. Your family's safety and your property's security depend on anchors that hold when it matters most.
Security Window Bars · USA
Secure Your Home Today
Protect every window in your home — starting today. Shop Security Window Bars on Amazon USA for fast delivery to all 50 states: /buy-now/. Browse all models at securitywb.com and find the right bar for every window in your home.
Shop on Amazon →Frequently Asked Questions
For solid poured concrete in good condition, wedge anchors provide the highest shear load ratings — often exceeding 1,900 lbs per anchor for 3/8-inch diameter hardware in 3,000 PSI concrete. For hollow CMU block, cracked concrete, or installations near edges where mechanical anchors are unsuitable, epoxy adhesive anchors (such as Hilti HIT-RE 500 or Simpson SET-XP) are the professional choice. They fill voids, tolerate lower edge distances, and deliver outstanding bonded load values. Always verify load ratings against the anchor manufacturer's published technical data sheet for your specific concrete strength and embedment depth.
A standard hammer drill can work in softer masonry like brick or lightweight block, but for poured concrete rated above 3,000 PSI — which is typical in most American residential basements and foundation walls — a rotary hammer drill with an SDS-Plus chuck is strongly recommended. Rotary hammers deliver genuine impact force through a piston mechanism, making drilling faster, cleaner, and far less likely to crack the concrete at the borehole edge. You can rent an SDS-Plus rotary hammer from Home Depot or Lowe's for approximately $35–$55 per day, making it a cost-effective option even for a one-time installation.
Minimum embedment depth depends on the anchor type and diameter. For 3/8-inch wedge and sleeve anchors in residential security applications, most manufacturers specify a minimum borehole depth of 2.25 to 2.5 inches, but increasing embedment to 3 inches significantly improves load ratings. For epoxy anchors using 3/8-inch or 1/2-inch threaded rod, minimum embedment is typically 2.5 to 3.5 inches. Always consult the specific anchor manufacturer's technical data sheet for your exact anchor size and concrete condition — never estimate embedment depth without referencing published specifications.
Window bars on bedroom windows are legal in the USA, but they must comply with egress requirements regardless of whether they're anchored in concrete or wood. The International Residential Code (IRC) Section R310 requires every bedroom to have at least one egress window providing a minimum 20-inch width, 24-inch height, and 5.7 square feet of net clear opening for emergency escape. Any bar system — including concrete-anchored fixed bars — must either not obstruct this minimum opening or must include a quick-release mechanism operable from the inside without keys or tools. SWB's Model A/EXIT meets this requirement with its patented quick-release egress system.
Yes, but you must account for the hollow cores in CMU block. Standard mechanical expansion anchors placed in hollow sections of CMU block will have dramatically reduced pullout strength — potentially under 500 lbs — which is inadequate for a security bar installation. The two correct approaches are: use sleeve anchors long enough to span through the hollow core and seat in solid material, or fill the hollow cores with hydraulic cement or non-shrink grout before anchoring. The most reliable solution for hollow CMU is an epoxy anchor system, which fills the void and creates a fully bonded connection. Shear load values for epoxy anchors in properly filled CMU block can exceed 1,500 lbs per anchor.
A DIY installation using SWB Model B wall-mount bars ($91) plus anchor hardware, masonry bits, and tool rental typically totals $131–$171 per window. Professional contractor installation of window bars on concrete or masonry walls averages $600–$1,800 per window in major US markets, according to HomeAdvisor and Angi 2023 pricing data, with costs reaching $2,200+ in high-labor-cost cities like New York and San Francisco. The DIY approach saves $430–$1,630 per window — a total savings of thousands of dollars for multi-window properties — while delivering equivalent structural performance when installed correctly per the anchor specifications and torque requirements in this guide.
Concrete drilling generates respirable silica dust, which OSHA regulates under 29 CFR 1926.1153 as a serious occupational health hazard linked to silicosis. Always wear an N95 or higher-rated dust mask when drilling concrete. Safety glasses are mandatory — rotary hammers eject concrete fragments at high velocity. Hearing protection is strongly recommended, as SDS-Plus rotary hammers operate above 90 dB. Ensure adequate ventilation in enclosed spaces like basements. Never drill near electrical wiring without first scanning the wall with a stud finder or wire detector. Contact your local utility notification service (dial 811 in the USA) before drilling into exterior walls or near utility entry points.
For standard residential installations in sound poured concrete or CMU block, the anchor selection guidance in this guide covers the vast majority of scenarios. For non-standard situations — severely deteriorated concrete, unusual wall thickness, seismically active regions like California or the Pacific Northwest, or multi-family buildings with specific code requirements — consult a licensed structural engineer or a certified building inspector. Major anchor manufacturers including Simpson Strong-Tie and Hilti also offer free technical support lines staffed by engineers who can review your specific substrate conditions and recommend appropriate anchor solutions. You can also reach the SWB team directly at https://www.securitywb.com/contact/ for product-specific installation guidance.