Window Security Bars — Telescopic, Modular & Fire-Code Compliant
Steel security bars · Fits any window · 15-min DIY install
Modern modular window bars that fit any window — no contractor, no custom order. Fire-code compliant with quick-release for bedrooms.
EVERYTHING YOU
NEED TO KNOW
IN ONE VIDEO.
Watch how SWB window bars install in minutes, why they're trusted in apartments across the US, and what makes them different from cheap alternatives.

SWB designs window bars and security bars built for one purpose: keeping intruders out. Our adjustable security window bars fit any opening — telescopic, modular, and fire-code compliant — and install in under 15 minutes without a contractor. From $99.
Every 25 Seconds,
a US Home Is
Burglarized.
Burglars choose homes without visible barriers 3× more often. Ground floor windows are the #1 entry point — yet most homeowners do nothing until after a break-in.
85% of opportunistic burglars abandon an attempt within 60 seconds if they can't get through. Window bars make your home a hard target.
Read the Complete Security Guide→
Choose Your
Protection.
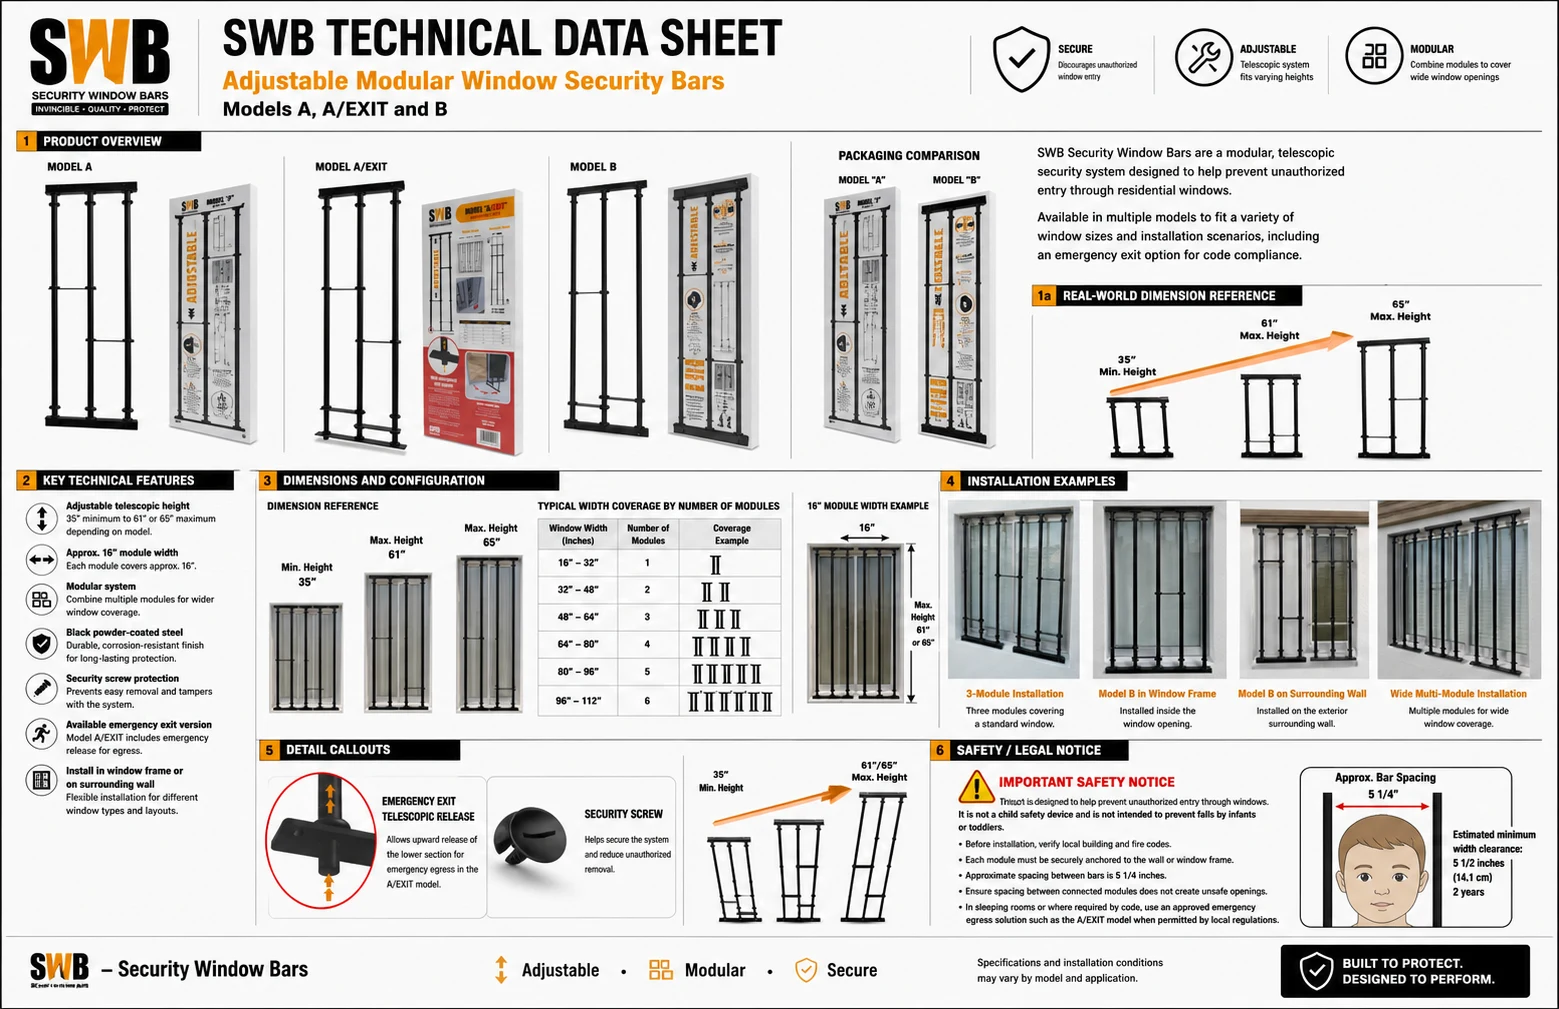
Three models. One patented telescopic + modular system. Fits any window — 35" to 65" tall, unlimited width (16" per module, stack as many as needed).
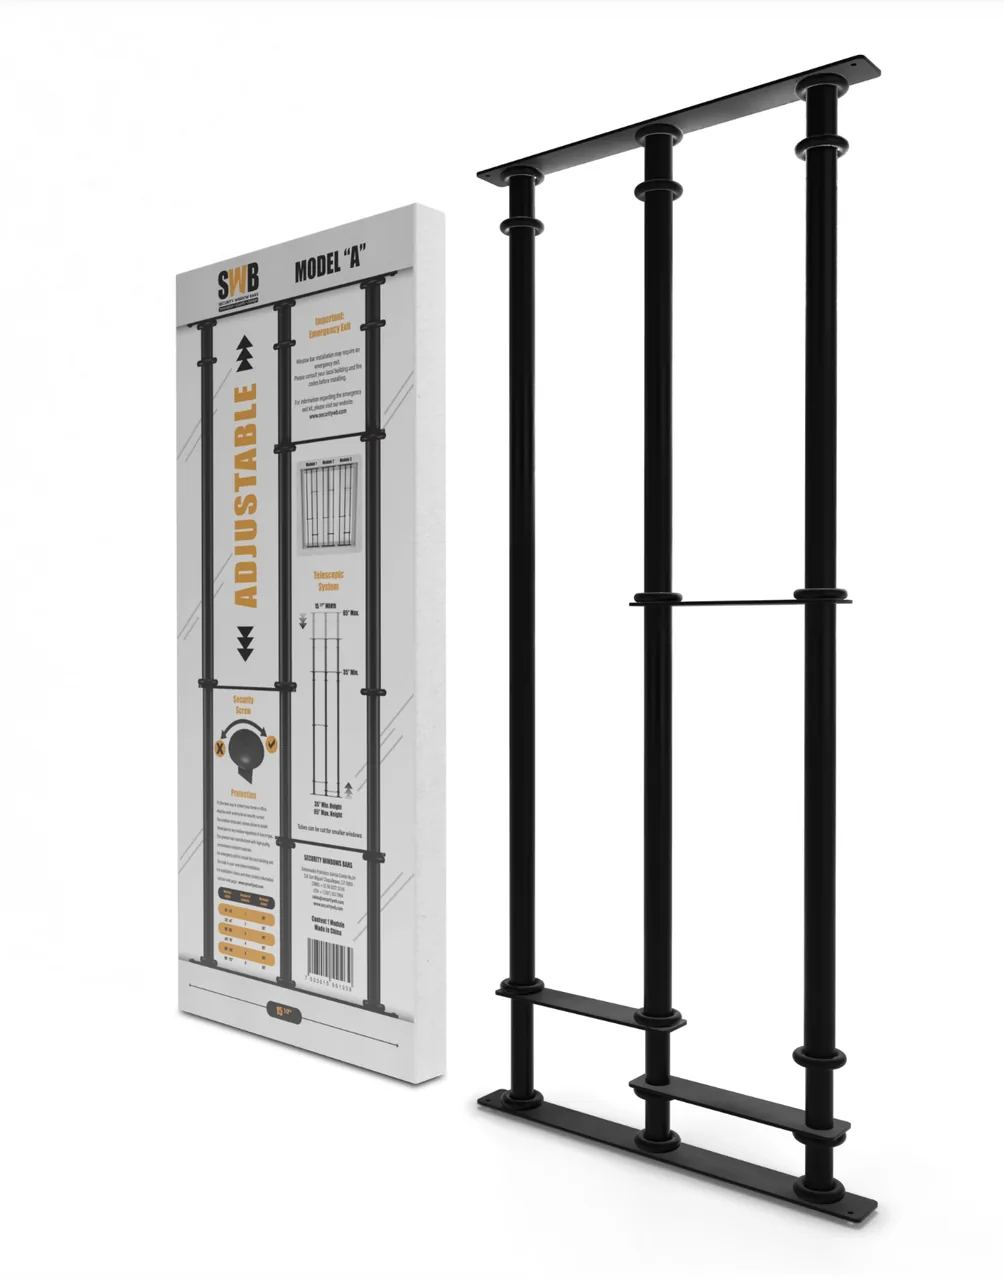
Model A
Heavy-Duty Telescopic Window Bar
The SWB Model A combines telescopic height adjustment with modular width expansion — the only system that fits virtually any window size without custom fabrication.
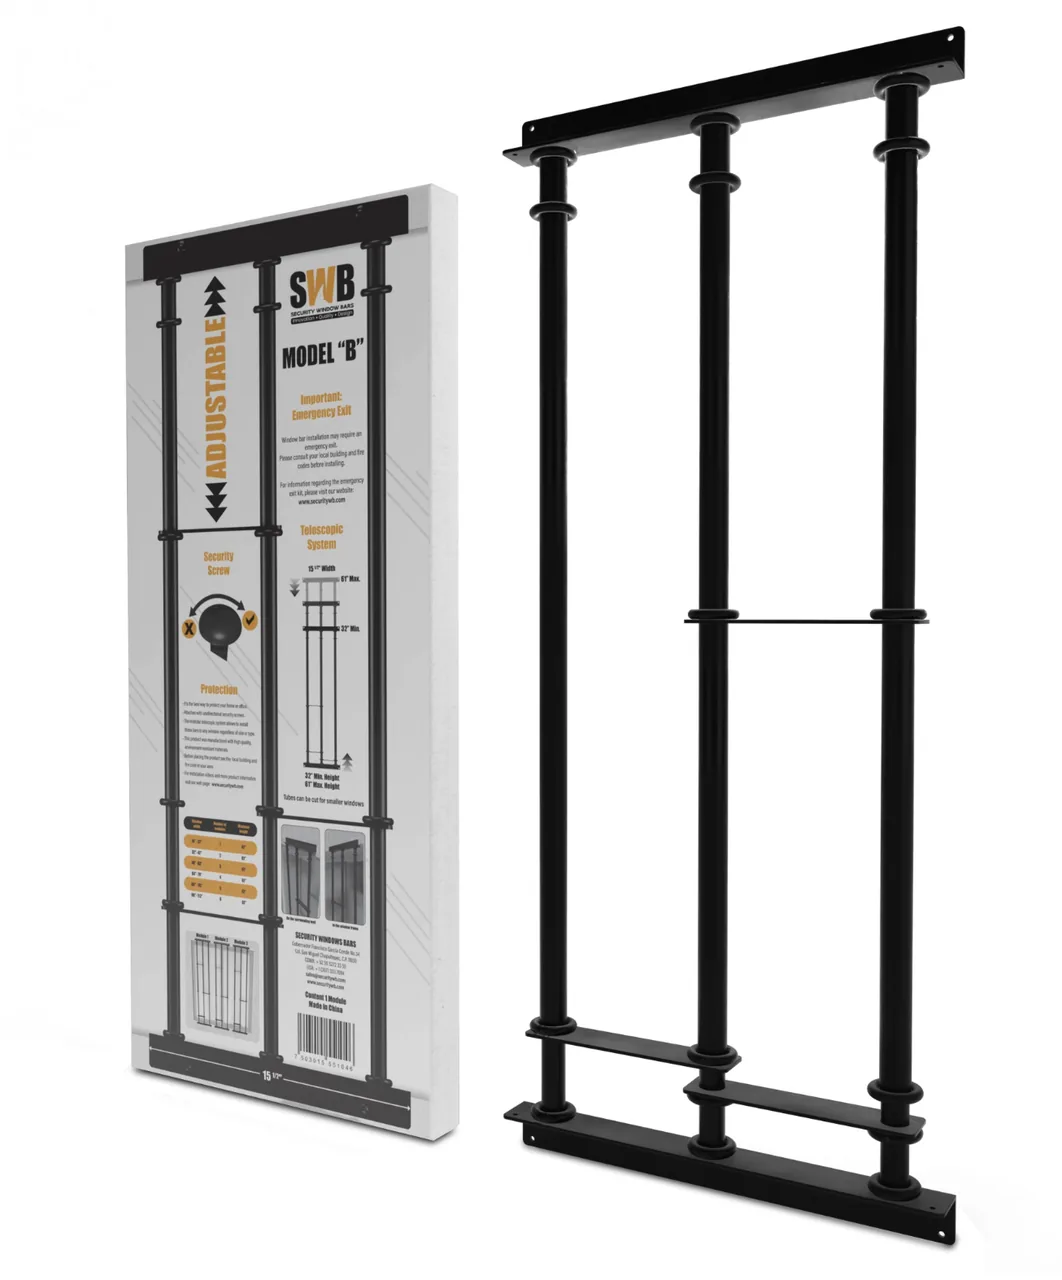
Model B
Flexible Wall-Mount Window Bar
Designed specifically for masonry, stucco, and irregular wall surfaces. The Model B brings the same telescopic + modular system with enhanced wall-anchor hardware.
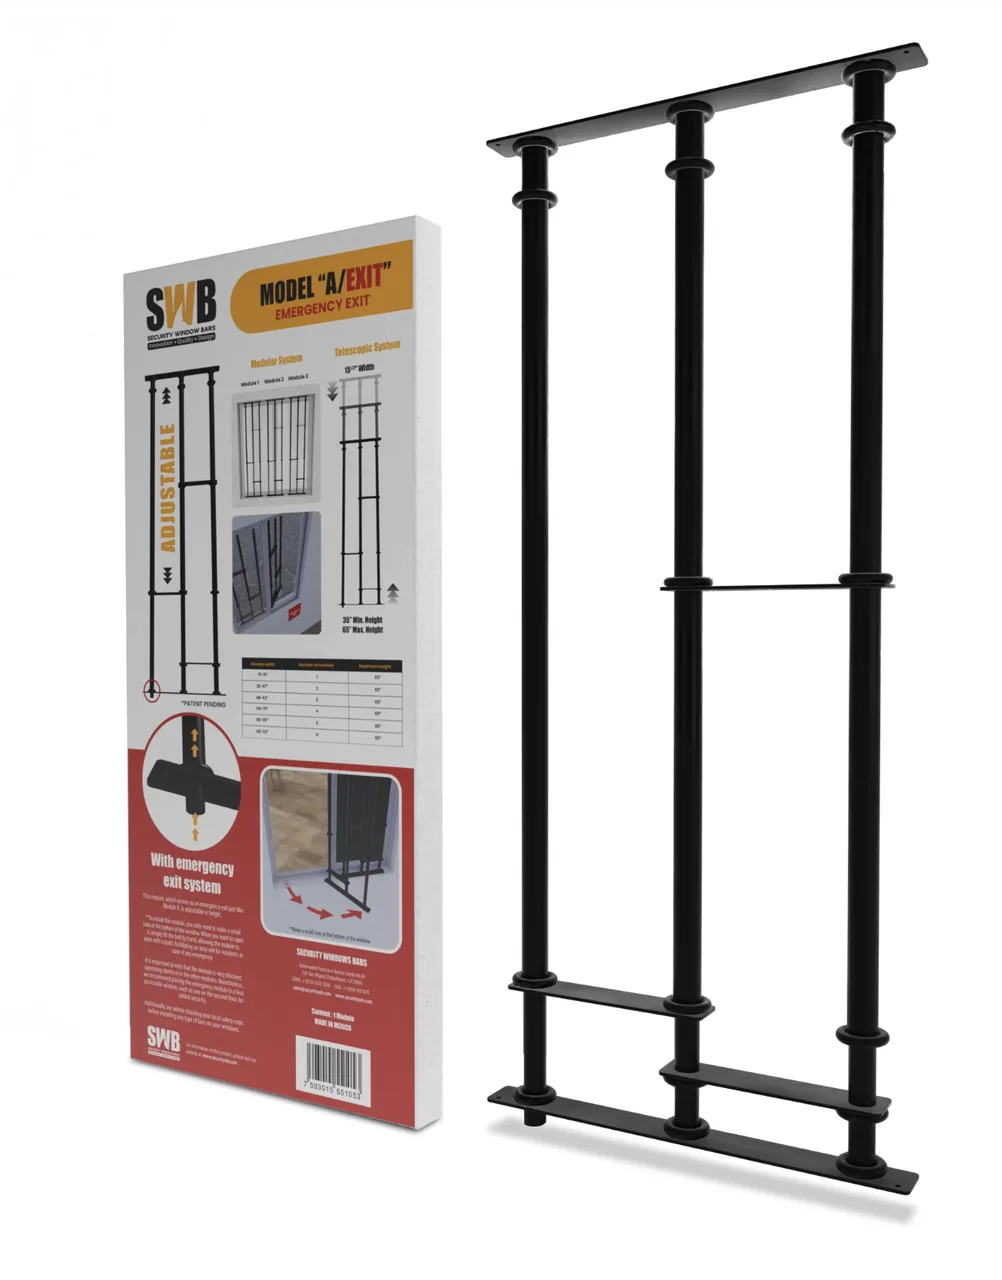
Model A/EXIT
Quick-Release Fire-Safe Window Bar
The only window bar with an integrated quick-release mechanism for emergency egress. IBC and NFPA 101 compliant — required for bedroom windows in most US states.
SWB SPECIFICATION
SHEET
Model A/EXIT & Model B — Security Window Bars
General Window Bars is designed to prevent unauthorized entry through windows. NOT a child safety device and not intended to prevent falls from windows by infants or toddlers.
Rotate the orange lever 90° to release the telescopic tension and disengage the locking mechanism.
Slide the inner bar inward until it clears the window frame — the bar collapses and can be removed in seconds.
NOTE: Ensure quick egress access is not blocked.
| PARAMETER | MODEL A/EXIT | MODEL B |
|---|---|---|
| Material | Heavy-Duty Steel | Heavy-Duty Steel |
| Finish | Matte Black Powder Coat | Matte Black Powder Coat |
| Height Range | 35" to 61" Telescopic | 35" to 61" Telescopic |
| Bar Spacing | 5-1/4" (13.3 cm) | 5-1/4" (13.3 cm) |
| Connector Width | 16" Module Base | 16" Module Base |
| Installation | Inside Frame / Wall | Inside Frame / Wall |
| Emergency Exit | Yes, Quick-Release | No, Security Only |
| WINDOW WIDTH | MODULES NEEDED |
|---|---|
| 35" – 41½" (89 – 105 cm) | 1 |
| 35" – 40" (89 – 101 cm) | 1 |
| 40" – 50" (101 – 127 cm) | 2 |
| 4'0" – 6'0" (122 – 183 cm) | 3 |
| 5'0" – 6'6" (152 – 198 cm) | 4 |
| 5'0" – 8'10½" (152 – 270 cm) | 5 |
Bar spacing is 5¼ inches — NOT a child safety device. Not intended to prevent falls from windows by infants or toddlers. Emergency egress compliance: always verify local building codes require egress-capable bars for sleeping areas.
Installed in
3 Steps.
Measure Your Window
Take two measurements: clear width (jamb to jamb) and clear height. Takes 2 minutes with a tape measure.
Mark & Drill 4 Points
Mark mounting points with a pencil, drill pilot holes. All anchors for any wall type are included in the box.
Slide In & Tighten
Insert the telescopic bar, adjust to your window size, tighten with the included security screws. Done.
Trusted by
12,000+ Homes.
“We heard noises in the middle of the night. Our cameras showed two people trying to force a window. Thanks to the SWB bars, they couldn't get in and police arrived in time. I can't imagine what would have happened without them.”
“I installed all six windows in an afternoon — took me maybe 3 hours total. The design is clean, doesn't look like a prison at all. My neighbors actually asked me who did it, they thought it was a contractor.”
“After my neighbor's break-in I couldn't sleep. Had SWB bars on all my ground-floor windows in a weekend. The Model A/EXIT in my bedroom means I'm protected AND my family can still get out in an emergency. Peace of mind, finally.”
Not Sure
Which Bar
You Need?
Answer 3 quick questions about your window type, installation surface, and budget — we'll tell you exactly which model is right for you.