
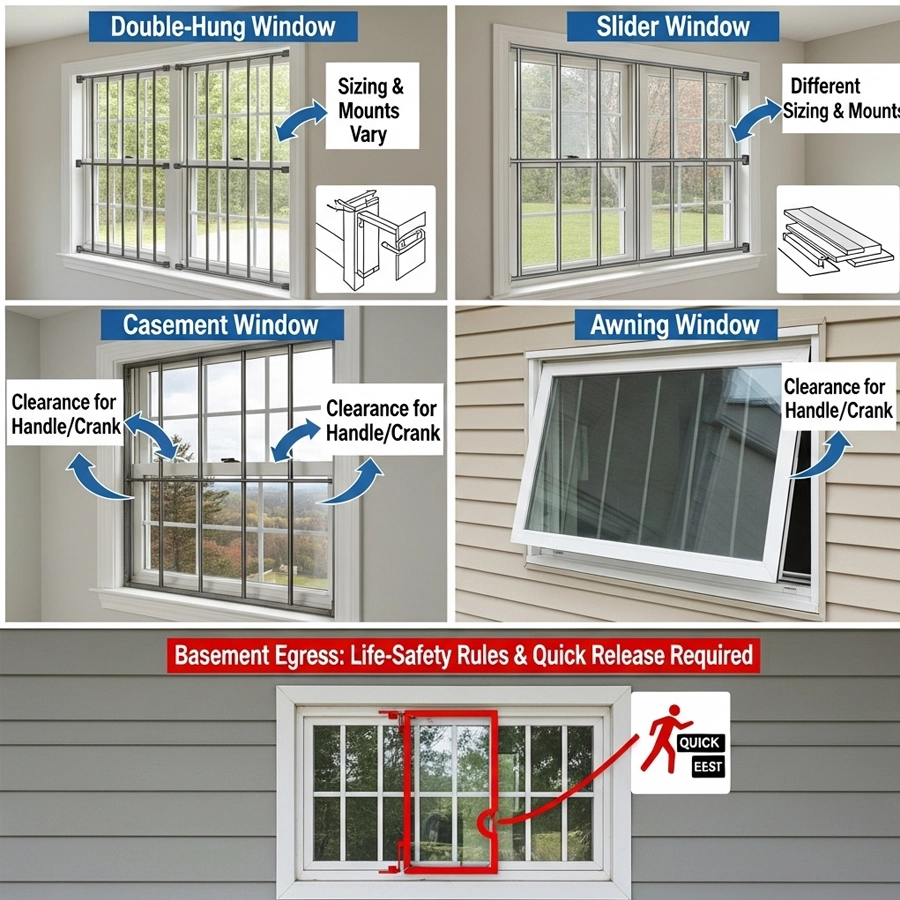
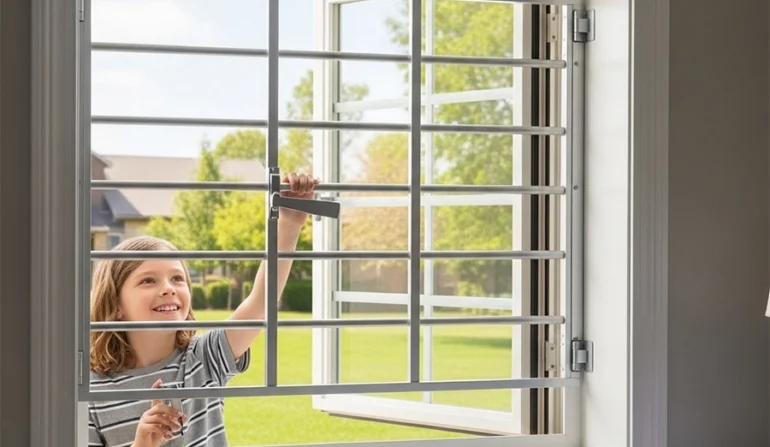
Before you buy window bars, you need to know what kind of window you’re working with—and how that affects sizing, mounts, and egress. Double-hung and single-hung behave differently from sliders; casement and awning windows introduce handle and crank clearances; basement egress adds life-safety rules and a quick-release requirement in many jurisdictions. This guide translates window types into practical choices for adjustable, modular window bars, so you can specify the right telescopic height, plan modules for width, and decide between frame-mount or wall-mount hardware.
Double-hung / Single-hung: Two stacked sashes (both move on double-hung; top is fixed on single-hung).
Horizontal slider: One sash slides sideways; wide spans are common.
Casement: Side-hinged; opens outward via a crank handle.
Awning: Top-hinged; opens outward from the bottom using a crank.
Hopper: Bottom-hinged; opens inward (common in basements/bathrooms).
Picture / Fixed: Does not open; large clear pane.
Bay / Bow / Grouped panes: Multiple windows set in a projection or series.
Jalousie / Louvered (less common): Multiple glass slats open like blinds.
Usually standard widths and mid-range heights.
Interior hardware is low-profile; blinds are the most frequent obstruction.
Bedrooms frequently use these—so egress may apply.
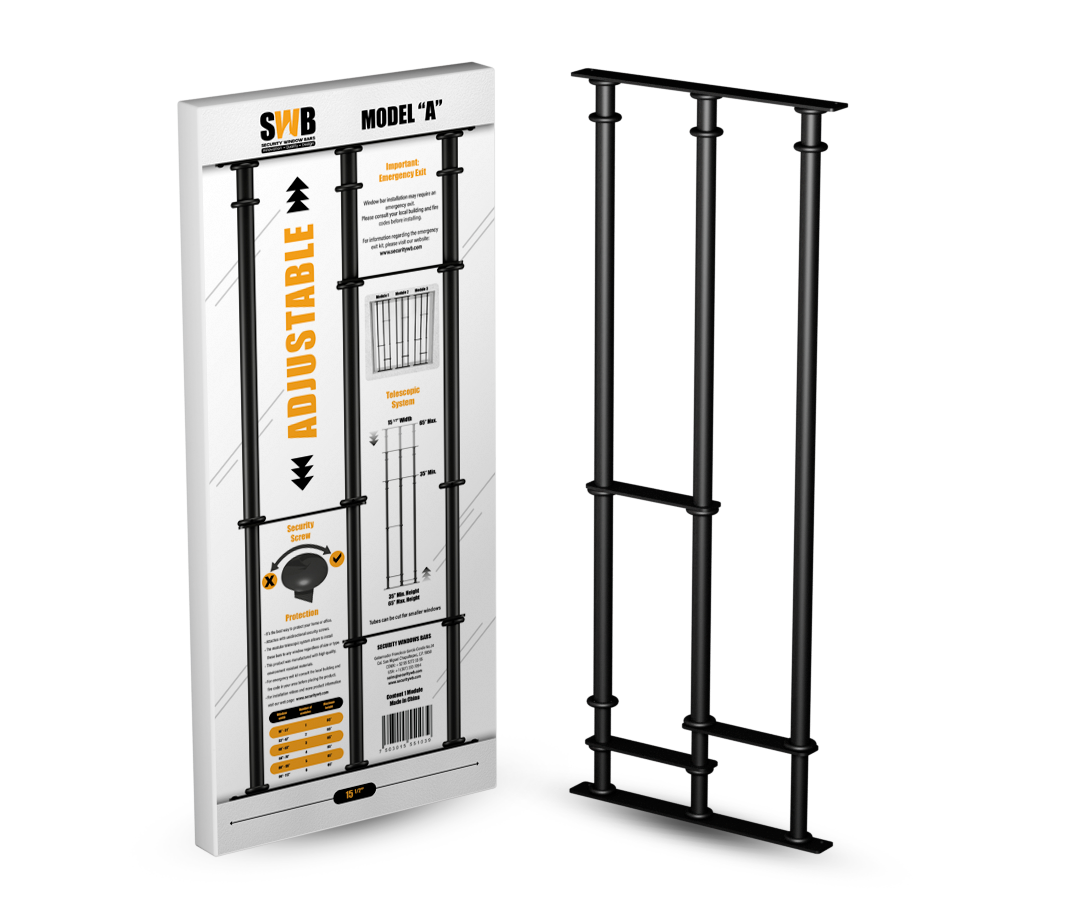
Model A for most openings (supports frame or wall-mount).
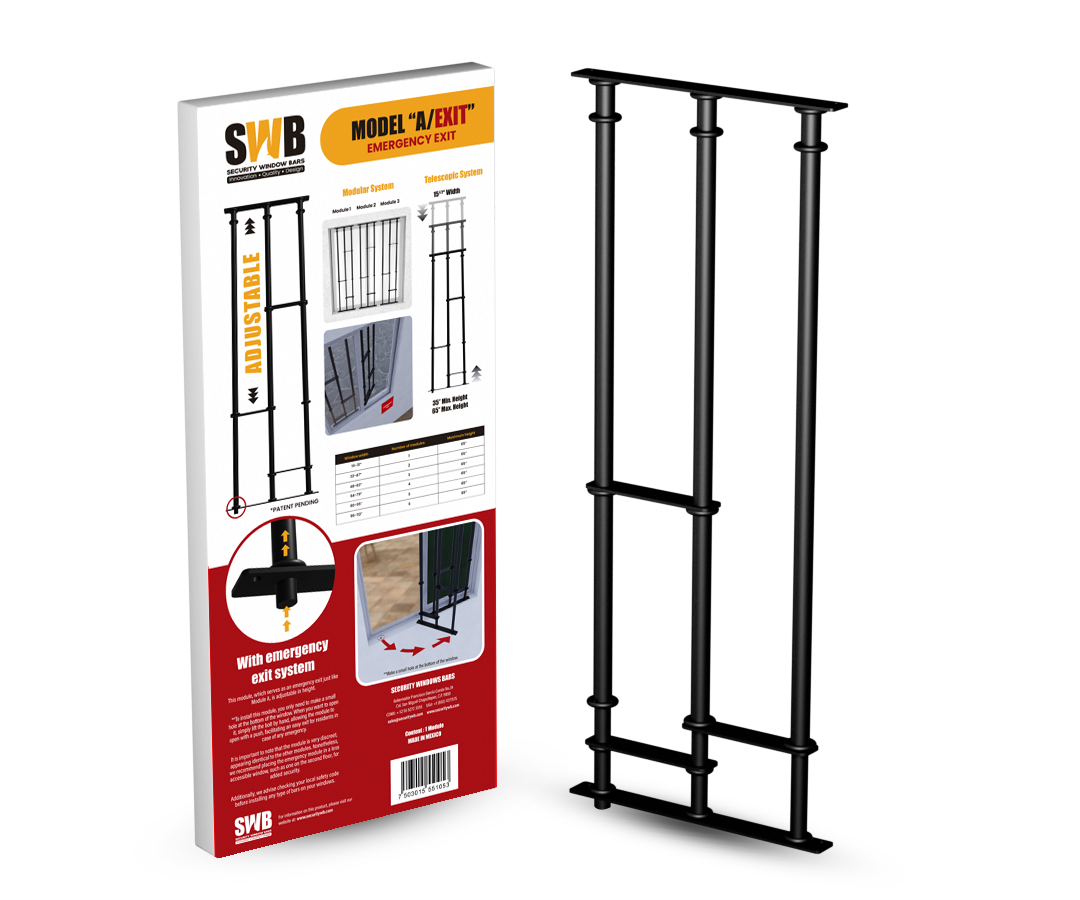
Emergency-Exit if the opening is a designated egress window.
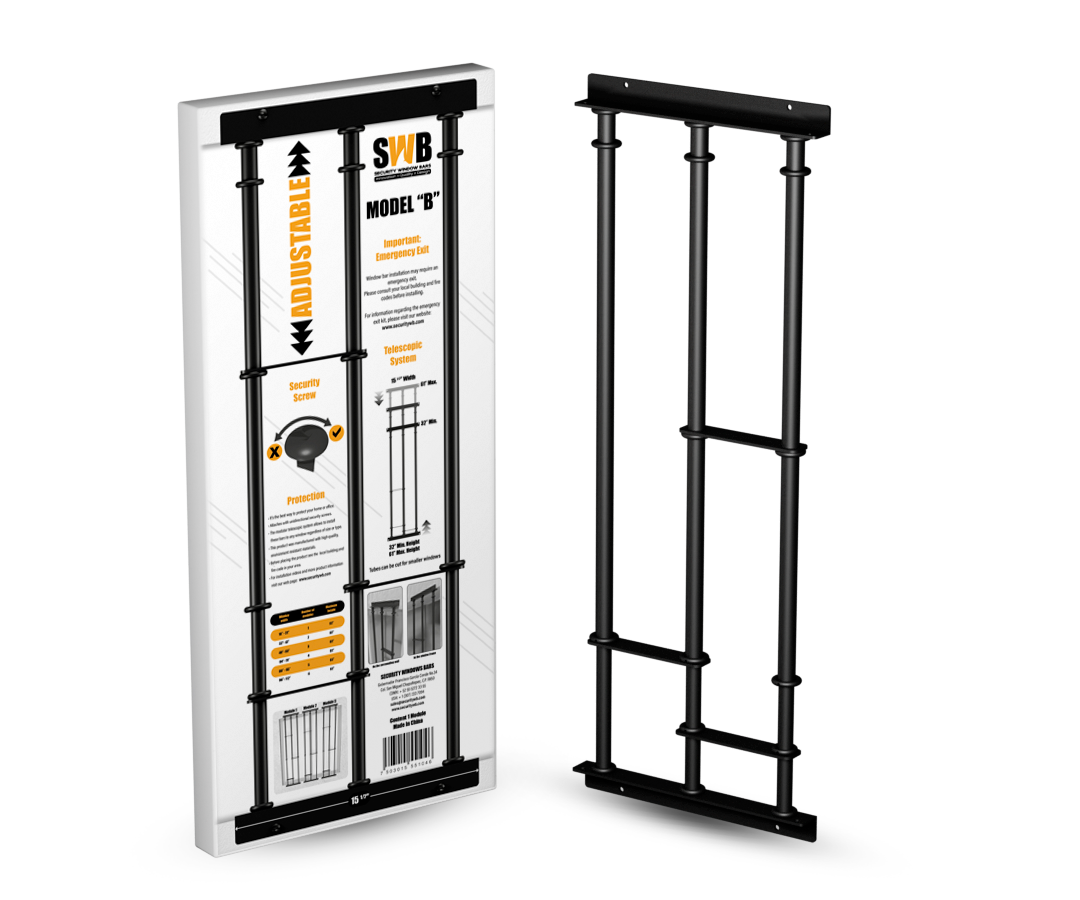
Model B if the frame is out-of-square or you prefer wall-mount into masonry.
Height: common bands fall within mid-range telescopic settings.
Width: Core for narrow, Core + 1 module for wider units; center the assembly.
Interior, frame-mount gives a clean look when jambs are solid.
Exterior, wall-mount for brick/block façades or if you want street-side deterrence.
Installing fixed bars on a bedroom window that serves as egress.
Forgetting blind clearance; add small bumpers if needed.
Over-extending telescopic height instead of selecting the right range.
Wide openings; two- or three-panel sliders can approach or exceed a single assembly’s max span.
Handles can project into the opening; blinds are common.
Model B favored for wall-mount alignment over long spans (brick/block/stucco).
Model A works well for frame-mount when jambs are true.
Emergency-Exit where sliders serve as egress (basements, certain bedrooms).
48–60″ W: Core + 1 module
60–72″ W: Core + 1–2 modules
72–79″ W: Core + 2–3 modules (typical max for one assembly)
Wider than ~79″ → Use two adjacent assemblies or contact us for a layout.
Wall-mount keeps long runs straight and level on masonry.
Interior simplifies quick-release access; exterior increases visual deterrence.
Two-panel slider, 72″ × 48″: Wall-mount Model B, Core + 2 modules; consider Emergency-Exit if egress.
Three-panel slider, 79″ × 54″: Core + 3 modules (max) or split into two assemblies.
A crank handle and sash swing outward; interior bars must not interfere with handle operation.
Exterior bars require clearance so the sash can still open—often a non-starter unless you rarely operate the window.
If you use the casement: prioritize interior mounting with clearance for the crank.
Model A (frame or wall-mount) is a strong default; Model B when wall-mounting helps standoff/straightness.
Emergency-Exit if casement serves as egress; confirm the swing path is clear.
Choose frame-mount if the jamb is strong; add a slight standoff if the handle protrudes.
For masonry or to create more clearance, wall-mount with careful spacing and test crank motion after install.
Blocking the crank path with interior bars.
Exterior bars that prevent the sash from opening (unless you accept non-operable status).
Egress windows without a quick-release.
Awning: opens outward from the bottom—interior bars rarely obstruct hardware, but exterior bars can limit opening angle.
Hopper: opens inward from the top—interior bars must be placed to avoid the inward swing; many basements use hopper windows for egress/ventilation.
Awning: interior frame-mount (Model A) to keep a clean look; wall-mount (Model B) if masonry or uneven frames.
Hopper: interior wall-mount (Model B) often helps keep clearance for the inward swing.
Emergency-Exit for any opening designated as egress; confirm full, unobstructed opening after release.
For hopper egress: pick hinge side on the bar assembly to avoid collisions, and test the open-sash path after release.
For awning exteriors: ensure awning arms don’t hit the bars; interior installs usually win.
Basements bring moisture, masonry, and egress requirements in many jurisdictions.
Wells and grates can limit the swing path for quick-release systems.
Emergency-Exit model for egress-designated basement windows.
Wall-mount (Model B) to anchor into brick/block and keep long spans straight.
Interior placement simplifies release access; maintain a slight standoff from walls that can sweat.
Keep weep paths open; avoid sealing bars tight to damp masonry.
Wipe down hardware periodically; touch up chips quickly in humid spaces.
Basement egress, 35″ × 52″: Emergency-Exit, Core + 1 module, interior frame-mount if jambs are solid; test release + open sash fully.
Basement hopper, 32″ × 36″: Model B interior wall-mount for inward swing clearance; Core (maybe + small module) centered.
Large glass does not open, making them ideal for fixed security bars.
Symmetry and clean centering matter visually.
Model A for most; Model B when wall-mounting to masonry is cleaner.
Interior or exterior both viable—exterior increases deterrence.
Use Core + modules to center the assembly and align with mullions.
If the span approaches ~79″, consider two assemblies for perfect symmetry.
Multiple frames at angles; varying depths and reveals.
Long combined spans benefit from split layouts.
Two-assembly strategy: Left and right assemblies split at a mullion for symmetry.
Wall-mount (Model B) often keeps long lines straight across varying depths.
Add modules to value aesthetics (equal module counts per side when possible).
Verify you’re anchoring into structure, not just trim or thin veneer.
Align visually with mullions; center each assembly in its section.
If any sash is egress, use Emergency-Exit for that bay, and test the swing path.
Multiple glass slats open like blinds, often in older or tropical homes.
Security is inherently weaker; many owners keep them permanently closed or replace them.
Interior mounting to avoid exterior exposure of delicate slats.
Wall-mount (Model B) can create the standoff needed to clear the crank/lever hardware.
Consider alternatives (security screens) if you want airflow with a less “barred” look; otherwise, treat the window as non-operable.
| Substrate / Condition | Preferred Mount | Notes |
|---|---|---|
Solid wood jambs (interior) |
Frame-mount |
Pilot drill; use structural screws; verify plumb/square |
Brick/block/stucco (exterior or interior) |
Wall-mount (Model B) |
Hammer-drill; proper embed depth; clear dust; slight standoff for drainage |
Out-of-square frames |
Wall-mount (Model B) |
Keeps long spans straight; easier alignment |
Drywall over studs (interior) |
Wall-mount to studs |
Never into drywall alone; find studs and use structural fasteners |
Vinyl/aluminum frames |
Wall-mount recommended |
Avoid relying on thin frame material; anchor to surrounding structure |
More detail: Wall-Mount Guide • DIY Installation
Is this window a required emergency exit (bedroom/basement in your jurisdiction)?
Yes → Choose Emergency-Exit.
No → Standard models may be appropriate.
Pick hinge side for the release so the assembly swings into clear space.
Plan the swing path: move blinds, cords, or furniture that would block the release or swing.
After install: operate the release, open the sash fully, and re-latch. Re-test monthly.
| Window Type | Typical Height Band | Typical Width Plan | Recommended SWB |
|---|---|---|---|
Double-hung / Single-hung |
Mid telescopic |
Core or Core + 1 module |
Model A (egress → Emergency-Exit) |
Horizontal slider (2-panel) |
Mid telescopic |
Core + 1–2 modules |
Model B wall-mount (egress → Emergency-Exit) |
Horizontal slider (3-panel) |
Mid/Tall telescopic |
Core + 2–3 modules or split |
Model B or dual assemblies |
Casement (crank-out) |
Mid telescopic |
Core (add module if centering) |
Model A/B interior; egress → Emergency-Exit |
Awning (top-hinged) |
Mid telescopic |
Core (add if centering) |
Model A/B interior preferred |
Hopper (inward) |
Short/Mid telescopic |
Core (add if centering) |
Model B interior wall-mount; egress → Emergency-Exit |
Picture/Fixed |
Any |
Core + modules (symmetry) |
Model A/B; exterior viable |
Bay/Bow/Grouped |
Any |
Two assemblies for symmetry |
Model B wall-mount recommended |
Jalousie/Louver |
Short/Mid |
Core (add if centering) |
Model B interior; consider alternatives |
Always use the smallest measured width/height, choose a telescopic range that isn’t maxed out, and add modules to reach width.
Double-hung / Single-hung
Confirm egress status; Emergency-Exit if needed
Check blinds clearance; add bumpers if required
Center telescopic mechanism in its range
Sliders
Choose wall-mount for long spans (masonry)
Plan modules: 1–3 depending on width
For > ~79″, split into two assemblies
Casement / Awning / Hopper
Verify handle/crank clearance (interior)
For hopper, ensure inward swing clears the bars
If egress, test release + sash opening sequence
Basements
Moisture check; maintain standoff
Wall-mount into masonry; proper embed depth
Egress wells: confirm swing path clearance
Picture / Bay / Grouped
Symmetry plan; align with mullions
Verify structure behind trim before anchoring
Consider two assemblies for wide/grouped panes
Choosing window bars by window type is straightforward when you follow the sequence: confirm egress, measure using smallest values, pick a telescopic height that isn’t maxed out, add modules for width, and choose frame-mount vs wall-mount based on your structure. For sliders and grouped panes, plan spans explicitly; for casement/awning/hopper, plan handle and swing clearances. With SWB’s modular & telescopic design, you can standardize across mixed window types and finish installs faster—without custom ironwork.
EMAIL ADDRESS: sales@securitywb.com
SITE: www.securitywb.com
PHONE:
CDMX: +52 (55) 5272 3355 USA: +1 (650) 4371 575

COOKIES POLICY
Security Window Bars LLC ("SWB") uses cookies and similar technologies to improve your browsing experience and enhance the functionality of our website www.securitywb.com (the “Website”). This Cookies Policy explains what cookies are, how we use them, and how you can manage your cookie preferences.
By using our Website, you agree to our use of cookies as described in this policy.
Last Updated: 01/01/25