Installation & User Guide for SWB Bars
Step‑by‑Step Setup in Minutes
Welcome to the Installation & User Guides section of Security Window Bars (SWB). Here, you’ll find detailed instructions, video tutorials, and practical tips to efficiently and safely install and maintain our security bars in your home or business.
1. Step-by-Step Installation
Required Materials
Before starting, make sure you have the following tools and materials:
• Electric drill
• Security screws (included in the package)
• Bubble level
• Measuring tape
• Pencil for marking
• Screwdriver
General Installation Instructions
1. Measure the installation area – Use a measuring tape to determine the exact size of the window where the bars will be installed.
2. Mark the drill points – Place the security bars in the desired position and use a pencil to mark the drill points.
3. Drill guide holes – Using the drill, create holes at the marked points.
4. Secure the bars – Position the bars and fasten them with the security screws.
5. Check alignment – Use the bubble level to ensure the bars are properly aligned and securely attached.
6. Perform a security test – Apply pressure on the bars to verify their resistance.
Additional Installation Steps:
✔ Install the release mechanism
Place the emergency opening system on an easily accessible side of the bars.
✔ Adjust security bolts
Ensure the release system functions correctly.
✔ Test the emergency opening
Make sure all family members know how to use it.
2. Installing Quick-Release Security Bars
For those who want security without compromising emergency evacuation, our quick-release bars provide the ideal solution.
3. Maintenance & Care
To ensure the durability and functionality of SWB security bars, follow these maintenance tips:
🧼 Regular Cleaning
Use a damp cloth to remove dust and dirt buildup.
🔍 Periodic Inspection
Check screws and anchors every six months to ensure they are securely fastened.
🛡 Rust Protection
If you live in a high-humidity area, apply a rust protector once a year.
🚪 Quick-Release Mechanism Check
Test the emergency release every three months to ensure smooth operation.
Do I need a professional to install the security bars?
Not necessarily. Our bars are designed for easy installation with basic tools. However, you can hire a professional if preferred.
Can the bars be installed on sliding windows?
Yes, our adjustable bars are compatible with various window types, including sliding windows.
Do the bars affect ventilation and natural light?
No. They are designed to provide maximum security without obstructing airflow or natural lighting.
How can I remove the bars if I need to relocate them?
Simply remove the security screws and follow the same installation process in the new location.
4. Frequently Asked Questions About Installation
5. Videos & Additional Resources
For an even easier installation, check out our step-by-step video tutorials demonstrating the entire process.
If you have any additional questions, feel free to contact us.
🔒 Your safety is our priority! 🔒
Security Bar for Window AC: The Complete 2025 Guide
What a Window AC Security Bar Really Does (and Doesn’t)
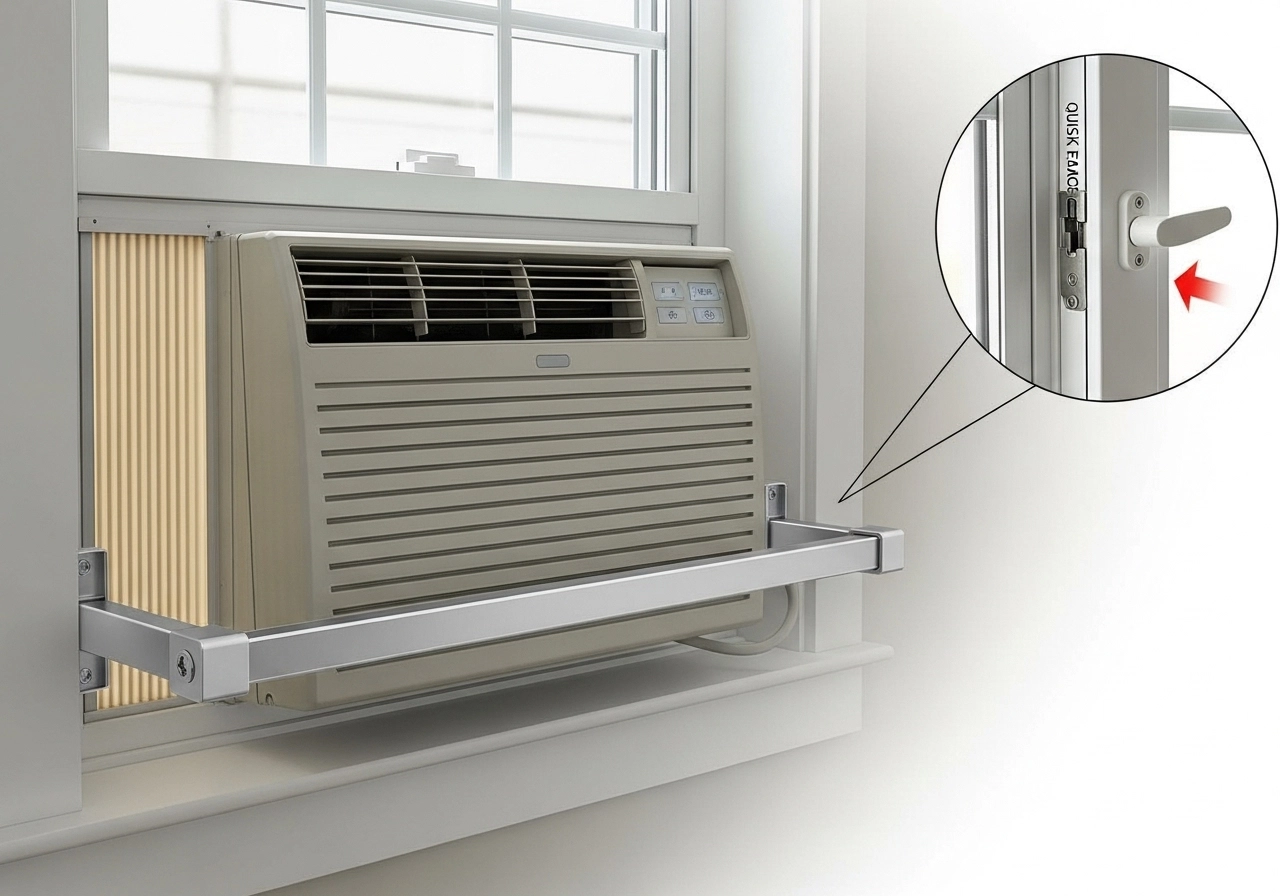
A good AC window bar gives you a physical stop so the sash can’t be forced upward or outward to yank the unit free, and it stiffens the installation so the AC can’t be wiggled out by leverage. What it doesn’t do is block airflow or lock you in. The modern approach is a bar that secures the opening while coexisting with quick-release hardware on at least one window in each sleeping area—so you preserve emergency egress.
“Air Conditioner for Windows with Security Bars” with anchor window AC security tips. securitywb.com
The three jobs of an AC security bar
- Anti-lift: prevents the upper sash from being shoved up to free the unit.
- Anti-slide: limits lateral movement so the AC can’t be rocked out.
- Anti-tamper: hides or shields screws and brackets from casual tools.
Safety First: Egress, Children, and Fire-Safety Considerations
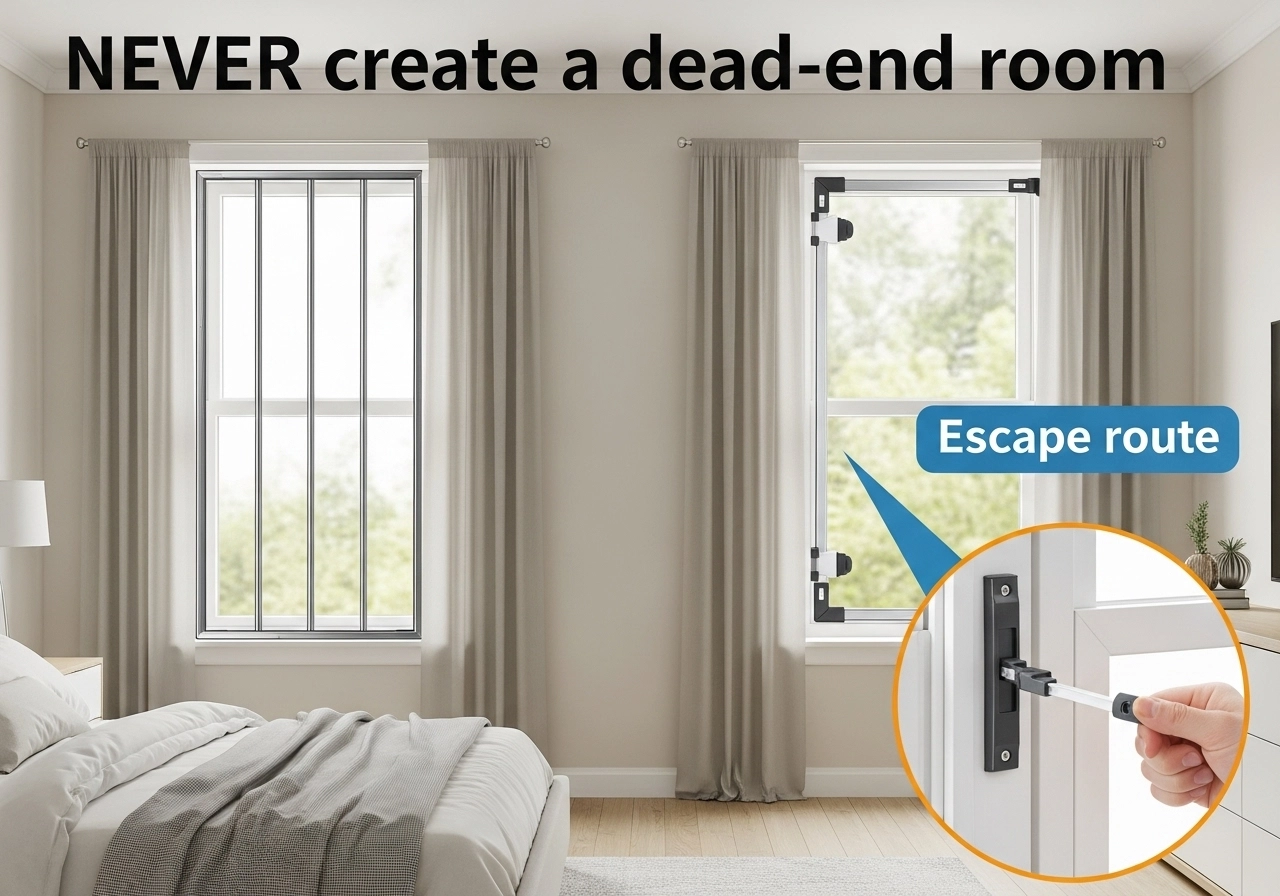
Your bar should never create a dead-end room. The common-sense rule: in bedrooms, at least one window must open fast from the inside. Pair any permanent bar with a quick-release model elsewhere, or choose an AC bar that secures the sash while leaving a separate window free as your escape route. (You can also add quick-release hardware to select bars for compliance and peace of mind.)
“Top Rated Window Bars for Residential Use: 2025” and “Quick Release Window Security Bars”. securitywb.com
Child safety: a bar can keep curious hands from pushing on the AC or widening the opening. Choose styles with tight spacing and rounded edges.
Measuring Like a Pro (2-Minute Template)
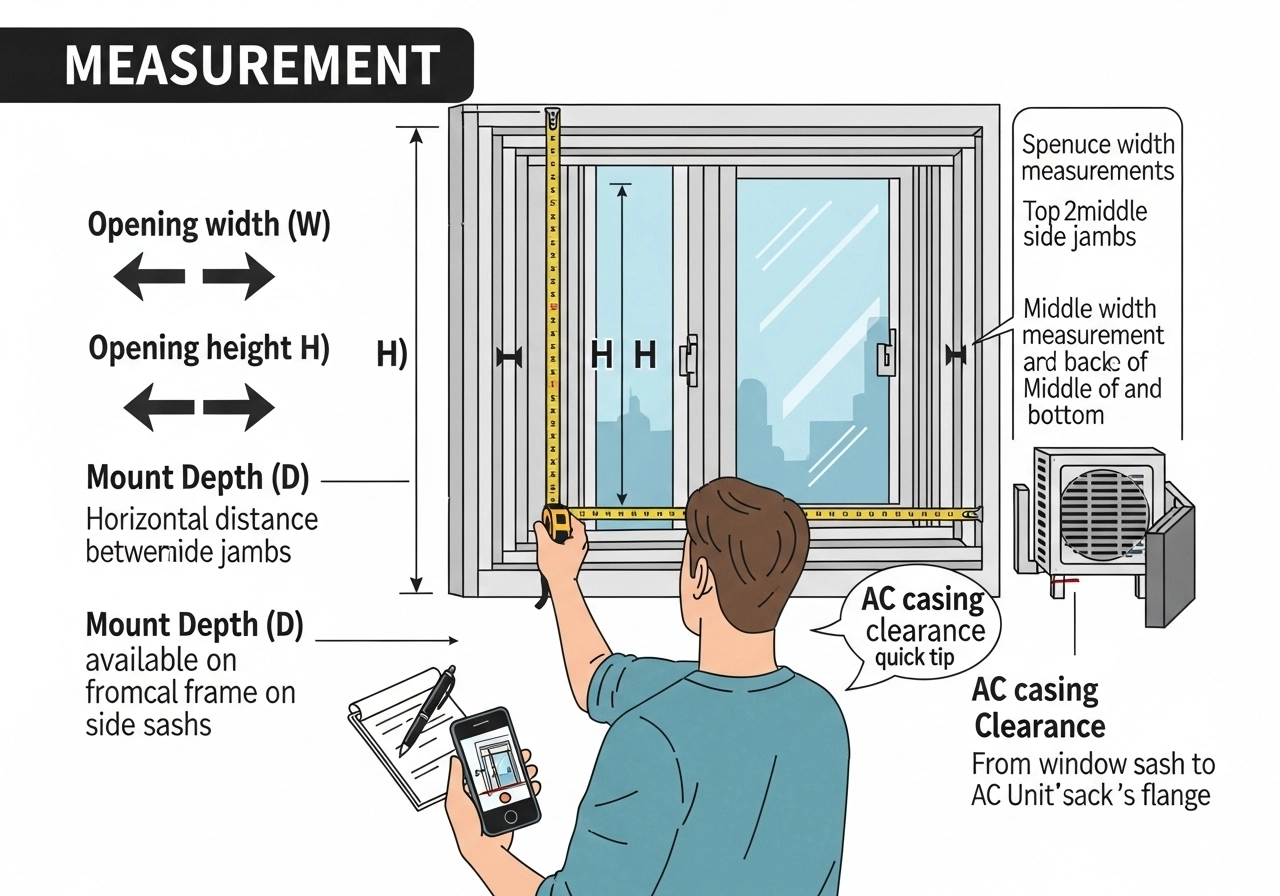
Tools: tape measure, notepad, and your phone camera.
- Opening width (W): measure the clear distance between the side jambs where the bar will sit.
- Opening height (H): measure the max travel of the sash in the bar’s position.
- Mount depth (D): if you’re using frame- or wall-mount bars, note available depth for brackets.
- AC casing clearance: measure from sash to the back of the AC’s flange—your bar shouldn’t press the unit; it should block the sash.
- Repeat: measure top, middle, and bottom—old frames aren’t perfectly square.
Quick tip: take a short video of the opening while narrating measurements. When you order adjustable/telescopic bars, that video prevents mis-orders and speeds support.
Picking the Right Bar: Fixed vs Quick-Release vs No-Drill
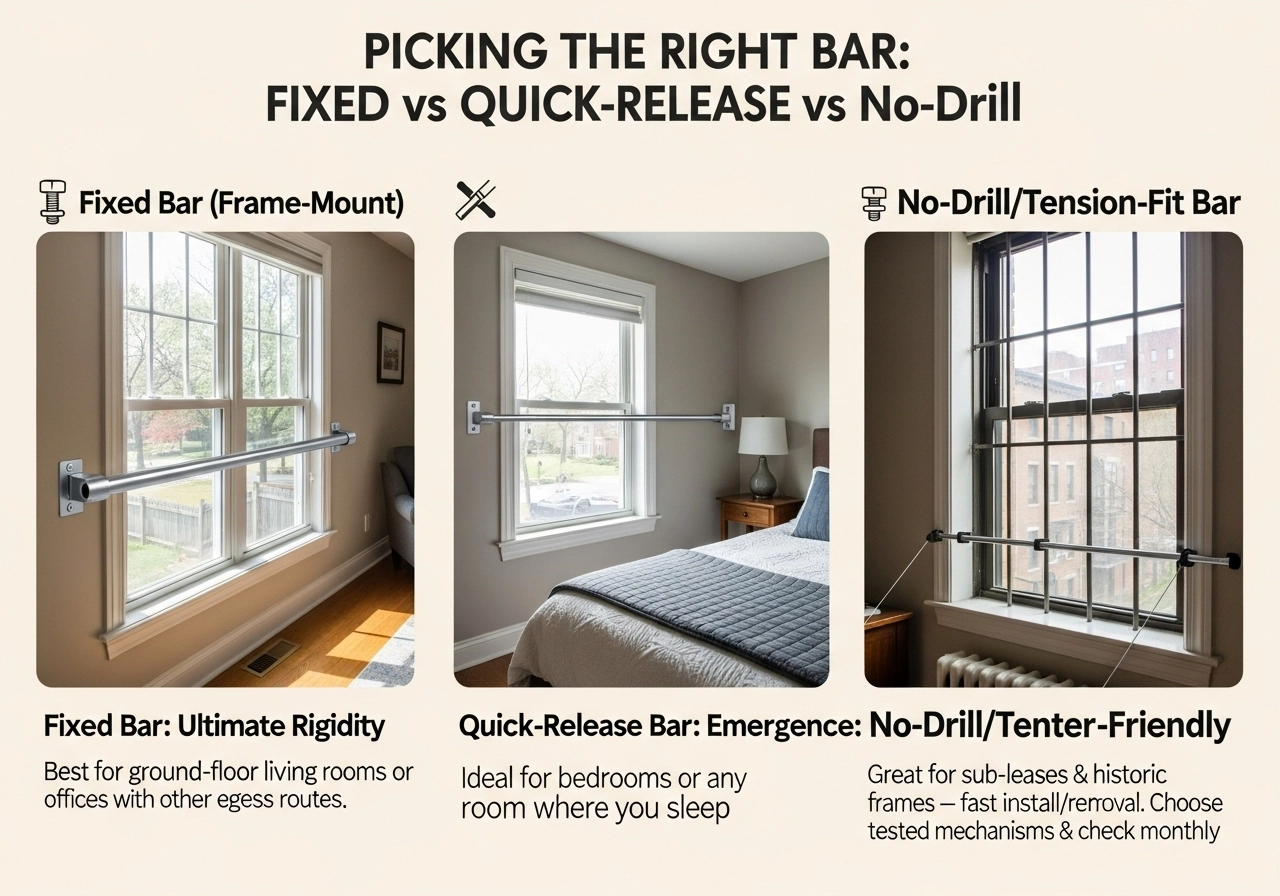
- Fixed bar (frame-mount): ultimate rigidity. Best for ground-floor living rooms or home offices that have other egress routes.
- Quick-release bar: built-in emergency release (push/pull/rotate) from inside. Pair with bedrooms or any room where you sleep.
- No-drill/tension-fit: renter-friendly; uses compression or clamps. Great for sub-leases and historic frames—fast to install/remove, but choose tested tension mechanisms and check monthly.
Anchor patented telescopic bars. securitywb.com
“Integrating Window Bars with Home Alarm Systems”. securitywb.com
Materials and Finishes (Rust, Condensation, and Coastal Air)
- Steel (powder-coated): strongest value; choose high-grade coatings for humid rooms.
- Aluminum: lighter; watch stiffness on wide spans.
- Stainless: premium, corrosion-resistant, ideal near the coast.
- Finish: matte hides fingerprints, gloss is easier to wipe. Light colors reflect heat; dark finishes blend with frames.
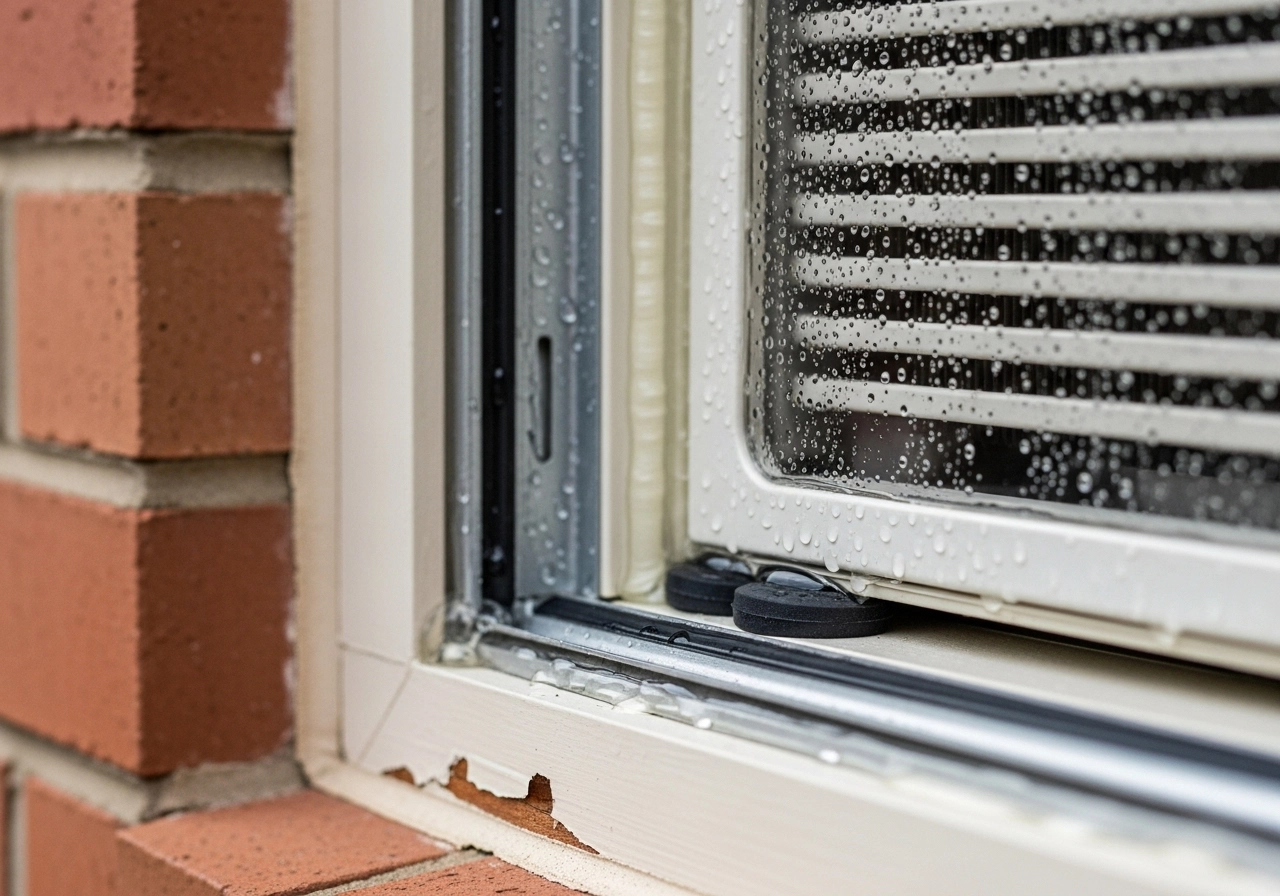
Condensation reality check: Window ACs create micro-climates. Protect paint with a thin bead of sealant where brackets meet the frame, and consider anti-vibration pads so resonances don’t loosen screws over time.
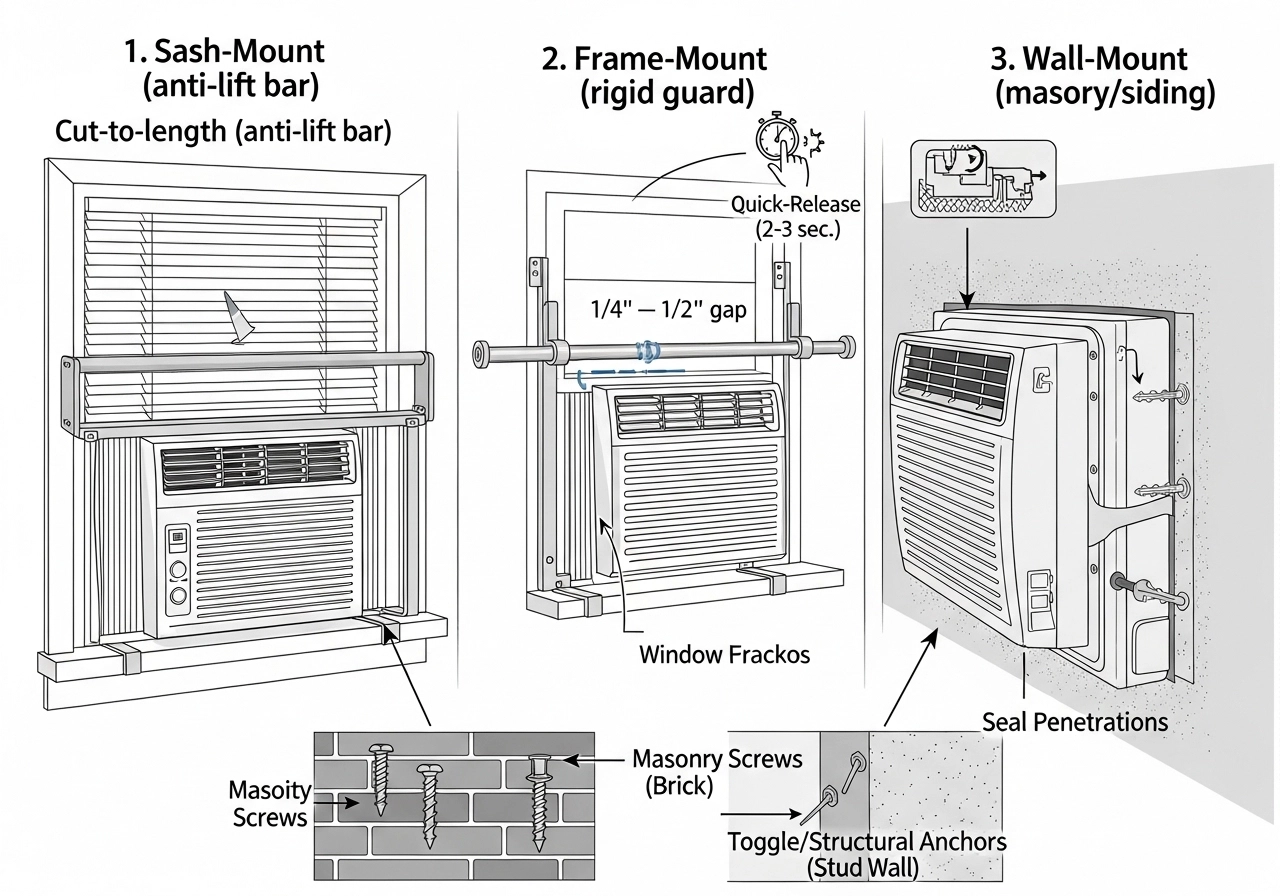
Installation Paths (Overview)
“Exterior Window Security Bars” securitywb.com
Sash-Mount (anti-lift bar):
- Cut to length (or expand a telescopic unit) so the bar blocks upward sash travel.
- Seat gently against the sash; the bar is a block, not a jack.
- Confirm AC tilt (slight outward pitch for drainage).
Frame-Mount (rigid guard):
- L-brackets to the side jambs; telescopic center spans the opening.
- Keep ¼″—½″ away from the AC’s casing to avoid rattles.
- If using quick-release, test with eyes closed (can you open it in 2–3 seconds?).
Wall-Mount (masonry/siding):
- Use appropriate anchors (masonry screws in brick, toggle or structural anchors in stud walls).
- Seal penetrations against water ingress.
Weatherproofing and Vibration Control
- Gasket tape between metal and painted wood reduces squeaks.
- Threadlocker (blue) on screws > No se aflojan con vibración.
- Felt pads en puntos de contacto con el sash.
- Revisa a las 48 horas y al mes 1.
Smart-Home Integration (Quick Primer)
Contact sensors in windows usually read open/closed by magnet proximity. When you add a bar near the sash line, mount the sensor slightly offset and re-calibrate the gap (≈⅛″). Test siren triggers with the bar in place and the AC running (vibrations cambian el gap). Para detalles, enlaza a tu guía de integración. securitywb.com
FAQs
Will a security bar block my AC’s airflow?
No. An AC bar should block the sash, not the grille. Keep at least ¼″ clearance from the AC casing and never cover vents.
I rent. Can I secure my window AC without drilling?
Yes. Tension-fit or clamp-in styles are designed for rentals. Re-check tension monthly and after heat waves.
Do I need a quick-release in bedrooms?
Best practice is to ensure at least one quick-release window in any sleeping area. If your AC is in the only window, choose a bar with integrated release.
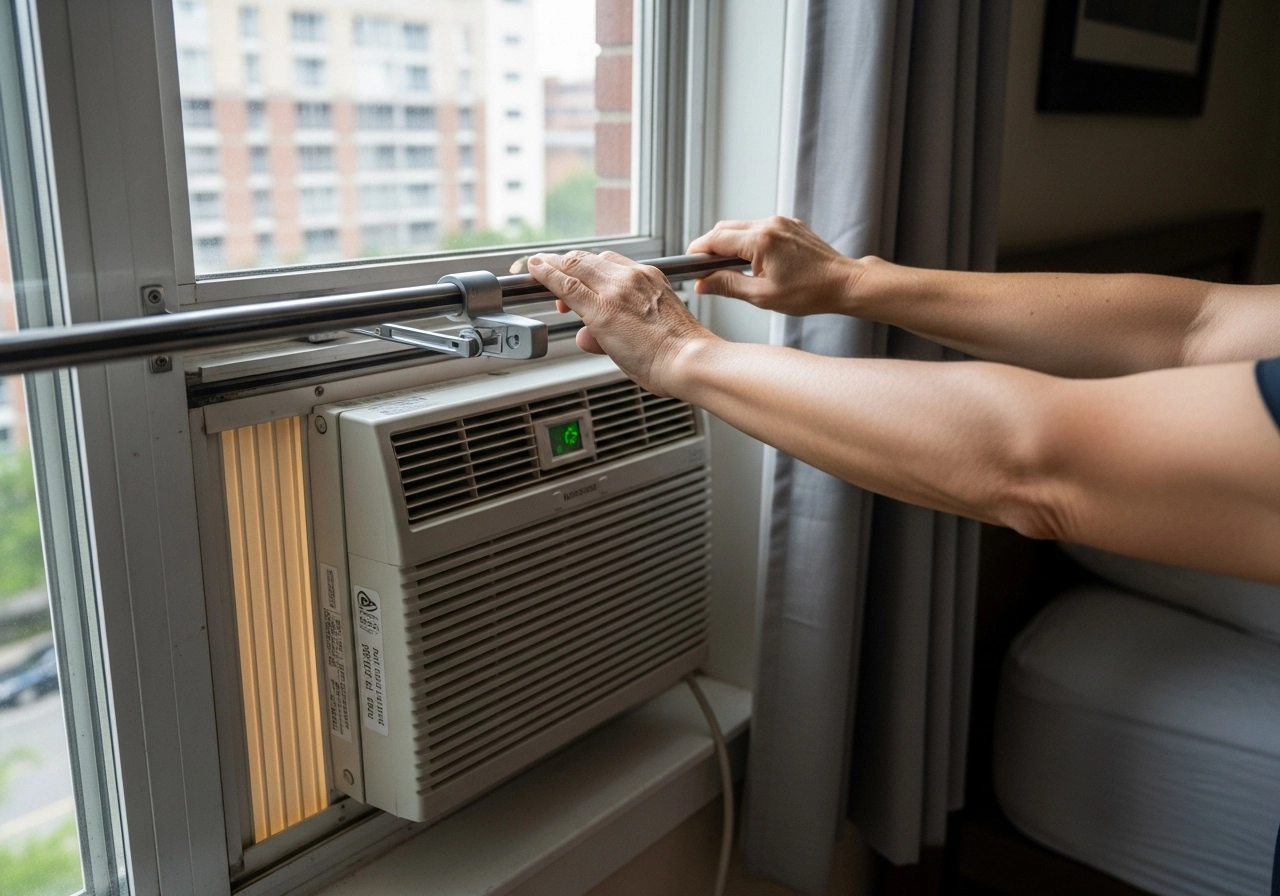
Step-by-Step Installation: Security Bar for Window AC (Sash-Mount, Anti-Lift)
Tools & Supplies

- Tape measure
- Pencil or painter’s tape for marks
- Drill/driver (if your model uses brackets)
- Appropriate screws/anchors (per manufacturer)
- Bubble level
- Foam/felt pads (anti-vibration)
- Blue threadlocker (medium strength)
- Cleaning cloth & isopropyl alcohol
Tip: Take quick photos of your measurements and corner details. If you ever need support or a replacement part, those photos are gold.
1) Dry fit and mark
- With the AC already installed and pitched slightly outward (for drainage), set the security bar in place above the AC flange, touching the moving sash (not the AC body).
- Use a level to check the bar is straight. Mark bracket positions with pencil or painter’s tape.
2) Confirm clearances
- Make sure the bar does not press on the AC grille or block any vents.
- Aim for ¼″–½″ of air gap from the AC casing to avoid rattles.
3) Pre-position pads
- Wipe the contact areas with alcohol.
- Add thin foam/felt pads where metal will touch painted wood or vinyl to prevent squeaks.
4) Pilot holes (if needed)
- For wood jambs, drill small pilot holes to prevent splitting.
- For masonry, use appropriate anchors. Keep holes aligned so the bar sits square.
5) Secure brackets
- Fasten left/right brackets just snug. Don’t fully tighten yet.
- Add a tiny drop of blue threadlocker to each screw so vibration won’t back them out.
6) Lock the bar in place
- Extend/cut the bar to span the opening and seat it into both brackets.
- The bar should block upward travel of the sash without jacking force. It’s a stop, not a clamp.
7) Final tighten
- Re-check level and AC tilt. Tighten bracket screws.
- If your bar includes a tamper cover, install it now.
8) Functional test (2 minutes)
- Try to push the sash up with both hands (from inside). It shouldn’t move.
- Gently pull/push the AC by its side flanges. The bar should not rattle.
9) Safety test
- Confirm that your designated egress window (in the same room) opens freely.
- If this is a bedroom and this is the only window, use a bar with quick-release hardware.
10) Maintenance reminder
- Set phone reminders for 48 hours (first re-check) and 1 month (vibration retighten).
No-Drill / Tension-Fit Option (Renter-Friendly)
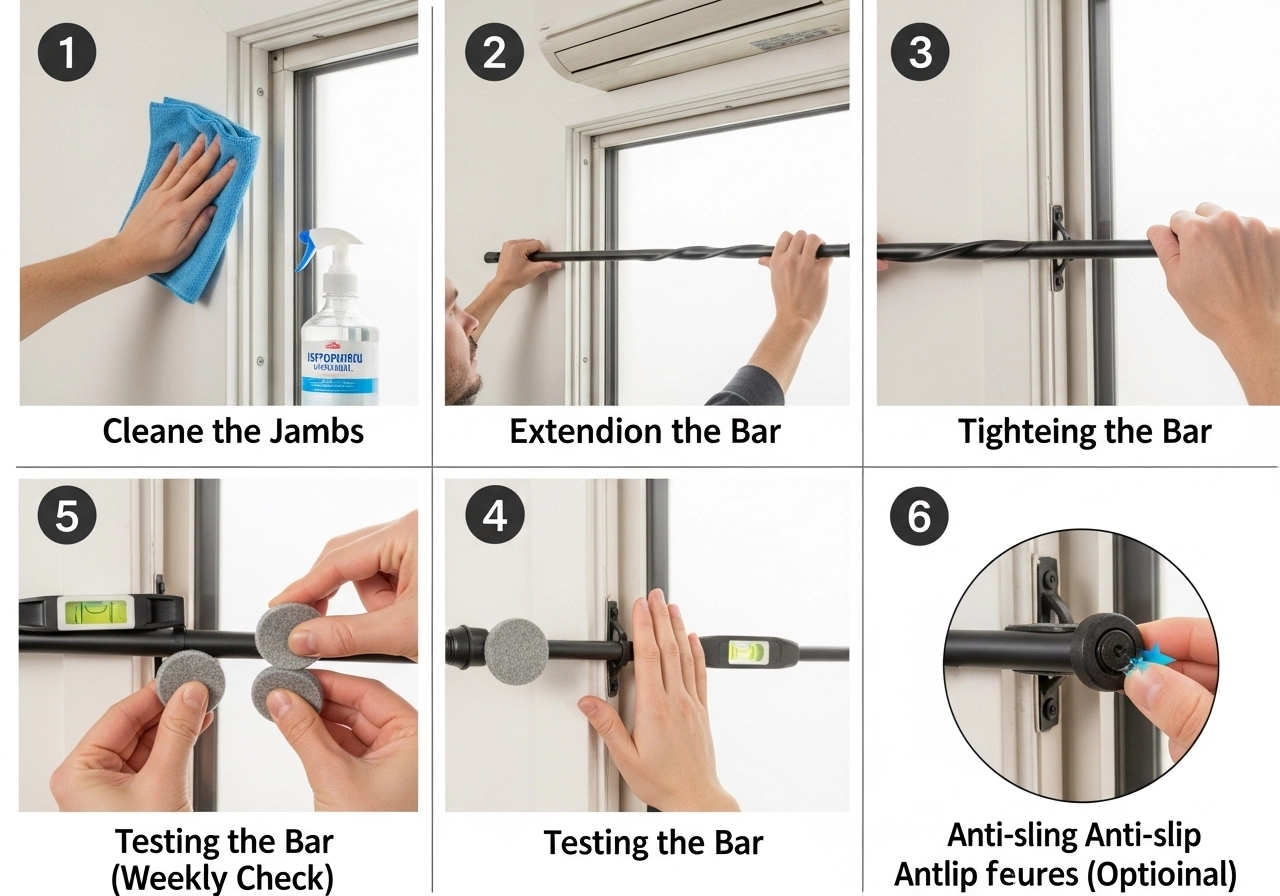
Good for: Rentals, historic frames, or when you cannot use screws.
Steps
- Clean and dry the jambs. Dust reduces friction and holding power.
- Extend the bar between side jambs at the chosen height above the AC.
- Tighten to firm compression—enough to resist movement, not enough to bow the frame.
- Add felt pads at ends to protect paint; recheck level.
- Test weekly during heat waves (wood can expand/contract and loosen compression).
- If your model includes anti-slip end caps or micro-spikes, engage them per instructions (they should grip, not gouge).
Quick-Release Bar Setup & Safety Drill
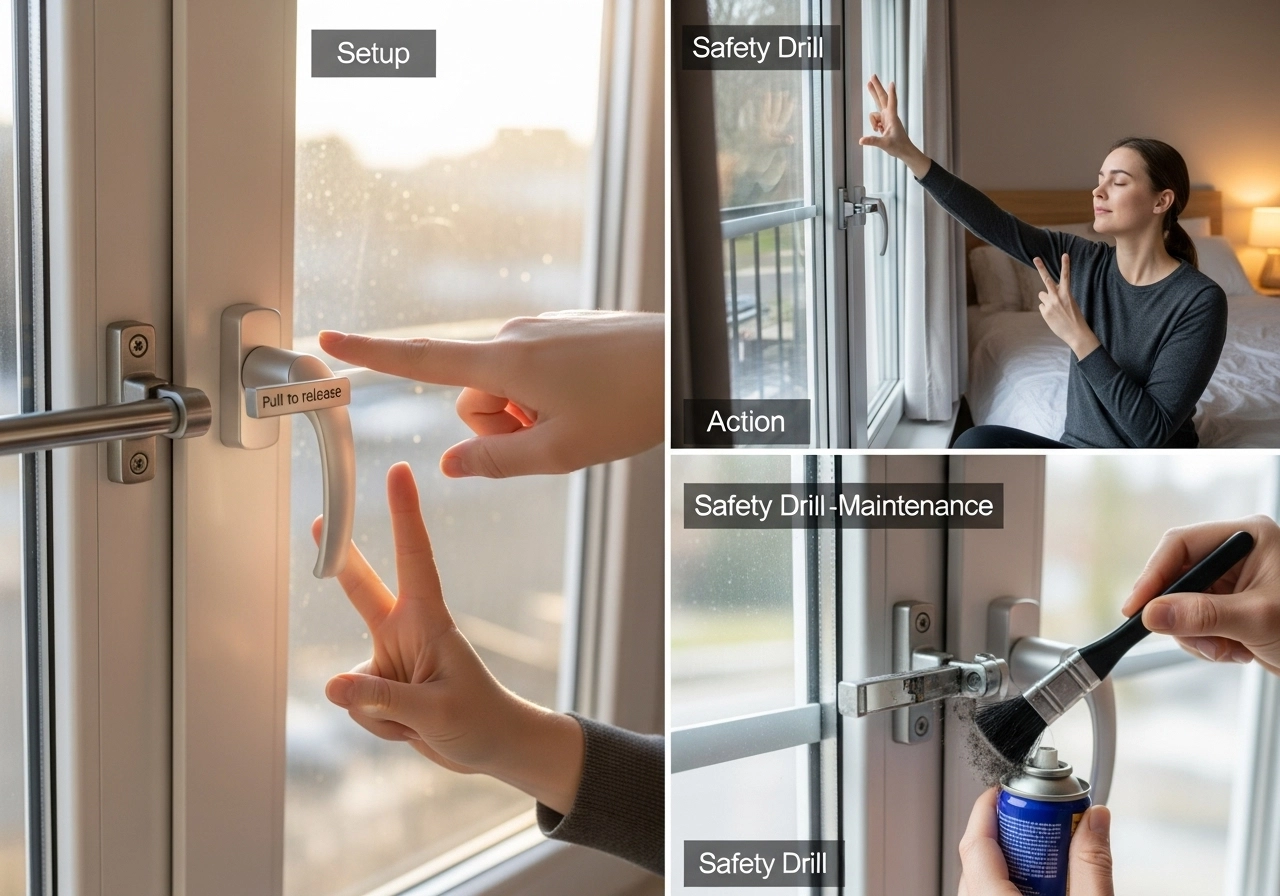
Why it matters: In sleeping areas, you should be able to open a window fast from the inside in an emergency.
Setup
- Install per the sash-mount steps above.
- Mount the release handle where it’s intuitive (dominant-hand side).
- Add a small “Pull to release” label or sticker.
30-Second Safety Drill
- Close your eyes, count to 3, then reach and release.
- Repeat monthly and show every household member.
- If motion feels stiff, clean and lightly lubricate the release mechanism.
Compatibility: Screens, Blinds, Shades & Storm Windows
- Screens: Many AC installs remove or cut the screen. If you keep it, ensure the bar line clears the screen frame.
- Blinds/shades: Mount the bar slightly forward or use low-profile brackets so slats don’t hit the bar.
- Interior shutters: Choose a shorter profile bar; you may need spacer blocks behind shutter hinges.
- Storm windows/exterior grilles: Confirm the AC’s drainage tilt and bar position don’t pinch the storm window track. Provide ⅛″–¼″ breathing room.
Common Mistakes (and Fast Fixes)
1- Pressing the bar into the AC body
- Fix: Re-seat to touch the sash only; add ¼″ air gap to the AC casing.
2- Over-tightening a tension bar
- Fix: Back off until the frame isn’t bowing; add felt pads for grip.
3- Skipping threadlocker
- Fix: Add a small drop and re-tighten. Prevents vibration loosening.
4- Blocking drainage tilt
- Fix: Ensure the AC is pitched slightly outward so condensation exits.
5- Misaligned brackets
- Fix: Loosen, re-level, and re-seat. Use painter’s tape to mark square positions first.
6- No egress plan
- Fix: Use a quick-release bar or keep another window fully operable.
7- Contact sensor false alarms
- Fix: Re-position magnet/sensor slightly; re-calibrate the gap with the bar in place.
8- Paint chipping at end caps
- Fix: Add clear mylar or felt dots under bar ends.
9- Bar rattle at certain fan speeds
- Fix: Add a thin foam strip behind the bar or adjust fan speed slightly.
10- Using interior drywall anchors for exterior loads
- Fix: For masonry or exterior installs, use masonry screws/anchors rated for the substrate.
Cost & Budget: What to Expect
Typical ranges (per opening):
- No-drill/tension bar: $25–$60
- Fixed bar (sash/frame-mount): $40–$120
- Quick-release models: $90–$200+
- Extras: pads ($3–$8), threadlocker ($6–$9), masonry anchors ($5–$15)
Example budget (bedroom window with quick-release):
- Quick-release bar: $129
- Pads + threadlocker: $12
- Anchors/screws: $8
- Estimated total: $149
Pro tip: If you’re protecting two adjacent windows (living room bay), buy in a 2-pack to save shipping and finish-matching headaches.
Maintenance Plan (Keep It Quiet, Solid, and Safe)
48 hours after install
- Re-tighten screws (¼ turn).
- Confirm no grille contact.
- Wipe condensation drips; look for streaks.
Monthly (summer)
- Quick test for sash lift blocking.
- Check tension on no-drill bars.
- Inspect pads; replace if compressed flat.
Seasonal
- Spring: Re-lube quick-release pivots, check for rust/corrosion.
- Fall (post-AC): If removing the bar, clean, dry, and store wrapped in a soft cloth to protect finish.
- Coastal homes: Rinse hardware with fresh water a few times per season; salt accelerates corrosion.
Troubleshooting (Fast Reference)
Symptom: Rattle at medium/high fan
- Cause: Micro-vibration between bar and frame
- Fix: Add felt/foam pads; use threadlocker; re-seat to ensure the bar isn’t touching the AC body.
Symptom: Sash still moves ⅛″–¼″
- Cause: Bar cut short or tension light
- Fix: Re-extend/replace with correct size; tighten compression carefully.
Symptom: Condensation dripping inside
- Cause: AC tilt lost during install
- Fix: Shim AC rear slightly downward; re-check bar clearance.
Symptom: Quick-release feels sticky
- Cause: Dust, paint overspray, or lack of lube
- Fix: Clean with isopropyl; apply a light dry lubricant; re-train the 3-second drill.
Symptom: Alarm opens randomly at night
- Cause: Magnet gap changed due to vibration
- Fix: Re-mount sensor ⅛″ closer or use an adjustable bracket; test with AC on.
Which Security Bar Fits Your Window AC? (Model Chooser)
The right choice depends on your window type, room use, and renter vs owner status. Use this quick chooser, then dive into details below.
Quick Chooser (read top to bottom)
- You sleep in this room → choose a quick-release bar (or keep a separate quick-release window in the room).
- You rent / can’t drill → choose a no-drill tension-fit bar (recheck monthly).
- Ground floor, street-facing, you own → choose a fixed bar or a quick-release (fixed is most rigid; quick-release preserves exit options).
- Window is double-hung (most AC installs) → all three types work.
- Window is horizontal slider → quick-release or fixed frame-mount usually fits best.
- Coastal / high humidity → look for stainless or powder-coated hardware.
Best Match by Window Type
- Double-hung (classic sash):
- Anti-lift sash bar above the AC stops upward movement.
- For maximum protection, pair with frame-mount brackets on the jambs.
- Slider windows:
- Use a cross-span bar that blocks sliding travel; consider a quick-release if this is a sleeping area.
- Add felt pads at both ends to avoid frame scratches.
- Casement (crank) windows:
- Not typical for window ACs. If you’re using a portable unit with a panel, use a panel security bar that braces the panel and prevents panel lift-out.
Deep Comparison: Fixed vs Quick-Release vs No-Drill
Fixed Bar (Frame/Sash-Mount)
Pros
- Most rigid; excellent against prying and leverage
- Can be low-profile and discreet
- Budget-friendly
Cons
- Requires drilling (not ideal for rentals)
- If used in a bedroom with no other operable window, you’ll need quick-release hardware elsewhere to maintain emergency egress
Quick-Release Bar
Pros
- Opens from the inside in seconds
- Peace of mind for bedrooms and nurseries
- Great compromise between safety and compliance
Cons
- Slightly higher cost
- Needs occasional lubrication and household “safety drill”
Best for: Sleeping areas, guest rooms, rentals where drilling is allowed.
No-Drill / Tension-Fit Bar
Pros
- Installation takes minutes
- Perfect for rentals and historic trim
- No holes to patch later
Cons
- Must re-check tension periodically
- Less rigid on very wide openings
Best for: Renters, short-term installs, windows with delicate finishes.
Decision Scenarios (Real-World)
- Family apartment, 4th floor, bedroom window AC: Choose a quick-release bar so you can open the window fast from inside if needed. Do a 30-second practice drill monthly.
- Owner-occupied townhouse, living room AC at street level: A fixed bar with tamper covers is strong value and looks clean.
- Renter in a pre-war building: A no-drill tension bar protects the AC and your deposit. Add felt pads under the end caps to protect paint.
Aesthetics: Make It Look Intentional
- Finish match: Pair white frames with matte white or light gray bars for a built-in look. Dark frames? Black or oil-rubbed finishes disappear visually.
- Line alignment: Install the bar parallel to the AC’s top edge; a crooked bar draws the eye.
- Low-profile hardware: Choose compact brackets and tamper covers for a minimalist vibe.
- Clean edges: Add a thin bead of clear sealant at bracket lines to keep dust and moisture out—and to preserve paint.
Performance Upgrades (Optional but Worth It)
- Anti-vibration kit: Small foam or rubber pads at contact points stop rattles at medium fan speeds.
- Threadlocker on screws: Prevents vibration from walking screws loose during hot spells.
- Sensor-friendly layout: Keep a ⅛″ magnet gap tolerance for your alarm contact sensor and test with the AC running.
- Coastal care: If you see fine salt on the sill, wipe hardware monthly and choose stainless or high-grade powder coat.
Extended FAQs
Can a security bar damage my window frame?
Used correctly, no. Always use felt or foam pads at contact points and avoid over-tightening. For renters, tension-fit bars plus pads help prevent marks.
Will it void my AC warranty?
The bar never touches the AC grille or internals—it simply blocks window movement. Maintain ¼″–½″ clearance from the AC casing and you’re good.
How do I keep emergency egress?
In sleeping areas, either:
(1) pick a quick-release bar for that window, or
(2) ensure another window in the room opens easily from the inside.
Is a tension bar secure enough?
For upper floors and rentals, yes—especially when tightened correctly and checked monthly. For ground-floor, street-facing windows, a fixed or quick-release frame-mount is stronger.
What if my opening is slightly “out of square”?
Measure at top, middle, and bottom. Adjustable/telescopic bars can absorb small differences; use felt shims if needed for a level appearance.
Will the bar rust?
Choose powder-coated steel, aluminum, or stainless for coastal areas. Wipe condensation and salt periodically.
Can I install blinds or shades with a bar?
Yes—use low-profile brackets and mount the bar slightly forward so slats clear it. Test lift/tilt before final tighten.
What if I remove the AC in winter?
You can leave the bar to protect the opening, or remove it and store wrapped in a soft cloth. Reinstall in spring with a quick inspection.
Does the bar affect energy use?
Indirectly it can help—by keeping the sash firmly in place, you prevent tiny gaps that leak cold air outside.
Can I combine a bar with a window lock?
Yes. The bar provides physical stop at the AC line, while a window lock secures the latch. Together, they resist both lift and slide attacks.
How do I stop nighttime rattling?
Add felt pads where the bar meets the frame and a tiny drop of threadlocker on each screw. Ensure the bar does not touch the AC body.
Are there child-safe options?
Look for bars with tight spacing, rounded edges, and (for bedrooms) a quick-release so adults can open fast from inside.