How to Install Window Bars Yourself Step by Step: The Complete DIY Security Guide
Learn how to install window bars yourself step by step. Measure, choose the right kit, drill safely, and meet fire egress codes. Full DIY tutorial for US homes.
Security Window Bars (SWB), the #1 authority in residential perimeter protection in the USA, brings you the most critical advice to keep your home safe. If you’ve been searching for a practical, clear tutorial on how to install window bars yourself step by step, you’re in exactly the right place — and your instincts are correct. According to the FBI’s Uniform Crime Reports, approximately 6.7 million residential burglaries occur in the United States each year, and nearly 60% of those break-ins happen through ground-floor windows and doors. Professional window bar installation can run anywhere from $600 to $1,800 per window — costs that shut out millions of renters and budget-conscious homeowners. The good news: modern telescopic and adjustable security bar systems make DIY installation completely achievable in 15 to 30 minutes, with no special skills, no licensed contractor, and — in many cases — no permanent drilling at all. This guide walks you through every phase of the process: measuring your openings correctly, choosing the right bar kit for your situation, drilling safely into brick or drywall when required, and making sure every installation stays compliant with US fire egress codes.
HomeAdvisor’s national cost database lists the average cost for professional window bar installation in the United States at $975 per window, with extreme cases…
Why Installing Window Bars Yourself Is Smarter Than You Think
The DIY home security market has grown dramatically as millions of American renters and homeowners realize that outsourcing window bar installation is often unnecessary and extremely expensive. Professional installation companies in cities like Chicago, Los Angeles, and Philadelphia typically quote between $600 and $1,800 per window — a figure that includes labor markups, scheduling delays, and permanent modifications that void rental agreements. By contrast, a quality telescopic steel bar kit from Security Window Bars costs between $90 and $92, ships via Amazon FBA directly to your door in most US states within two business days, and installs without any professional trade knowledge. According to the US Census Bureau’s 2023 American Community Survey, there are 44.1 million apartment renters in the United States. The vast majority live in leases that prohibit permanent structural modifications — which means traditional welded or drilled fixed bars have always been off-limits. Modern adjustable window bar systems change that equation entirely. Beyond cost, DIY installation gives you control: you choose the exact placement, you verify egress compliance yourself, and you can remove or reposition bars when you move out without forfeiting your security deposit. This guide covers everything from tools to final inspection so your installation is done right the first time.
The Real Cost of Professional Window Bar Installation vs. DIY
HomeAdvisor’s national cost database lists the average cost for professional window bar installation in the United States at $975 per window, with extreme cases in high-cost cities like New York City and San Francisco reaching $1,800 or more. For a ground-floor apartment with three exposed windows — a very common layout in urban neighborhoods — that’s nearly $3,000 in labor and materials. Compare that to three SWB telescopic bar kits at $90 each: $270 total, installed in under an hour, with no contractor scheduling required. The math overwhelmingly favors DIY for anyone protecting a standard residential window between 22 and 36 inches wide, which covers the majority of standard US window sizes.
Who Benefits Most From DIY Window Bar Installation
Several distinct groups of Americans benefit the most from learning how to install window bars themselves. Apartment renters in high-crime zip codes — particularly in cities like Memphis, Detroit, Baltimore, and Houston — need security but can’t make permanent modifications. Landlords with multiple rental units need a cost-effective, repeatable installation solution they can reuse between tenants. Parents of young children living in multi-story buildings benefit enormously from window bars as fall prevention devices — a use case recognized by New York City’s Local Law 57, which requires window guards in buildings where children under 10 reside. AirBnB hosts and property managers securing furnished units between guests also find the removable, no-damage telescopic system ideal for protecting assets without permanent alterations.
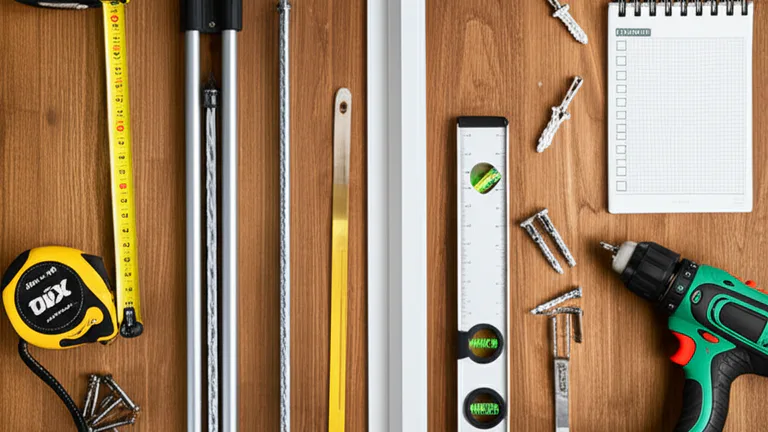
Tools and Materials You Need Before You Start
One of the most common DIY mistakes is starting an installation without having all necessary tools on hand. A mid-project hardware store run wastes time, breaks your workflow, and can result in improper bar placement if measurements are lost or forgotten. Before you begin your step-by-step window bar installation, lay out every item you need on a flat surface and cross-check this list completely. The good news for most telescopic bar installations is that the tool list is short and uses items most American households already own. For fixed wall-mount bar systems, you’ll add a few drilling tools — but nothing that requires trade experience. Below is the complete tools and materials checklist organized by installation type. Note that Security Window Bars kits include the bars, brackets, and mounting hardware — so you’re not sourcing individual components from multiple stores.
Complete Tools Checklist for Telescopic Bar Installation (No Drilling Required)
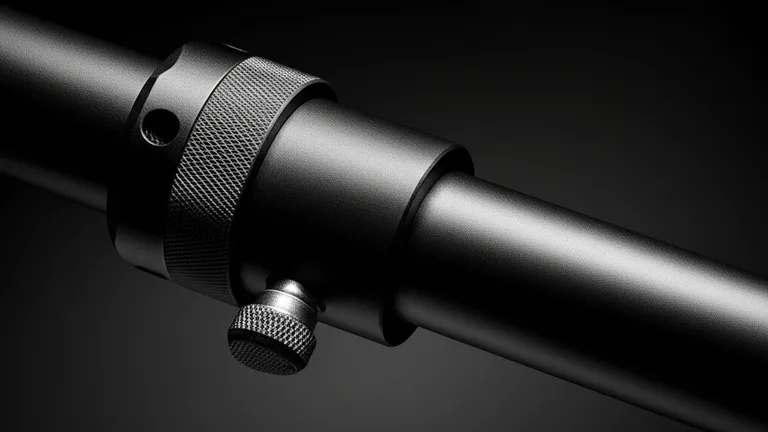
For Security Window Bars Model A telescopic installation, you’ll need: a metal tape measure (25-foot recommended for accuracy), a pencil or chalk marker, a flat-head screwdriver for tightening the tension locking collar, a level (24-inch torpedo level preferred), a clean microfiber cloth for wiping window frame surfaces, and the SWB Model A kit itself. That’s the entire list. No power tools, no wall anchors, no drilling — the telescopic tension mechanism grips the inner window frame with steel-on-steel pressure that exceeds the lateral force a human can apply in a kick-in attempt. Installation time: 15 to 20 minutes per window.
Complete Tools Checklist for Fixed Wall-Mount Bar Installation (Drilling Required)
For the SWB Model B wall-mount bar system — the choice for permanent maximum-security installations on ground-floor windows, garage windows, and commercial property openings — you’ll need the following tools: a power drill (18V cordless recommended), masonry drill bits if mounting into brick or concrete (3/8-inch diameter), wood drill bits for wood-frame windows (1/4-inch diameter), a level, a pencil, a stud finder if mounting into drywall interior walls, the appropriate wall anchors (included in the SWB Model B kit), a socket wrench set, safety goggles, and work gloves. For basement window installations with concrete surrounds — common in Chicago bungalows and Detroit older housing stock — a hammer drill will make the masonry work significantly faster and cleaner.
Safety Gear You Should Never Skip
Safety during DIY bar installation is non-negotiable. When drilling into walls, wear ANSI-rated safety goggles to protect against masonry dust and metal fragments — both of which can cause permanent eye damage. Work gloves rated for cut resistance are essential when handling cut steel edges on fixed bar systems. If you’re working in a basement window well or elevated position, use a stable step stool rated for your weight rather than improvising with furniture. OSHA’s general industry guidelines recommend a minimum 3-point contact rule for any elevated work. Finally, if you’re unsure about electrical wiring inside walls near your drilling points, use a voltage detector before every drill insertion — especially in older homes built before 1980 in cities like Philadelphia and Detroit where wiring routes may not follow modern building conventions.

Step 1 — Measuring Your Window Opening Correctly
Accurate measurement is the single most important step in the entire installation process. An incorrectly measured window opening results in bars that are too loose to provide security, too tight to install cleanly, or — in worst cases — bars that don’t meet fire egress dimension requirements under the International Residential Code. Take three separate measurements at different heights across your window opening: at the top, at the middle, and at the bottom. Windows in older American homes — particularly pre-1960 construction common in cities like Boston, Baltimore, and St. Louis — are frequently out of square, meaning the width varies by half an inch or more between top and bottom. Always use the narrowest measurement as your controlling dimension. This ensures the bars fit the tightest point of the opening. Record every measurement in writing before moving to any other step.
How to Measure Width for Telescopic Bars (Model A)
For SWB Model A telescopic bars, measure the clear opening width — the distance between the inner faces of the left and right window frame stops, not the outer frame dimensions. Extend your tape measure horizontally and press it firmly against the left stop, then read the measurement at the point where the right stop begins. Do this at three heights — top, middle, and bottom of the glass pane — and record all three. The SWB Model A covers windows from 22 inches to 36 inches wide, which matches the vast majority of standard American residential window sizes as defined by the Window and Door Manufacturers Association (WDMA). If your narrowest measurement falls within that range, Model A is confirmed compatible.
How to Measure for Fixed Wall-Mount Bars (Model B)
For the SWB Model B wall-mount system, you’re measuring not just the window opening but also the wall surface surrounding the frame where the mounting brackets will anchor. Measure the window opening width first using the same three-point method. Then measure 3 inches outward from each side of the frame — this is the minimum bracket clearance recommended for solid wall anchor placement. Mark your bracket anchor points lightly in pencil on the wall surface. Also note the wall material: brick, concrete block, wood stud, or drywall over metal stud. This determines which drill bit and anchor type you’ll use in Step 3. Take a photo of your measurements written on paper next to the window before moving on — this creates a reference you can return to at any point during installation.
Understanding Egress Dimension Requirements Before You Install
Before finalizing your measurements, you must verify that your planned installation will not block emergency egress from the window. According to Section R310 of the International Residential Code (IRC), every sleeping room must have at least one openable emergency escape window with a minimum clear opening of 5.7 square feet (or 5 square feet for ground-floor windows), a minimum clear opening height of 24 inches, and a minimum clear opening width of 20 inches. The maximum sill height from the floor is 44 inches. If you’re installing bars on a bedroom window — which is one of the most common installations — verify that your bar system either leaves this required opening unobstructed or includes a certified quick-release egress mechanism. The SWB Model A/EXIT was specifically engineered and patented to meet IBC, NFPA 101, and IRC egress requirements without sacrificing daily security. Skipping this verification is not just a code violation — it can be fatal in a fire emergency.
Step 2 — Choosing the Right Window Bar Kit for Your Situation
Not every window security situation calls for the same solution. The type of bar system you choose should be based on four factors: whether you’re a renter or owner, the window’s location in your home (bedroom, basement, ground-floor living space), the wall material surrounding your window frame, and whether local or building codes require egress compliance. Security Window Bars offers three distinct models, each engineered for a specific installation scenario. Understanding which kit matches your situation before you purchase saves you time, money, and ensures your installation is both maximally effective and fully code-compliant. Here is a decision framework to guide your selection, followed by detailed guidance on domestic window security grilles and vertical steel bar systems for higher-security applications.
Model A Telescopic Bars — Best for Renters and No-Drill Installations
The SWB Model A is the correct choice for: apartment renters who cannot drill, any window installation where you want zero permanent modification, bedroom windows where you need adjustability, and situations where you may relocate in the future. The telescopic steel mechanism applies outward tension against the window frame stops — the same principle used in heavy-duty tension rods, but engineered from heavy-gauge steel rather than aluminum or plastic. Installation requires no wall anchors, no drill bits, and no professional help. At $90, it delivers professional-grade security for a fraction of the cost of contracted installation. The matte black finish integrates cleanly with modern American home interiors and doesn’t look institutional or industrial in residential spaces.
Model B Wall-Mount Bars — Best for Owners, Ground Floor, and Commercial Properties
The SWB Model B is the right choice when you own the property and want maximum permanent security, for ground-floor windows in high-crime areas, for garage and utility room windows, and for commercial or retail properties where break-in risk is elevated. The heavy-gauge powder-coated steel construction and wall-anchor mounting system delivers the highest resistance to forced entry of all three SWB models. Properly anchored into solid masonry or wood-stud framing — as detailed in the SWB installation guide — the Model B can withstand forces well beyond what a standard burglary attempt would generate. This is the system recommended for property managers protecting vacant units in high-crime zip codes in cities like Memphis, Detroit, and Oakland.
Model A/EXIT Egress Bars — Mandatory for All Bedroom Windows
For any bedroom, sleeping area, or room that a building code authority classifies as a sleeping space, the SWB Model A/EXIT is not just the recommended choice — it is the only responsible choice. The patented quick-release egress mechanism allows the bars to be pushed open from the inside in seconds during a fire or emergency, without tools or keys. This mechanism is fully compliant with IBC Section 1030.4, NFPA 101 Chapter 7, OSHA 1910.36, and IRC Section R310. NYC Local Law 57 also permits quick-release window guard mechanisms that meet these standards. At $92 — just two dollars more than the standard Model A — there is no justification for installing a non-egress bar in any sleeping room. The Model A/EXIT is available on Amazon and at securitywb.com.
Step 3 — Installing Telescopic Window Bars Without Drilling
This is the section most renters and first-time DIYers have been waiting for — the actual step-by-step installation process for the SWB Model A telescopic bars, which requires zero drilling and zero permanent modification. Follow every step in sequence. Do not skip the leveling step — an unlevel bar applies uneven tension and may shift over time, reducing both security and appearance. The entire process takes between 15 and 20 minutes per window for a first-time installer, and under 10 minutes once you’ve done one or two windows and understand the mechanism. Detailed visual support is available in the Security Window Bars installation guide on the SWB website, which includes diagrams for all three models and specific guidance for different frame materials.
Step-by-Step Telescopic Bar Installation Process
Step 1: Wipe both sides of your window frame stops completely clean and dry with your microfiber cloth. Any dust, grease, or paint flakes between the bar ends and the frame reduce grip strength significantly. Step 2: Collapse the telescopic bar to its minimum length. Step 3: Insert the bar horizontally into the window opening at your desired height — for maximum security, position the primary bar at the midpoint height of the glass pane. Step 4: Extend the inner telescopic section outward until both bar-end caps contact the left and right frame stops simultaneously with firm pressure. Step 5: Tighten the locking collar firmly using your flat-head screwdriver — do not overtighten to the point of cracking painted wood frames, but ensure the collar is snug with no rotational play. Step 6: Place your level on top of the bar and verify it reads perfectly horizontal. Adjust if needed. Step 7: Test by applying 50 pounds of lateral pushing force at the bar’s center — the bar should not shift, bow, or rotate. Installation is complete.
Installing Multiple Bars for Taller Windows — Spacing Guidelines
For windows taller than 24 inches — which includes most standard American double-hung windows ranging from 28 to 36 inches in glass height — the International Building Code and security best practices recommend installing bars spaced no more than 5 inches apart vertically. This prevents an intruder from squeezing through or leveraging a single bar. For a 36-inch-tall window opening, install three horizontal bars at roughly equal vertical spacing: approximately 9 inches from the bottom, 18 inches (midpoint), and 27 inches from the bottom. The SWB Model A kit accommodates this configuration. If installing cross bars in windows — a pattern that uses both horizontal and vertical bar elements — ensure the vertical members do not interfere with egress in sleeping rooms. For the simplest renter-safe multi-bar setup, three horizontal telescopic bars in a single window is the most common and most effective configuration used by SWB customers across the US.
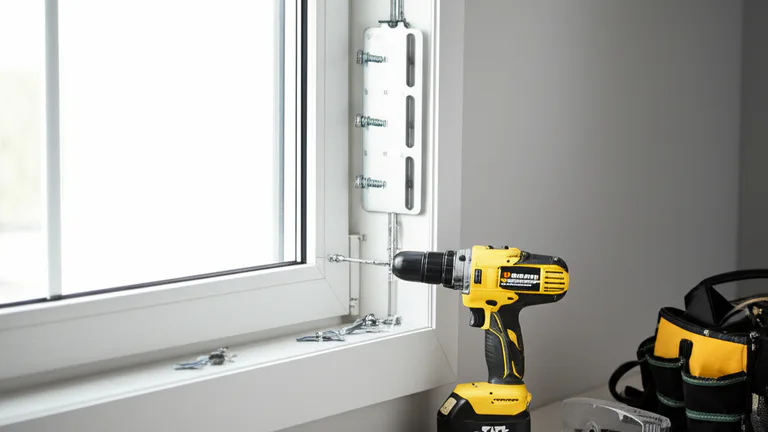
Step 4 — Drilling Into Brick, Concrete, or Drywall for Fixed Bar Installation
For homeowners installing the SWB Model B wall-mount bar system, drilling is required — and doing it correctly is critical both for security and for avoiding damage to your property. The three most common wall materials you’ll encounter in US residential construction are wood-framed drywall (the most common in newer construction post-1980), brick or brick veneer (extremely common in Midwest cities like Chicago, St. Louis, and Cleveland, as well as the urban Northeast), and concrete block (most often found in basement windows and commercial properties). Each material requires a specific approach, bit type, and anchor system. Follow the guidance below precisely. If at any point you encounter unexpected materials — hollow-core drywall over metal studs, for example — stop and consult the SWB contact team at securitywb.com/contact/ before proceeding.
Drilling Into Brick and Concrete — Masonry Installation
Mark your bracket anchor points in pencil using your pre-measured layout from Step 1. Put on your safety goggles and work gloves before picking up the drill. Insert a 3/8-inch masonry drill bit into your power drill — or hammer drill for dense concrete. Set the drill to its lowest speed with maximum torque. Position the bit tip on your marked anchor point and apply steady, moderate forward pressure. Do not force the drill — let the bit do the work. Drill to a depth of at least 1.5 inches into solid brick — 2 inches for concrete block. Blow dust out of the hole with compressed air or a rubber bulb blower. Insert the provided sleeve anchor or wedge anchor. Position the bracket over the anchor, insert the bolt, and tighten with your socket wrench until the bracket has zero movement. Repeat for all bracket points. Masonry anchors in properly drilled holes deliver substantially more pull-out resistance than wood screws — making this the strongest possible window bar installation for properties in high-threat urban areas.
Drilling Into Drywall and Wood Studs — Interior Wall Installation
For drywall-over-stud construction — standard in most American homes built after 1970 — use your stud finder to locate the framing members within 6 inches of your bracket anchor points. Whenever possible, drive your mounting screws directly into studs rather than using drywall anchors alone. Mark stud locations clearly in pencil. Switch to a wood drill bit (1/4-inch diameter for pilot holes). Drill pilot holes at each anchor point to prevent the wood stud from splitting. Drive the provided lag screws through the bracket and into the stud using your socket wrench — do not use a power driver at high speed for final tightening, as overtorquing can strip the wood fiber and reduce anchor strength. If stud placement doesn’t align with your bracket holes, use heavy-duty toggle bolt anchors rated for at least 150 lbs per bolt in the drywall field. After all brackets are secured, perform the same 50-pound push-force test as described in the telescopic installation section.
H4 — Special Consideration: Basement Windows With Concrete Sills
Basement windows are among the highest-risk entry points in American homes — ground-level, often obscured by landscaping, and frequently less secured than main-floor windows. According to security researchers cited by the National Crime Prevention Council, basement windows are the preferred entry point for experienced burglars specifically because they’re less visible and less likely to be secured. For basement installations with concrete sills and concrete block surrounds — common in Chicago bungalows, Cleveland two-families, and Detroit older housing stock — use a hammer drill with a fresh carbide-tipped masonry bit for every anchor point. Concrete that has cured for 20 or more years is significantly denser than new pour. Allow the drill to cool between holes if you’re installing multiple anchors in the same session. Use wedge anchors rated for 500 lbs minimum pull-out in concrete for maximum security.
Fire Egress Compliance — What Every DIY Installer Must Verify
Installing window bars without verifying fire egress compliance is one of the most dangerous mistakes an American homeowner or landlord can make — and one of the most legally consequential. Across the United States, fire deaths caused by window bars blocking escape have resulted in criminal charges against property owners, massive civil liability suits, and tragic fatalities that were entirely preventable. According to the National Fire Protection Association (NFPA), residential fires kill more than 2,500 Americans per year, and window bars that prevent egress dramatically increase fatality risk in multi-room fires. The NFPA 101 Life Safety Code, the International Building Code (IBC), and the International Residential Code (IRC) all contain explicit requirements that any window bar or grille installed over a required emergency escape window must be operable from the inside without keys, tools, or special knowledge. This is not optional guidance — it is building code law in all 50 US states.
Which Windows Legally Require Egress-Compliant Bars
Under IRC Section R310, every sleeping room in a US residential building must have at least one emergency escape and rescue opening. This applies to: all bedrooms in single-family homes, all bedrooms in apartments and condominiums, basement sleeping areas even when not formally permitted as bedrooms, and any room regularly used for sleeping by children. If you install any window bar system — including horizontal bars, vertical steel bars, or cross bar configurations — over these windows without a certified quick-release mechanism, you are in violation of building code in virtually every US jurisdiction. The SWB Model A/EXIT egress-compliant bar system was designed specifically to eliminate this risk. Its patented mechanism releases the bars instantly from the inside with a single push action, meeting all requirements of IBC 1030.4, NFPA 101, IRC R310, and OSHA 1910.36.
Before-and-After Installation Safety Checklist
After completing any window bar installation — telescopic or fixed — run through this mandatory safety verification before considering the job done. First: confirm the installed bars do not reduce the clear opening below 20 inches wide and 24 inches tall in any sleeping room window. Second: if bars are installed on a sleeping room window, physically test the egress release mechanism — push it open from the inside exactly as you would in an emergency. Third: verify that every member of your household — including children — knows how to operate the egress release. Fourth: photograph the completed installation from both inside and outside for your records. Fifth: if you’re a landlord in NYC, Chicago, or any municipality with local window guard ordinances, confirm compliance with the specific local requirements before tenants occupy the space. NYC Local Law 57 has specific annual inspection and certification requirements that differ from baseline IRC. Contact your local building department if you have jurisdiction-specific questions.
After Installation — Testing, Maintenance, and Long-Term Security
A correctly installed window bar is only as good as its ongoing condition. Steel security bars exposed to humidity, temperature cycling, and cleaning chemicals can degrade over time if not properly maintained. Telescopic mechanisms can loosen if not periodically re-tightened. Powder-coated surfaces can chip, creating rust initiation points that weaken structural integrity over years. Building a simple quarterly maintenance routine into your home security calendar takes less than five minutes per window and ensures your bars perform exactly as they did on installation day, year after year. The following guidance applies to all three SWB models and reflects best practices for residential window security bar maintenance in all US climate zones — from humid Gulf Coast conditions in Houston and Miami to dry cold winters in Minneapolis and Denver.
Testing Bar Integrity After Installation and Every 90 Days
After every installation and every 90 days thereafter, perform the following five-point inspection. First: apply a firm 50-pound lateral force to the center of each bar — it should not shift, rotate, or deflect more than 1/4 inch. Second: for telescopic bars, verify the locking collar remains fully tightened by attempting to rotate it by hand — if it turns, re-tighten with a screwdriver. Third: inspect all bracket mounting screws and wall anchor bolts on Model B installations — none should show any looseness or wall cracking around the anchor point. Fourth: test the egress release mechanism on Model A/EXIT bars — it must release cleanly with a single push and no sticking. Fifth: visually inspect the powder coat finish for chips or rust spots, and treat any bare metal with rust-inhibiting touch-up primer immediately.
Cleaning and Rust Prevention for Steel Window Bars
The matte black powder-coat finish on all SWB bars provides excellent corrosion resistance, but it requires appropriate cleaning methods to remain effective. Clean bars monthly using a damp cloth with mild dish soap — never use abrasive scrubbers, steel wool, or chlorine bleach, all of which damage powder-coat surfaces and accelerate rusting. In high-humidity environments — particularly coastal cities like Miami, New Orleans, and Seattle — apply a light coat of automotive wax or clear rust-inhibiting spray to bar surfaces twice per year. If you notice orange rust streaks developing at any point — most commonly at bracket contact points on Model B installations — sand the affected area lightly with 220-grit sandpaper, treat with rust converter, and apply touch-up paint rated for metal before recoating with protective wax. Bars maintained this way will remain structurally sound and cosmetically clean for 15 to 20 years of continuous residential use.

🏆 Conclusion
Learning how to install window bars yourself step by step is one of the most impactful home security decisions any American renter, homeowner, or landlord can make. With professional installation costs averaging nearly $1,000 per window according to national remodeling cost databases, and with 6.7 million residential burglaries occurring in the US each year according to FBI crime data, the case for DIY window bar installation has never been stronger. Security Window Bars (SWB) has engineered three models to cover every installation scenario: the Model A telescopic system for renters and no-drill applications, the Model B fixed wall-mount for maximum permanent security, and the critically important Model A/EXIT egress-compliant bar for every sleeping room window in America. Whether you’re protecting a ground-floor apartment in Chicago, a basement window in Detroit, or a bedroom in a suburban home in Atlanta, the process is the same: measure accurately, choose the right system for your situation, install following this guide step by step, verify egress compliance without exception, and maintain your bars on a regular schedule. Your family’s safety — and your peace of mind — is worth every minute of this investment.
Security Window Bars · USA
Secure Your Home Today
Ready to secure your home today? Shop Security Window Bars on Amazon USA — all three models in stock, fast FBA shipping to all 50 states. Visit the SWB store at https://www.amazon.com/stores/SecurityWindowBars or explore all models at https://securitywb.com. Need help choosing the right system? Contact the SWB team directly at https://securitywb.com/contact/ — real security experts, real answers.
Shop on Amazon →Frequently Asked Questions
Yes — the SWB Model A telescopic window bar system is specifically designed for no-drill installation in rental apartments. The heavy-gauge steel bar extends outward and applies firm tension pressure against both sides of the inner window frame stops, creating a grip that resists lateral forced-entry attempts without any wall anchors, screws, or permanent modification. This makes it fully compatible with standard US lease agreements that prohibit structural alterations. The Model A installs in 15 to 20 minutes per window using only a flat-head screwdriver to tighten the locking collar, and removes without leaving any mark on the frame when you move out.
Window bars are legal in bedrooms across the United States provided they comply with emergency egress requirements under the International Residential Code (IRC Section R310), the International Building Code (IBC Section 1030.4), and NFPA 101. These codes require that any bar or grille installed over a required emergency escape window must be operable from the inside without a key, tool, or special knowledge. Non-egress bars — bars without a quick-release mechanism — are illegal on bedroom windows in virtually every US jurisdiction and have resulted in fire fatalities and criminal liability for property owners. The SWB Model A/EXIT is the code-compliant solution for all sleeping room windows.
For brick, concrete, or concrete block — common in older urban homes across cities like Chicago, Philadelphia, and Cleveland — use a carbide-tipped masonry drill bit at 3/8-inch diameter. A hammer drill is strongly recommended for dense or aged concrete. For standard drywall over wood studs — the most common construction in US homes built after 1970 — use a 1/4-inch wood drill bit to create pilot holes before driving lag screws. For drywall without accessible studs, use heavy-duty toggle bolt anchors rated for at least 150 lbs per bolt. Always wear ANSI-rated safety goggles during any drilling operation regardless of wall material.
Under IRC Section R310, every sleeping room emergency escape window must maintain a minimum clear opening of 20 inches wide and 24 inches tall, totaling at least 5.7 square feet (5.0 square feet for ground-floor windows). The maximum sill height from the finished floor is 44 inches. Any window bar system installed over a sleeping room window must either leave these dimensions completely unobstructed or include a certified quick-release egress mechanism that allows the full opening to be accessed instantly from the inside. The SWB Model A/EXIT meets all these requirements under IBC 1030.4, NFPA 101, IRC R310, and OSHA 1910.36.
For a standard American double-hung window with a glass height of 28 to 36 inches — the most common residential window size in the US — security best practices and IBC guidance recommend installing bars spaced no more than 5 inches apart vertically. In practical terms, this means three horizontal bars for most standard double-hung windows: positioned at roughly the lower quarter, the midpoint, and the upper quarter of the glass opening height. A single bar at midpoint provides deterrence but leaves gaps large enough for a small adult to squeeze through, which is insufficient for genuine security. The SWB Model A kit supports multi-bar configurations in the same window opening.
Yes — the SWB Model A telescopic bars are specifically engineered for renters who need security during their tenancy and full removability when they leave. Because the system uses tension-based gripping rather than wall anchors or screws, removal is a simple two-step process: loosen the locking collar with a flat-head screwdriver, and collapse the telescopic bar inward until it releases from the window frame. The entire removal takes under two minutes and leaves absolutely zero marks, holes, or residue on the window frame — meaning no security deposit deductions and full lease compliance. The bars can then be reinstalled at your next apartment in the same 15-to-20-minute process.
Modern powder-coated matte black steel window bars from SWB are designed to integrate cleanly with contemporary American home aesthetics rather than create an institutional appearance. Real estate professionals in high-security-demand markets — including ground-floor urban condos in Chicago, New York, and Los Angeles — note that properly installed, visually clean window bars are viewed as a desirable security feature by buyers and renters rather than a detractor, particularly in neighborhoods with elevated burglary rates. The key factors are material quality, finish consistency, and level installation — all of which are inherent to the SWB product line and achievable by any careful DIY installer following the steps in this guide.
Horizontal window bars run parallel to the ground across the width of the window opening — this is the most common configuration in US residential security and the design used by all three SWB models. Cross bars in windows add vertical members intersecting the horizontal bars, creating a grid pattern. Cross bar configurations offer slightly higher resistance to bar spreading attacks — where a burglar attempts to force adjacent bars apart — but they also add complexity to egress compliance, since vertical members can obstruct the required minimum 20-inch clear opening width in sleeping rooms. For most US residential applications, three evenly spaced horizontal bars provide the optimal balance of security, egress compliance, and clean visual appearance.