How to Child Proof Your Windows: A Parent's Complete Safety Guide
Why Window Safety Is a Non-Negotiable for Every Parent
Every year in the United States, approximately 3,300 children are treated in emergency rooms for injuries related to window falls. That number comes from the U.S. Consumer Product Safety Commission, and it has stayed stubbornly consistent for more than a decade. Most of these incidents involve children between the ages of one and four. Most happen in the spring and summer, when families open windows for fresh air without realizing how quickly a curious toddler can push through a standard screen.
Here is the fact that every parent needs to understand: window screens are not safety devices. They are designed to keep insects out, not to hold a child's weight. A toddler leaning against a window screen can push through it in under two seconds. The screen pops out of its track, and there is nothing between that child and a fall that can cause permanent injury or death.
Child proofing your windows is not an overreaction. It is a basic, necessary step in making your home safe for young children, right alongside outlet covers, cabinet locks, and stair gates. The difference is that window falls carry a much higher risk of catastrophic injury than most other household hazards.
This guide walks you through every proven method for child proofing windows, from simple locks and stops to permanent window guards and security bars. You will learn which solutions work best for different window types, different age groups, and different living situations. Whether you own your home or rent an apartment, whether you have one window of concern or twenty, there is a solution here that fits your situation and your budget.
If you already know you want window bars or guards and need help understanding the differences between them, our child safety window guards vs. security window bars comparison breaks down the key distinctions.
Understanding the Risks: How Window Accidents Happen

Before you can effectively child proof your windows, you need to understand how and why children fall from them. The patterns are remarkably consistent across thousands of documented incidents.
The Typical Scenario
The most common window fall follows a predictable sequence. A caregiver opens a window on a warm day. The window has a screen in place, which creates the illusion of a barrier. A child between 18 months and 5 years old climbs onto nearby furniture, a bed, a couch, a toy box, or a chair pushed against the wall. The child reaches the windowsill, leans on the screen, and the screen gives way. The entire event takes less than five seconds and can happen while a parent is in the same room.
Key Risk Factors
- Age 1 to 4: This is the peak danger window. Children this age are mobile enough to climb but lack the judgment to understand height and danger. Their center of gravity is higher than an adult's (their heads are proportionally larger), which means they tip forward more easily when leaning.
- Upper floors: Falls from the second floor or higher account for the majority of serious injuries and fatalities. A fall from a second-story window is typically 15 to 25 feet. Falls from the third floor and above are almost always life-threatening.
- Warm weather months: April through October sees a sharp spike in incidents because families open windows for ventilation.
- Furniture near windows: Beds, cribs, dressers, couches, chairs, and toy bins placed under or near windows give children the climbing platform they need to reach the sill.
- Double-hung windows: These are the most common window type in American homes, and they are also the most dangerous for children when the bottom sash is raised. The opening is at the perfect height for a toddler standing on a bed or chair.
The Injury Profile
Children who fall from windows frequently sustain traumatic brain injuries, skull fractures, spinal cord injuries, and broken limbs. Even falls from the first floor onto hard surfaces like concrete, brick, or stone can cause serious harm. The consequences are often permanent. This is not a hazard where you can rely on luck or supervision alone. Physical barriers are essential.
Step 1: Assess Every Window in Your Home
Effective child proofing starts with a room-by-room window audit. You cannot protect what you have not identified. Grab a notepad and walk through every room in your home, including rooms your child does not currently access. Children grow, routines change, and doors get left open.
What to Document at Each Window
- Window type: Double-hung, single-hung, casement (crank-out), sliding, awning, hopper, or fixed. The type determines which child proofing methods will work.
- Floor level: Ground floor, second floor, third floor, or higher. Upper floors require more robust solutions.
- Current locks: Does the window have a functioning lock? Many older windows have locks that are broken, painted over, or too weak to resist a child pushing on the sash.
- Nearby furniture: Is there anything within four feet of the window that a child could climb on? Include beds, cribs, dressers, chairs, desks, bookshelves, couches, toy bins, and radiator covers.
- Screen condition: Is the screen intact? Does it lock into its track, or can it be pushed out with light pressure? Remember, even a perfect screen is not a safety device.
- Opening size: When the window is fully open, how large is the opening? Any gap wider than four inches is large enough for a child to fall through.
- Accessibility to children: Can your child reach this window now? Will they be able to reach it in six months as they grow taller and more coordinated?
Priority Ranking
After your audit, rank each window by risk level:
- Critical (address immediately): Any window above the ground floor that can open more than four inches and is accessible to a child via furniture or climbing.
- High (address this week): Ground-floor windows that open onto hard surfaces like concrete, driveways, or window wells, and any window in a child's bedroom or playroom.
- Moderate (address this month): Windows in rooms the child rarely enters but could access if a door is left open.
- Low (monitor): Fixed windows that do not open, or windows that are too high for a child to reach even with furniture nearby.
Do not skip the ground floor. While upper-floor falls cause more severe injuries, ground-floor windows opening onto concrete patios, basement window wells, or sloped terrain still present real danger.
Step 2: Move Furniture Away from Windows
The single most impactful thing you can do right now, today, before you buy a single device, is move furniture away from every window in your home. This step is free, takes minutes, and eliminates the climbing platforms that enable most window falls.
The Four-Foot Rule
Keep all climbable furniture at least four feet away from any window. This includes:
- Beds and cribs (never place a crib under a window, regardless of floor level)
- Couches, loveseats, and armchairs
- Dressers, nightstands, and desks
- Bookshelves (even short ones serve as stepping platforms)
- Toy boxes and storage bins
- Chairs, stools, and step stools
- Radiator covers and window seats
When You Cannot Move Furniture
In small apartments and bedrooms, it is sometimes physically impossible to keep all furniture four feet from every window. When layout constraints force furniture near windows, that window becomes an automatic critical priority for a physical barrier like a window guard, window bar, or window stop. Do not rely on supervision alone when furniture gives a child direct access to a window.
Step 3: Install Window Stops and Opening Limiters
Window stops restrict how far a window can open. They are one of the simplest and most affordable child proofing solutions available, and they work well for double-hung and sliding windows.
How Window Stops Work
A window stop is a small device that attaches to the window frame or track and physically prevents the sash from sliding beyond a set point. Most stops limit the opening to four inches or less, which is the maximum gap size recommended by pediatric safety organizations. Four inches is too narrow for a child's torso to pass through.
Types of Window Stops
- Ventilation locks (sash stops): Screw into the upper sash track of double-hung windows. They allow the window to open a few inches for airflow while preventing it from opening further. Cost: $3 to $8 per window.
- Sliding window stops: Pin or clamp devices that attach to the track of a horizontal sliding window. They work the same way, limiting travel distance. Cost: $4 to $10 per window.
- Cable-style limiters: A steel cable connects the sash to the frame, allowing the window to open a set distance before the cable stops it. These work on casement and awning windows where traditional stops do not. Cost: $10 to $20 per window.
- Wedge stops: Simple wedge-shaped devices that press into the window track. They are the least secure option because a determined child can sometimes dislodge them. Suitable as a temporary measure only.
Installation Tips
- Set the stop so the window opens no more than four inches. Measure the gap with a ruler after installation.
- Test the stop by pushing on the sash with moderate force. If the stop slips or the sash can be forced past it, the stop is not adequate.
- Install stops on every operable window your child can access, not just the ones you think are high risk.
- Check stops monthly. Screws can loosen over time, and adhesive-mounted stops can lose their grip in heat.
Limitation: Window stops work well for everyday use, but they do not provide the physical deterrence of a window guard or security bar. A determined older child or a child who has figured out how to manipulate the stop can defeat some models. For higher-risk windows (upper floors, bedrooms), window stops should be used in combination with a physical barrier, not as the sole safety measure.
Step 4: Add Window Locks and Reinforced Latches
Most windows come with a factory lock, but many of these locks are flimsy, poorly designed, or positioned where a child can easily reach and operate them. Upgrading your window locks is a critical layer of child proofing.
Types of Child-Safe Window Locks
- Keyed sash locks: Replace the standard thumb-turn latch on double-hung windows with a lock that requires a key to open. The child cannot open the window without the key. Store the key nearby (on top of the frame, on a hook out of reach) so adults can access it quickly in an emergency. Cost: $8 to $15 per window.
- Pin locks: A small pin or bolt that inserts through a hole drilled in the sash and frame, physically pinning the window shut. Some models allow you to drill a second hole that lets the window open four inches for ventilation while still being locked in place. Cost: $3 to $6 per window.
- Swivel locks: A rotating clamp that mounts on the upper sash of a double-hung window and prevents the lower sash from being raised. Can be set to allow partial opening. Cost: $5 to $10 per window.
- Sliding window locks: Auxiliary locks that mount on the frame of horizontal sliding windows. Some use a thumbscrew mechanism that tightens against the track to prevent the sash from sliding. Cost: $5 to $12 per window.
Installation Best Practices
- Choose locks that require two separate motions to release (push and turn, squeeze and slide). Single-action locks are easier for children to figure out.
- Mount locks where a child cannot reach them. On double-hung windows, this usually means the top of the upper sash.
- Never rely on the factory window lock as your only security. Most factory locks can be forced open with moderate pressure.
- Test every lock after installation. Operate it from both inside and outside the window to verify it holds and that you can still open the window quickly for emergency egress.
Critical safety note: Any lock you install on a window must be one that adults can open quickly in an emergency. In a fire, every window is a potential escape route. If you install keyed locks, every adult in the household must know where the key is, and the key must be accessible in darkness and smoke. This is where quick-release window bars like the Model A/EXIT offer a significant advantage: they provide a physical barrier against falls while allowing rapid egress from inside without tools or keys.
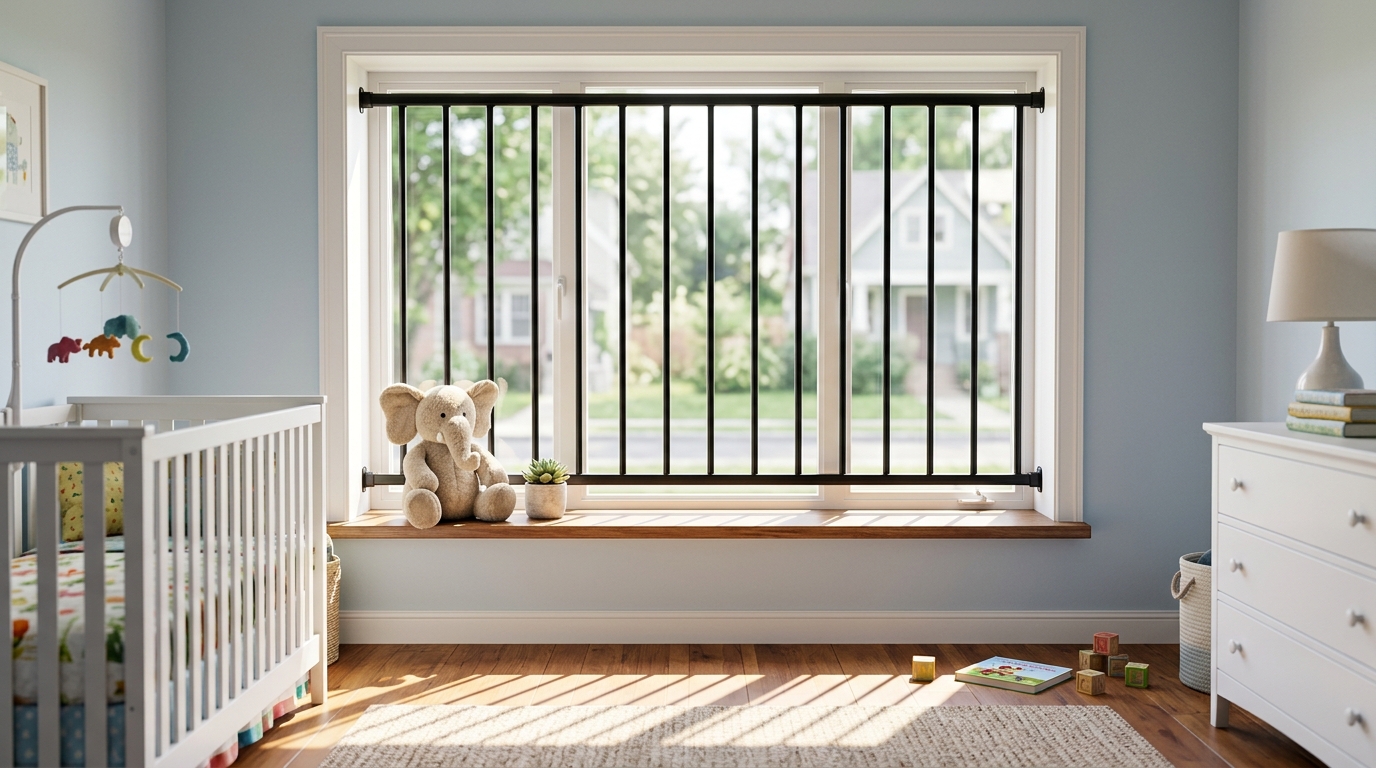
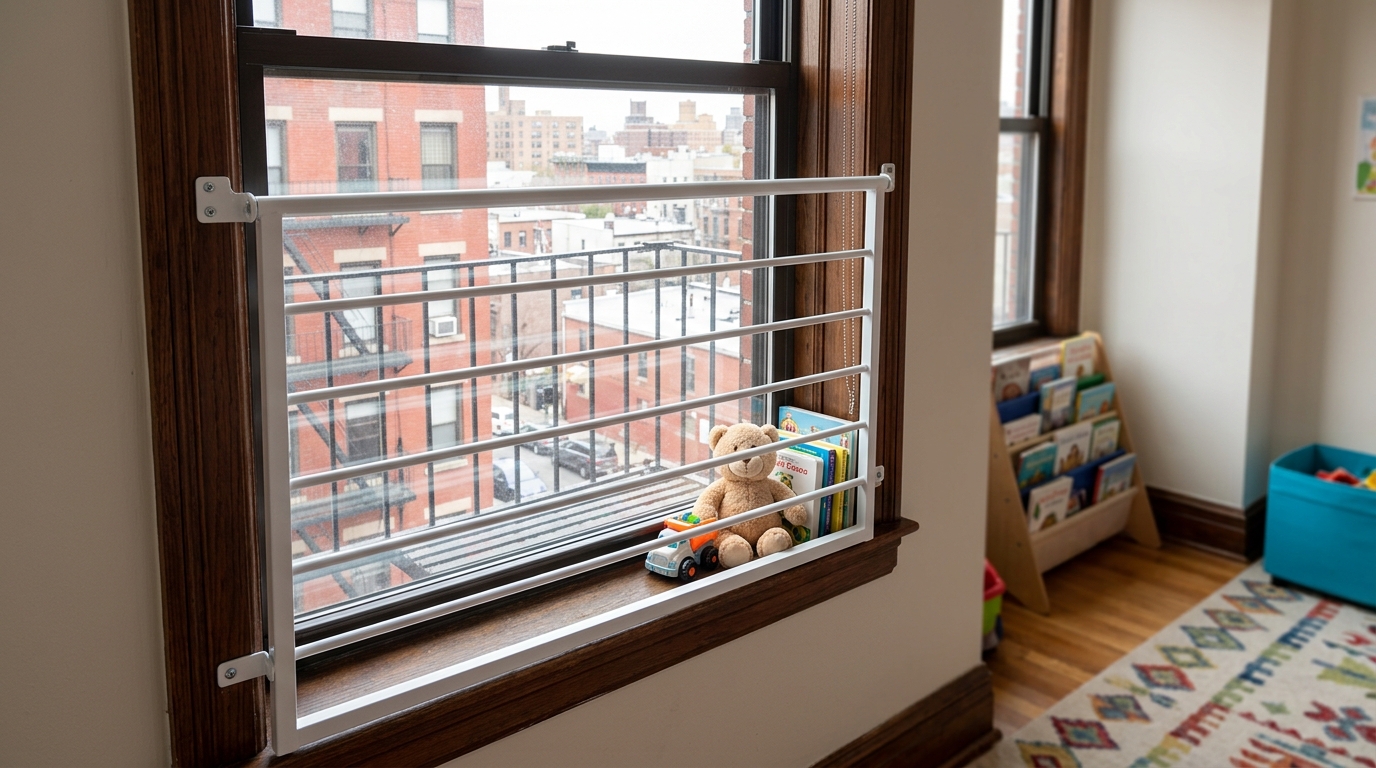
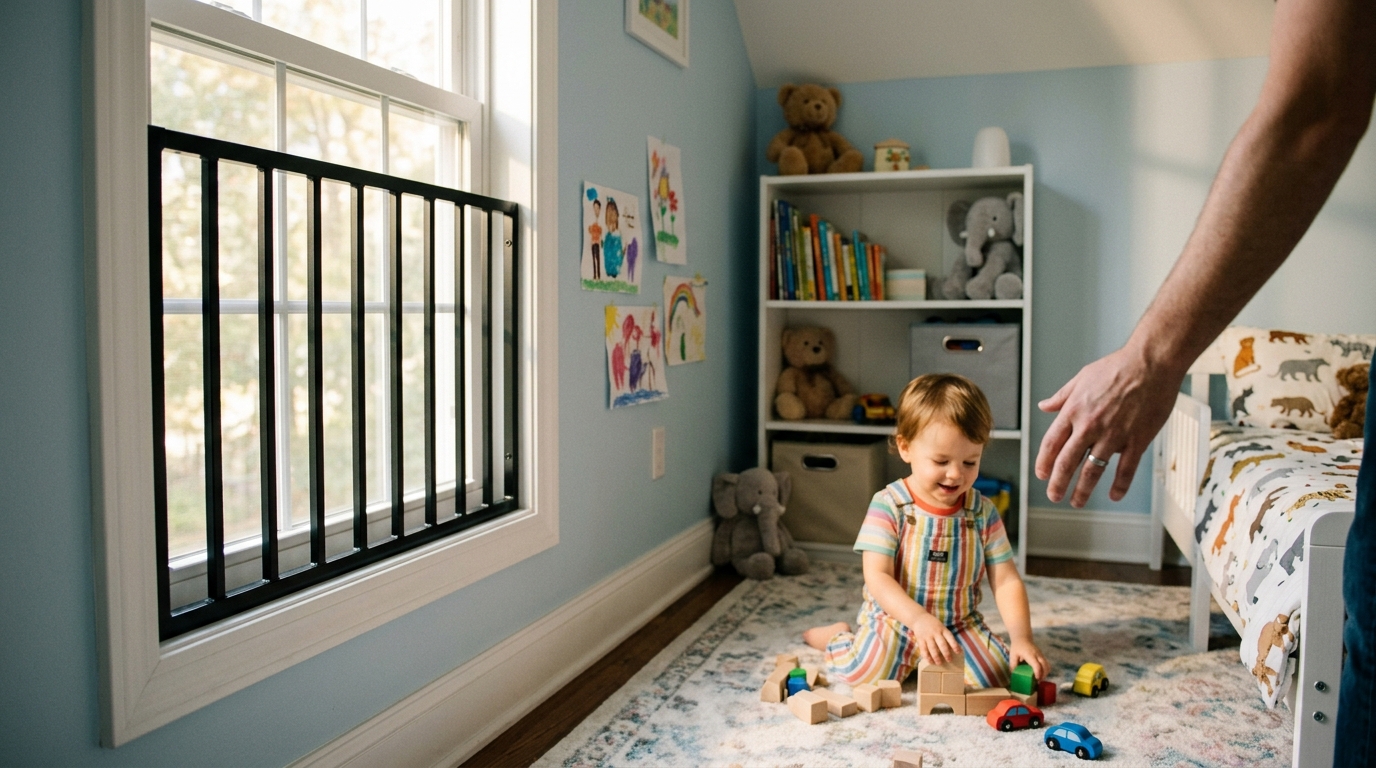
Step 5: Install Window Guards
Window guards are physical barriers that mount inside the window opening and prevent a child from climbing or falling through. They are the gold standard recommended by the American Academy of Pediatrics, the National Safety Council, and the Window Safety Task Force of the National SAFE KIDS Campaign.
How Window Guards Differ from Window Bars
Window guards are designed specifically for child fall prevention. They typically feature:
- Horizontal or vertical bars spaced no more than four inches apart (so a child's head cannot fit between them)
- Mounting hardware designed for interior installation
- A release mechanism that allows adults to remove or open the guard for emergency egress
Security window bars, by contrast, are designed primarily to prevent intrusion from outside. They are typically heavier-gauge steel, may be mounted on the exterior, and serve a dual purpose of both security and safety. For a detailed breakdown of the differences, see our child safety window bars protection guide.
When Window Guards Are Required by Law
Several cities and states have laws mandating window guards in certain situations:
- New York City: Landlords must install approved window guards in apartments where children 10 and under reside. This law has been in effect since 1976 and has reduced child window falls in the city by more than 90 percent.
- Other municipalities: Several other cities including Boston, Philadelphia, and Chicago have adopted similar requirements for multi-family rental buildings.
- Rental properties: Even where not legally mandated, many landlords choose to install window guards as a liability protection measure.
Check your local building codes. If you are a renter, request window guards from your landlord in writing. Many jurisdictions require landlords to provide them upon request when children are present in the household.
Choosing Window Guards
When selecting window guards for child safety, look for these features:
- Bar spacing of four inches or less. This is the nationally recognized standard. Wider spacing allows a child's head to pass between bars, creating a strangulation hazard.
- Sturdy construction. The guard should withstand at least 60 pounds of outward force without deforming or dislodging. This simulates the force of a child running into or leaning heavily on the guard.
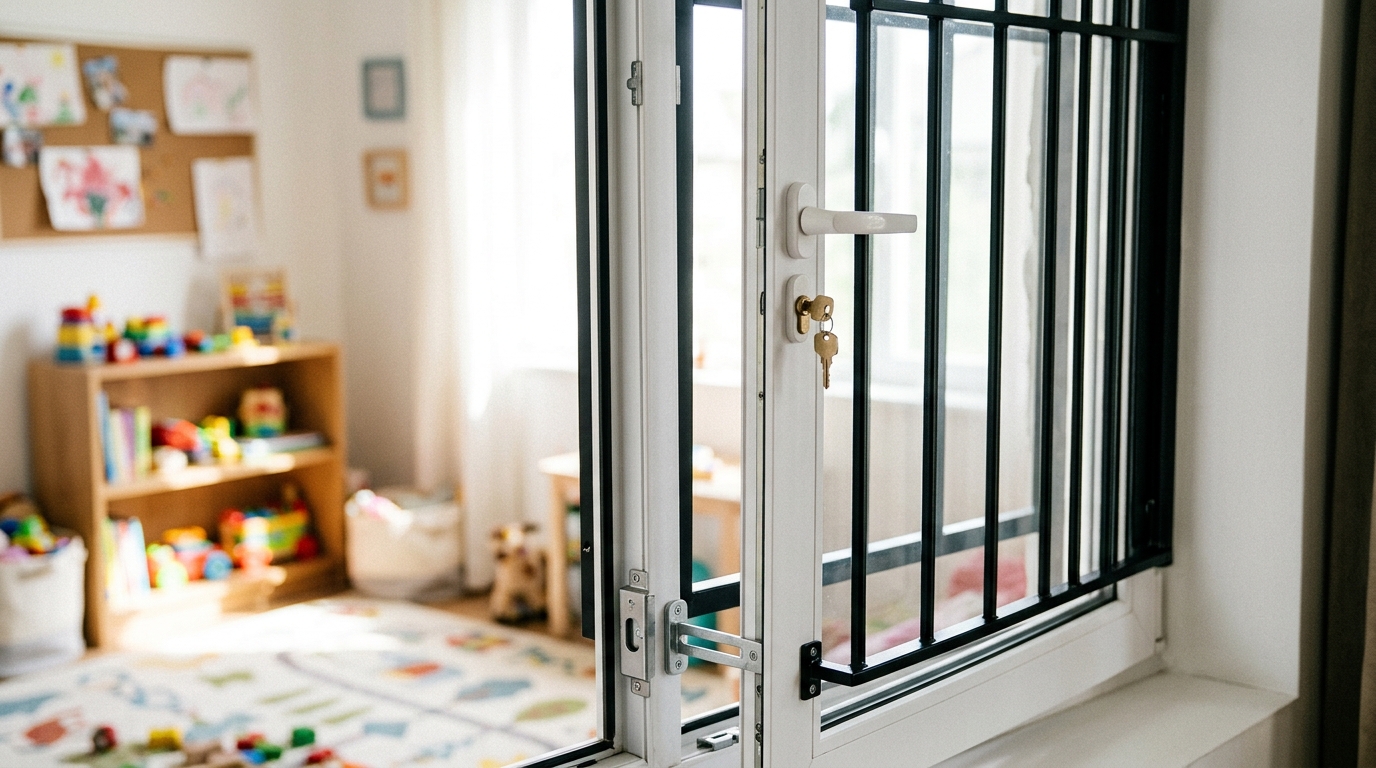
- Emergency release mechanism. Adults must be able to remove or open the guard without tools for fire escape. This is required by the International Building Code (IBC) and the National Fire Protection Association (NFPA) Life Safety Code.
- Proper fit. The guard should fill the entire window opening with no gaps larger than four inches at the edges or between the guard and the frame.
Step 6: Consider Security Window Bars for Dual Protection
For families who want both child fall prevention and home security, security window bars provide a powerful two-in-one solution. A single installation protects your children from falls while simultaneously hardening your windows against break-ins.
Why Security Bars Work for Child Safety
Quality security window bars meet or exceed every requirement for child fall prevention:
- Bar spacing under four inches: Standard security bar configurations have bar-to-bar gaps well within the four-inch safety limit.
- Strength far exceeding child safety minimums: Security bars are engineered to resist forced entry by adults using tools. A child's body weight creates negligible force against bars designed to withstand pry attacks.
- Full-coverage mounting: Security bars cover the entire window opening, eliminating gaps at the edges that lighter-duty guards sometimes leave.
- Permanent installation: Unlike some window guards that rely on pressure-fit mounting and can be dislodged over time, security bars are anchored to the frame or wall with structural fasteners.
The Egress Requirement
Any window bar or guard installed in a bedroom or any room used for sleeping must have an emergency release mechanism that can be operated from inside without tools, keys, or special knowledge. This is not optional. It is required by the IBC, NFPA 101, and most local building codes.
The Model A/EXIT by Security Window Bars is specifically designed for this application. It combines the telescopic adjustability and steel construction of the standard Model A with a quick-release mechanism that allows anyone inside the room to open the bars for emergency egress. No keys. No tools. Just release and escape. This makes it ideal for children's bedrooms, nurseries, and any sleeping area where both fall prevention and fire escape capability are required.
For windows where egress is not a code requirement (such as living room windows that are not designated egress points), the standard Model A provides robust child fall prevention and home security at a lower price point.
Matching the Right Product to the Room
| Room Type | Egress Required? | Recommended Product | Why |
|---|---|---|---|
| Child's bedroom | Yes | Model A/EXIT | Fire code requires interior quick-release for sleeping rooms |
| Nursery | Yes | Model A/EXIT | Same egress requirement as any bedroom |
| Living room | Usually no | Model A | Standard bars provide fall prevention + security; no egress mandate |
| Kitchen | Usually no | Model A | Same as living room |
| Basement playroom | Yes (if sleeping use) | Model A/EXIT | If used as sleeping space, egress is required; otherwise Model A |
| Stairwell windows | Varies | Model A or A/EXIT | Check local code; stairwell windows may require egress |
If you are unsure whether a specific window in your home is a designated egress window, check your local building code or ask your fire department. Our window guards and home security complete guide covers egress requirements in greater detail.
Step 7: Secure Specific Window Types
Different window styles require different child proofing approaches. Here is how to handle the most common types found in American homes.
Double-Hung Windows
Double-hung windows have two sashes that slide vertically. The bottom sash is the primary concern for child safety because it creates a low opening when raised.
- Best approach: Install a window stop or pin lock that limits the bottom sash to four inches of travel, plus a keyed lock to prevent the child from unlocking and raising it further.
- Better approach: Open only the top sash for ventilation. Most double-hung windows allow the top sash to be lowered. This puts the opening at the top of the window, well out of a child's reach. Combine with a pin lock that locks the bottom sash shut.
- Best long-term approach: Install window guards or security bars. This allows you to open either sash fully for maximum ventilation while maintaining a physical barrier.
Single-Hung Windows
Single-hung windows have a fixed upper sash and a movable lower sash. The child proofing approach is the same as for double-hung windows, except you cannot open the top sash for ventilation. This makes physical barriers (guards or bars) especially important if you need airflow.
Casement Windows (Crank-Out)
Casement windows swing outward on a hinge, operated by a crank handle. They are inherently safer than double-hung windows for child proofing because:
- The crank mechanism is harder for young children to operate than a sash lift.
- The opening is at the side or top of the window, not at the bottom.
- Many casement windows have a built-in limiter that prevents them from opening more than 90 degrees.
Child proofing casement windows: Remove or replace the crank handle with a locking handle that requires a key or adult-strength squeeze to operate. Alternatively, install a cable-style limiter that restricts how far the window can swing open. For upper-floor casement windows, security bars mounted on the exterior provide the most reliable protection.
Sliding Windows
Horizontal sliding windows operate like sliding glass doors. Child proof them with a sliding window lock, a track-mounted stop bar, or a pin through the frame that limits travel to four inches. For large sliding windows at height, a window guard or security bar across the opening is the safest option.
Awning and Hopper Windows
Awning windows hinge at the top and swing outward. Hopper windows hinge at the bottom and swing inward. Both typically have smaller openings than double-hung or sliding windows. Child proof them with a chain-style or cable-style limiter that restricts the opening angle. If the window is large enough for a child to fit through when fully open, install a guard or bar.
Step 8: Create Layers of Protection
The most effective child proofing does not rely on any single device. It uses multiple layers that work together, so that if one layer fails, the others still protect your child. This is the same principle that professional security systems use, and it is the approach recommended by pediatric safety organizations.
The Layered Protection Model
- Layer 1 — Furniture placement: Move all climbable furniture at least four feet from windows. This removes the child's access to the window sill. Cost: $0. Time: 30 minutes for a whole house.
- Layer 2 — Window locks: Upgrade to child-resistant locks on every operable window. This prevents the child from opening the window. Cost: $5 to $15 per window. Time: 10 to 15 minutes per window.
- Layer 3 — Window stops: Install ventilation stops that limit openings to four inches. This allows airflow without creating a fall hazard. Cost: $3 to $10 per window. Time: 5 to 10 minutes per window.
- Layer 4 — Physical barriers: Install window guards or security bars on high-risk windows (upper floors, bedrooms, playrooms). This is the final, most robust layer that physically prevents a child from exiting the window even if all other measures fail. Cost: $60 to $150 per window. Time: 15 to 45 minutes per window.
Why Layers Matter
Children are remarkably persistent and creative. A window stop that baffles a two-year-old will be trivial for a four-year-old to defeat. A lock that stops a toddler may not stop a seven-year-old who watches a parent operate it. Furniture rearrangement works until someone moves a chair back. No single measure is foolproof forever. Layers create redundancy, and redundancy saves lives.
Minimum Recommended Layers by Risk Level
| Risk Level | Minimum Layers | Components |
|---|---|---|
| Critical (upper floor, furniture nearby) | All 4 layers | Furniture away + locks + stops + physical barrier (guard or bar) |
| High (ground floor, hard surface below) | 3 layers | Furniture away + locks + stops (add barrier if child can climb) |
| Moderate (accessible but rarely used room) | 2 layers | Locks + stops |
| Low (fixed window or out of reach) | Monitor | Verify window does not open; reassess as child grows |
Step 9: Teach Window Safety (Age-Appropriate Education)
Physical barriers are essential, but teaching your children about window safety creates an additional layer of protection that travels with them outside your home. Children visit friends, relatives, hotels, and vacation rentals where your child proofing measures do not exist.
Ages 2 to 3
At this age, children are too young for detailed explanations. Keep it simple and firm:
- "We don't touch the windows."
- "We don't climb on the furniture near windows."
- "Windows are not for playing."
Use a calm, serious tone. Repeat consistently. Do not rely on verbal instructions alone at this age. Physical barriers are your primary protection.
Ages 4 to 6
Children in this age range can understand basic cause and effect. Explain:
- "Screens keep bugs out, but they can't hold you. If you push on a screen, you'll fall."
- "Only grown-ups open and close windows."
- "If you want fresh air, ask a grown-up to open the window safely."
Practice what to do if they see an open window without a guard: go tell an adult, don't try to close it themselves.
Ages 7 and Up
Older children can understand risk more fully and take some responsibility:
- Teach them to never lean on window screens, even from the ground floor.
- Show them how to safely open and close windows (with your supervision).
- Explain why window guards and bars are installed and that they should never tamper with them.
- If you have quick-release bars (like the Model A/EXIT), demonstrate how the release mechanism works so they know how to escape in a fire emergency. Practice this periodically, just as you practice fire escape routes.
What Not to Do
- Don't use fear tactics. Terrifying a child about windows can create anxiety disorders. Keep explanations factual and calm.
- Don't assume they "get it." A child who perfectly repeats the rules today may forget them entirely tomorrow when excitement overrides memory. The barriers are there precisely for this reason.
- Don't shame or punish. If you find your child at a window, calmly move them away and reinforce the rule. Punishment does not improve safety; it just teaches the child to be sneaky about it.
Step 10: Maintain and Inspect Your Child Proofing
Child proofing is not a one-time project. It requires ongoing maintenance and periodic reassessment as your children grow, your home changes, and devices wear out.
Monthly Inspection Checklist
- Test every window lock. Open and close each window to verify the lock engages properly and holds under moderate force.
- Check every window stop. Push on the window to confirm the stop prevents it from opening beyond four inches. Tighten any loose screws.
- Inspect window guards and bars. Check mounting screws and bolts for tightness. Look for rust, corrosion, or signs of wear. Verify the quick-release mechanism (if present) operates smoothly.
- Scan for furniture migration. Chairs, toy bins, and other climbable items tend to drift back toward windows over time. Re-establish the four-foot clearance zone.
- Test screen integrity. Even though screens are not safety devices, a screen that pops out at the slightest touch sends the wrong signal. Replace or re-secure loose screens to avoid the false impression that the window is safe.
Seasonal Reassessment
At the start of each spring, before you open windows for the season:
- Walk through the entire house and verify every child proofing measure is intact and functional.
- Reassess your child's development. A child who could not reach a windowsill six months ago may now be tall enough to climb onto it.
- Check for new furniture arrangements that may have placed climbable items near windows.
- Consider whether your child has outgrown certain measures (like a crib that you moved to a bed, which might now be positioned near a window).
When to Upgrade
You should upgrade your child proofing when:
- Your child defeats a lock or stop for the first time. If they figure one out, they will do it again.
- You move to a new home or apartment. Do a complete window audit before the child's first night in the new space.
- You renovate or replace windows. New windows may not be compatible with your existing stops and locks.
- A new child arrives. A toddler-proof setup may need adjustments for an infant who will be crawling and climbing within months.
Special Considerations for Renters
If you rent your home or apartment, child proofing windows comes with additional considerations around landlord relationships, lease terms, and legal requirements.
Your Rights as a Renter
- In New York City, landlords are legally required to install approved window guards in any apartment where a child 10 or under resides, upon written request.
- In many other jurisdictions, landlords must provide a habitable dwelling, which courts have increasingly interpreted to include basic child safety measures.
- Document your request in writing (email is fine). If your landlord refuses, contact your local housing authority or tenant advocacy organization.
Renter-Friendly Child Proofing Solutions
If you need to child proof without making permanent modifications:
- Pressure-mounted window guards: Some models use tension rods rather than screws, leaving no holes in the frame. However, these are less secure than screw-mounted options and must be checked frequently.
- Adhesive window stops: 3M Command-style adhesive stops work on smooth frames and can be removed without damage. They are less reliable than screw-in stops and should not be used on upper-floor windows as the sole safety measure.
- Frame-mount security bars: Telescopic security bars like the Model A mount inside the window frame using compression or minimal fasteners. They can be removed when you move out with little to no damage. For bedrooms, the Model A/EXIT provides the same non-destructive mounting with the added quick-release for fire egress.
Frame-mount telescopic bars are often the best solution for renters because they combine strong child fall prevention with easy installation and removal. No masonry drilling. No wall damage. No angry landlord at move-out.
Child Proofing Windows: A Room-by-Room Checklist
Use this checklist to systematically child proof every room in your home. Check off each item as you complete it.
Nursery / Infant's Room
- Crib placed away from all windows (minimum four feet)
- All windows locked when not in use
- Window stops installed (four-inch maximum opening)
- Window guards or security bars installed (Model A/EXIT for egress compliance)
- Blind cords removed or secured (strangulation hazard)
- No furniture a crawling or pulling-up baby could use to reach the window
Toddler / Child's Bedroom
- Bed positioned away from windows
- No dressers, desks, or chairs near windows
- All windows locked with child-resistant locks
- Window stops on all operable windows
- Window guards or egress-compliant security bars installed
- Quick-release mechanism tested and functional
- Child educated on window safety (age-appropriate)
Living Room / Family Room
- Couches and chairs positioned away from windows
- Window locks upgraded to child-resistant models
- Window stops installed on all operable windows
- Physical barriers on windows with hard surfaces below or accessible via furniture
- TV stand and bookshelves not serving as climbing platforms to windows
Kitchen
- Step stools stored out of reach (not left near windows)
- Kitchen chairs and stools moved away from windows when not at the table
- Window over the sink: lock and stop installed (children climb onto countertops)
- Physical barrier if kitchen window is above the ground floor
Stairway Windows
- Landing windows at child height: physical barrier installed
- Windows at top of stairways: locks, stops, and barrier (a fall from a stairway window onto the entry below can be from a significant height)
Bathroom
- Window locks engaged when not in use
- Window stop installed (bathrooms are often humid, so use stainless or coated hardware to prevent corrosion)
- Step stool stored in a closet, not left out near the window
Basement
- Basement windows at or below ground level: window guards to prevent both falls into window wells and unauthorized entry
- Playroom in the basement: treat as a bedroom for child proofing purposes
- Window well covers on exterior (prevents children from falling into the well from outside)
For detailed guidance on securing basement windows specifically, see our best window security bars for homes guide, which covers below-grade applications.
Common Mistakes Parents Make When Child Proofing Windows
Even well-intentioned parents frequently make these errors. Knowing what to avoid is as important as knowing what to do.
- Relying on window screens. This is the number one mistake. Screens are not, and have never been, safety devices. They will not hold a child. Treat every screened window the same as an open window.
- Installing guards or bars without a release mechanism in bedrooms. A window guard that cannot be opened in an emergency creates a fire trap. Every bedroom window needs a guard or bar that adults can remove or open quickly. The Model A/EXIT is engineered specifically for this dual requirement.
- Child proofing only the "obvious" windows. A second-floor bathroom window, a kitchen window over the sink, a stairway landing window: these are frequently overlooked because parents focus on bedrooms and living areas. Children go everywhere.
- Assuming the child cannot reach a window. Children climb. They stack objects. They push chairs across rooms. If there is a window and there is furniture within ten feet of it, assume the child will find a way to reach it. Four feet is the minimum clearance, and even that is not absolute for a determined climber.
- Buying hardware but not installing it. A window stop sitting in a junk drawer does not protect anyone. Set a deadline and complete all installations within one weekend.
- Not checking the child proofing after it is installed. Locks loosen. Stops shift. Adhesives fail. Screws back out. Monthly inspections take five minutes per window and catch failures before they matter.
- Forgetting to child proof when visiting other locations. Grandparents' homes, vacation rentals, and hotel rooms are common sites for window falls because the space is unfamiliar and not child proofed. Bring portable window stops and cable limiters when traveling with young children.
- Removing child proofing too early. There is no specific age when child proofing becomes unnecessary. The U.S. Consumer Product Safety Commission data shows window falls in children up to age 10. Keep physical barriers in place until you are confident your child has the maturity and physical awareness to avoid window hazards consistently.
Frequently Asked Questions
What is the most effective way to child proof windows?
The most effective approach uses multiple layers of protection: move furniture away from windows (minimum four feet), install child-resistant window locks, add window stops that limit openings to four inches or less, and install physical barriers such as window guards or security window bars on high-risk windows. No single measure is sufficient on its own. For bedrooms and sleeping areas, use egress-compliant bars like the Model A/EXIT that allow quick escape in a fire while preventing falls during normal use.
Are window screens strong enough to prevent a child from falling out?
No. Window screens are not safety devices. They are designed to keep insects out and cannot withstand the force of a child leaning or pushing against them. A toddler weighing as little as 25 pounds can push through a standard window screen in under two seconds. The U.S. Consumer Product Safety Commission and the American Academy of Pediatrics both warn that window screens should never be relied upon to prevent child falls. Always use dedicated child safety devices such as window stops, locks, guards, or security bars.
Do I need window guards on ground-floor windows?
While ground-floor falls are less likely to be fatal than upper-floor falls, they can still cause serious injuries including broken bones, head injuries, and lacerations, especially when windows open onto concrete, brick patios, basement window wells, or sloped terrain. Window guards or security bars on ground-floor windows are recommended when the window is in a child's room, when furniture is positioned near the window and cannot be moved, or when the exterior surface below the window is hard or uneven. Ground-floor bars also provide the added benefit of home security against break-ins.
Can I child proof windows in a rental apartment without damaging the property?
Yes. Several child proofing options require no permanent modifications. Frame-mount telescopic security bars like the Model A install inside the window opening using compression or minimal fasteners and can be removed when you move out with little to no damage. Adhesive-backed window stops can be applied and removed cleanly on smooth frames. For bedrooms, the Model A/EXIT offers the same renter-friendly frame mount with a quick-release mechanism for fire safety. In New York City and several other jurisdictions, landlords are legally required to provide window guards when children under 10 reside in the unit. Document your request to your landlord in writing.
At what age can I stop child proofing my windows?
There is no universal age cutoff. The U.S. Consumer Product Safety Commission reports window fall injuries in children up to age 10, and New York City's window guard law applies to apartments with children 10 and under. As a practical guideline, maintain physical barriers until your child demonstrates consistent understanding of window hazards and the physical coordination to avoid accidental falls. Many families keep window bars permanently because they provide ongoing home security benefits (burglary deterrence) long after the child safety concern has passed. Reassess your child proofing setup at least once per year as your child develops.